Sunday, November 17, 2013

Thanksgivvukah II: More Poultry, and Other Holiday Fauna

The whole Thankgivvukah thing - the upcoming coincidence of the second night of Chanukah with Thanksgiving on November 28 - got me crocheting like mad, which is a mixed blessing. On the good side, I've made quite a few turkey menorahs. Here's one that wasn't in the last post. It flew off to Boston last week.
But it occurred to me that, if the world doesn't end this Thanksgivvukah, no one will need my free turkey menorah pattern for another 77,000 years, when the next coincidence of dates occurs. So I tweaked my pattern a bit to make a peacock. It worked out pretty well!

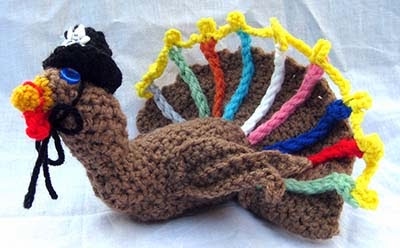
My dear stitching friend Rivi let me know that she used my directions to make this little guy:
What a difference fuzzy black yarn makes for his hat! It turns it into shtreimel,  Rivi also hung a little dreidel charm around his neck, and used variegated yarn for the candles. Thanks, Rivi, for winging it! (Ha!)

Another reason for my crochet jag was that I wanted to put some items in my community gallery's holiday boutique, which opened last night. (If you're in the L.A. area, check out the SPACE in South Pasadena - lots of great presents in different media.) I can't crochet my way to minimum wage this way, but it's a lot of fun to participate. I made a couple of unicorns,

I set a challenge for myself to start with the tip of the horn. It worked, though admittedly it's a pretty stubby horn.

I also made a lot of crocheted swimming pools/desktop relaxation visualization devices, most of which I'll show in another post.  Here's just one.
(The flotation device says "LIFE")

Now I need to stop with the crochet. It's so relaxing and addictive, but having woken up today with a completely numb right arm, I received the universe's message loud and clear: Get back to the quilting already!

Monday, November 11, 2013

Vegan Except Chicken Soup

Have you read 'Vegan Before 6?' I haven't, yet, but I gather that the gist of this bestseller by New York Times food writer Mark Bittman, is that if you eat a healthy diet before dinner (i.e. most of the time), you can eat whatever at the evening meal, and still maintain (or recover) a healthy weight. I enjoyed the interview here, and seriously doubt it would work for me, but I do admire the author's optimism!

So I'm calling this table runner 'Vegan Before Soup'. It describes the cognitive dissonance that happens during my vegetarian intervals, when I, or someone I love, gets sick. Noble veggie instincts fly out the window, replaced by the fierce conviction of my Eastern European ancestors that the patient's last best hope is chicken soup. It's in my blood. Literally.

So, a couple of weeks ago, at a needlework conference, I happened upon this awesome fabric:
Sold here, among other places. There's a red-and-white version - for Xmas? - as well as sober the b-and-w above. 
Despite having more food fabric than I knew what to do with, my tribal unconscious would not let me pass by this fabric; I went crazy and bought a yard.

Only a yard because, if you read my last installment, you know I also recently experienced a massive influx of colorful, hyperrealistic, and best of all, free, fruit-and-vegetable fabrics.

At home, a careful reading of the fabric recipe revealed that I also had fabric depictions of several key ingredients: Carrot, onions, garlic, and various greens. So I added 2 1/2" strips of them to either side.
Above and below the chicken soup panel, those are 2 1/2" strips of fabric with tiny inexplicably  blue chicken heads.

I also happen to own magnificently hideo-beautiful vintage African fabric with giant green-and-burgundy roosters, gifted to me by a kind and generous friend. (If anyone knows what the rooster symbolizes on African fabric, I'd love to know.)

So my question now, is whether to leave the front as it is, above, or to add a witness:
What do you think? Giant green chicken or no? Vote in the comments!

For the back, I stuck with a purely healthy vegetarian theme. These are also 2 1/2" strips.
This table runner, or placemat, would be a great present for anyone who believes in the magical healing powers of fruits, vegetables, and, of course, chickens.

Tuesday, November 5, 2013

Beyond Bacon: Fun with Fruit and Vegetable Fabric

Ah, youth! Thinking back to my early days of quilting, when I was a wee wain of thirty-mumble, I was so carefree about what I put into my mouth, and into the throat of my sewing machine (there being a strong correlation).

How I loved sweet and/or high-carb treats and their many representative textiles - bagels, pizza, ice cream cones, cows - although unhealthy, the fabric versions at least contained plenty of fiber, so I shamelessly collected, and too-often ate, them all.
I also made quite a few food pyramids (above and below are here and here), and wallhanging/potholders, too (here.)
Ice cream, gummi bears, pizza, and finally, on the lower right, vintage cartoon character Andy Capp is eating french fries in the inexplicable fabric with the blue background,. 

Junk food seemed far easier to find in the fabric stores than healthier fare. So I have been very happy in recent years, when fabric companies began putting out luscious, mouthwatering, larger-than-life, realistic depictions of  perfect fruits and vegetables. 

Especially Fabri-Quilt, a fabric manufacturer whose produce fabric come in collections with title variations of Farmer John's (Farmer John's Garden, Farmer John's Market, etc. Observe them via the 'category' search window here.)

I contacted the company, and they offered me a bushel of free fruit-and-veggie fabric, if I would design something from it. Having never designed for a fabric company before, having never been offered so much (new) free fabric before, you could say that I...bit.

 Here's what I came up with:
It's kind of like an asterisk, or exclamation points.
It's got nearly as much and better-looking produce than my local farmer's market. Going around the wedge circle, starting at 12 o'clock, we have:
  • artichokes (with purple highlights!), 
  • carrots,
  • corn, 
  • cherries,
  • peas, 
  • eggplant, 
  • pears, 
  • radishes, 
  • peaches (omg they look delicious), 
  • cauliflower & broccoli, 
  • avocado (there's also realistic tortilla chip fabric out there, in case you're making a guacomole dip quilt, but we won't go there right now),
  • oranges, 
  • potatoes, 
  • asparagus (also unaccountably, gorgeously purple and green), 
  • blueberries, 
  • and pomegranates. 
  • They also sent me a blackberry fabric that I judged too dark to use in this quilt (though I did put it in the first potholder below). 
The center of the quilt above looks like an apple, but it's not; much more exotically, it's a whole pomegranate from one of the fabrics.

I used the fused scraps to make matching potholders. They're also simple, with raw edge applique. Blueberries float in the center.
The next one has zigzag stitches around all the appliques.
'Have a Salad' is written in the upper left corner with free-motion quilting.

Along with farmers and fruitarians, fruit and veggie projects are perfect gifts for people who are striving to eat healthily, people who actually do eat healthily, gardeners, people trying to quit smoking, teachers, Mayor Bloomberg, the First Lady, etc.

DH surprised me by hanging these potholders on the door to the pantry (which holds the chips), as a suggestion to back away and move towards the refrigerator, instead, for a nice piece of fruit.

The non-maraschino cherry on top is that, whatever the configuration, you can personalize your healthy  project with a message that fits and entertains but doesn't lecture or overly annoy your giftee - I  used 'Eat Farm Fresh,' on my quilt,

But after it was done, of course, better ideas started flowing:
  • Give Peas (and Carrots) a Chance
  • Kale: The New Chocolate (alas, I haven't found a kale print yet.)
  • You Are What you Sew, (= Part 1)
  • Sew Have a Salad (= Part 2)
  • Bacon Isn't Enough
More caption suggestions welcomed!

If you'd like guidance for the potholders, a free pattern is on the Fabri-Quilt site, and on my pattern page. And a complete illustrated 13-page pattern for the quilt as well as the potholders is also on my pattern page. It's suitable for confident beginners and beyond.

Fabri-Quilt is also hosting a scrumptious fat-quarter bundle giveaway for people who leave comments on their blog. The contest closes next Saturday, Nov. 9, 2013.

And I'd love to hear about what you've made from fruit and veggie fabrics! 

Saturday, November 2, 2013

Chiarascuro, Black & White Quilt Fabric, and the Happy Wrinkle Zone


Chiarascuro. What a beautiful word. Do you know it? It's Italian, for light/dark, and its origins (says Wikipedia) are in Renaissance Italian artists who used dark ink and white gouache paint. It's acquired new meanings since, in art, photography, and film, usually connoting dramatic contrast.

A few years ago, as a part of the Fast Friday Fabric Challenge, I had a month to make a chiarascuro quilt. After learning the term's meaning, I went through my stash of black-and-white (and sometimes grey) quilting fabrics, and pulled out a bunch, including:
  • zebra stripes
  • white mod circles on black
  • black polka dots on white
  • white fish skeletons on black
  • white human skeletons on black
  • grey chevrons on white
  • black-and-red eyeglasses frames on white - it provided the dab of red. 
  • Op-art faces of people who look like they're from 1960s London, at least one of whom looks a lot like Twiggy, (who is alive and well, thank heavens, and looking not much older than in her  heyday, speaking of mod and skeletal.)
The lady on the lower right looks like Twiggy to me.
Even though the color range of these fabrics is limited, they vary dramatically in value. Value is the most powerful concept I've learned as a quilter. Like chiarascuro, value is about light and dark - chiarascuro is an extreme way to approach value. In quilting, value - relative lightness and darkness - is often more important than color. Profound truism recited by quilt teachers: "Color gets the credit, but value does the work."

Contemplating value also directly transports the brain to The Zone: Beyond thoughts and words, completely engaged, where we wish to dwell forever.

Another deeply meditative thing for anyone who works with fiber (or paper) is weaving. There's just something so primal about over, under, over, under. It's a mantra. As a kid, I loved weaving those little potholders, and I still do.
So I took the aforementioned high-contrast black-and-white prints to the cutting board, cut off half inch strips, and sorted them into five piles - dark, med-dark, medium, med-light, and light.

To ascertain value, one must squinch one's eyes, which will give one wrinkles, but they're worth it. (OK, to forestall crow's feet, you could also look at them through the wrong end of a binoculars, or a piece of red plastic with a regal name. I bet that's why Twiggy still looks young.)

I wove the strips on top of a rectangle of fusible interfacing, glue side up. The lightest strips went horizontally across the top, and vertically down on the far right. The horizontal strips darkened in color moving down, and the vertical strips darkened moving to the left. This resulted in the light area in the upper right, which seems to travel and fade to the dark area on the lower left. And high contrast checkered areas in the upper left, and lower right. Value magic!

Once woven, I pressed the strips in place, added a border of the groovy faces, created a fringe with the excess vertical strands, white buttons and colorful beads (Boy, did this quilt need some color! The heck with value and chiarascuro!)

It was backed with batting and backing fabric. The edges were handstitched with a blanket stitch.

I gave it as a present to a dear friend, but really, the present was to me, for the time I spent in the happy value/squinting/weaving zone!


Wednesday, October 30, 2013

5 Easy Pumpkins for Fabric Lovers (There's still time!)


It's the night before Halloween, and OMG, you completely forgot to decorate! Me too! That's okay, if you're a quilter and have ten minutes, it's just enough time and more than enough materials to make these. Numbers 1-3 have to be the fastest fabric craft ever invented (not by me). 

Along with the supplies of which you have plenty (fabric scraps), you will need some kind of stuffing (bits of fabric/batting work in a pinch), plus string, ribbon, yarn, rick-rack, rattan, wire, etc - anything much longer than it is wide. 

# 1. Hippie Pumpkin Find something that you/your mother/your grandmother wore when orange and brown were trendy (such as, in this case, my mother's 1960s-era orange-and-brown psychedelic halter top outfit:)
Can you imagine wearing this fabric? Fortunately, my mom looked good in everything. So do pumpkins.

To make: Cut the rectangle to 15" x 6". Fold the strip in half wrong side out (if it has a wrong side), and stitch the two short ends together. Then hand stitch a loose running stitch all the way around the bottom, in a circle, with strong thread, and pull tight, gathering it. Knot and cut off the thread. Turn right side out, insert stuffing. Locate vintage rick-rack and wind wedges into the pumpkin and around the stem. Tie off, and done.  

2. Finished Stem Pumpkin. Same idea, but with a one-sided print fabric . Because the back is different than the front, cut this piece wider: 15" x 10" high.  Fold down the long top edge, to the back, by about 3". Stitch the short ends together, gather at the bottom as for pumpkin 1, and find something to wrap to create wedges and the stem. Note that at the top of the stem, the wrong side doesn't show! I'm easily impressed. 

3. Treat Pumpkin: Use a woven homespun plaid (both sides are the same and it may have a  fuzzy selvage at the top edge.) Fill the pumpkin with small treats (ideally chocolate) and/or containers of dental floss, wrapped with tissue paper to fluff them out. Tie off with a ridiculous amount of shiny rat tail. Give it to someone who will appreciate it (such as another quilter who loves woven plaid scraps almost as much as chocolate). 

It's fun to experiment with different windings, such as 'Compulsive' 
And 'Uninhibited': 
4. Flattened Pumpkin Coaster Now we're moving into quiltier territory of 2-D:
Obtain a 4" x 6" piece of stiff interfacing with fusible on one or both sides, such as Peltex (any thick interfacing is fine); and scraps of an orange batik with lots of variations in it. (Felt works if you have nothing else.)

Cut the Peltex into a pumpkin shape. Cut the fabric into smallish pieces and press them to one side of the interfacing. (Do it on top of a nonstick press sheet to protect your ironing board on bottom, if you're using two-sided interfacing.)

Where the fusible doesn't show, or if there's no fusible, use a plain glue stick to adhere the pieces.

On the reverse side, adhere a single, different pumpkin-ish piece of fabric. When both sides are fused or glued in place, free-motion quilt vertical arcs from the pieced side. Finish the edges with a tight zig-zag (cord the edging if you have time).

Find a stem-colored streaky batik (I used green, you could use brown, or your imagination; grosgrain ribbon would be nice too) and rough-cut a 1.5" x 6" strip. Fold it into a loop, gather it underneath a button. Stitch down the button. Nice coaster, wall hanging, or bookmark. Kids can make a face on it, cutting shapes from black fabric backed with fusible web. Or, they can cut holes to make the facial features. You can also adhere it to a postcard. And speaking of postcards:

5. Freeform Modern Liberated Pump Kin (sic) Postcard (Shown at the top of the page).  Start as in project 4, with a piece of  sturdy interfacing (ideally with fusible on one or both sides) cut to 4" by 6".  Cut a square of orange fabric to 3" x 3". Polka dots are always the perfect choice. Center it on the postcard and press in position. Cut four 1.5" grey squares. Set them, one by one, on top of each corner of the pumpkin fabric and stitch along their diagonals. Fold the inner corners of the grey fabric outward along the stitching line, and press down.  Now the pumpkin has 8 sides and softer angles. Cut two squares of grey fabric that are approximately 2 1/4" x 2 1/4". Using a quarter-inch seam allowances, stitch one, face down, along the right edge of the pumpkin-and-triangles. Stitch the other one, face down, to the left edge. Open them outward, and press flat in position. 

Now cut a strip of grey fabric that's 2" x 6.5", and stitch it horizontally along the bottom of the pumpkin unit. Fold it open and down, and press. 

Finally, cut another grey strip to 2" x 6", cut it in half, and insert a piece of brown (or other stem colored fabric) that's about 1.5" wide by 2" high. Stitch the three pieces together with the stem in the middle. Align it along the top edge of the pumpkin unit, face down, and stitch along the top edge. Press up and open. 


Trim all the top fabrics back to the size of the interfacing underneath, i.e. 4" x 6". 

Free-motion quilt a message. I wrote "Pump Kin Post Card." It's for sending to kin? To pump them for homemade pie? For Thanksgiving? Or Thanksgivvukah? OK, it's yet another wallhanging/bookmark/mug rug! 

Extra credit (and a few extra minutes): If you won't be putting the postcard in the mail as is (but might send it in a padded envelope) add a row of orange-ish buttons to the bottom. 

Adhere a light colored plain fabric on the back (for messages). Use fusible web if the back doesn't already have fusible. When both sides are covered with fabric, and all edges are cut even, zig zag around the edges to finish. 

You're done! Strew these things about! Your home is now adequately and creatively decorated! Happy Halloween! 

Update: #6. Pumpkin fabric decoupage. People do it. Really - just Google it. If you use a fake pumpkin as the base, you never have to throw the pumpkin (and, more importantly, its fabric) away. 


Saturday, October 26, 2013

Interactive Crocheted Turkey Menorah for Thanksgivukkah!

Is it a bird? Sort of. Is it a peacock? Almost.
But wait, of course! It's an Thanksgivukkah menorah!
Are you looking at me quizzically? Or are you nodding knowingly? Sometimes it's hard to tell.

If you've chatted with Jewish people lately, are one yourself, or you watch Colbert, you may be aware that Thanksgiving this year falls on the first day (second night) of Hanukkah, causing a clever person to dub it 'Thanksgivukkah.'

Alternatively, one of my favorite machine embroiderers, Sue Warshell of Stitches by Sue, is calling it Thanukah, which is definitely less of a mouthful for a holiday that's all about eating. (What about Hanugiving? Or Thank-u-kkah?)

Whatever you call it, the calendrical coincidence only happens once every 77,000 years (if ever), so it is a sort of a big deal. Happily, it has generated waves of creativity, not just linguistically, but also with fusion foods (pumpkin challah! pumpkin kugel!), crafts, decor, (many at Buzzfeed), and even fine art.

There are also amalgamations of the respective holidays' major symbols, turkeys and menorahs. For example, there is the menurkey, designed by a 9-year-old and funded on Kickstarter; a turkorah, by a wood artist; and a nameless candelabra made by arranging a flock of identical ceramic turkii (back at that Buzzfeed page), which could perhaps be dubbed a Turk-o-flock-o-Hanukkah-thanks.

I've been pondering this unique holiday in the midst of my personal crocheting jag. So, the other night, I was moved to make the following thing, complete with removable Pilgrim/Hasid hat and "lightable" tail candles.

Before lighting:

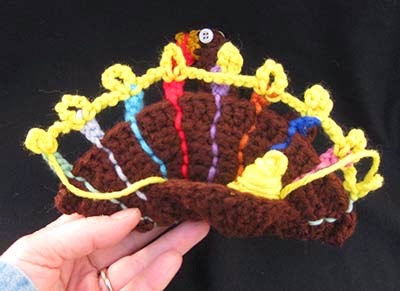
I suggest permanently lighting the middle candle, the shammes. Then, to light the nightly candles, while sitting at the festive table, simply pull out your handy Hanukah crochet hook (also good for spearing latkes) and hook a picot in yellow yarn. Here's the shammes and the first night only lit up (far lower right):
 The third night:
 The fourth:
 The sixth:
The final night:
Note the blue star on the removable Pilgrim hat/yarmulke (Pilgrims: Lost tribe?) It also has a tiny ball of yellow yarn as a fashion accessory.
For my second Thanksgivvukah menorah, I stitched a pocket on the back of the tail, to hold the beginning and ending yarn balls, as you chain stitch through the holiday (and for storage).
When the holiday's over, simply pull out all stitches, roll the yarn back into a ball, and put it in the the pocket, and bury it in a platinum time capsule until the year 79,811.

How did I make it? I can't give you an exact pattern, but I can give you a somewhat detailed strategy. Download the free 4-page sheet here.

To work with my strategy, you must understand working in rounds in crochet, and know how to increase and decrease. If you are experienced at crochet, especially amigurumi, this pattern will be a breeze. (My favorite amigurumi learning and pattern site is www.planetjune.com.)

Since I did this project this rather quickly, it has NOT been tested. That's why the strategy sheet is free! If you give it a shot, I would welcome comment and suggestions, and maybe a picture or two wouldn't hurt, to cathy (dot) perlmutter (at) gmail (dot) com.

So Happy Thanksgivukkah, or whatever you call it! And don't forget to cook a turdonut! (I just made that up. It's sufganyot/jelly donut stuffing for the turkey! The jelly inside the donuts inside the turkey makes it a triple cardiac threat, just like a turducken!)

I'll try to stop now. 

UPDATE: I can't stop. Pumpkin Latkes = Plotzkes.
UPDATE: Many more mashups are here
UPDATE: Not all Thanksgivvukah things are kitschy! Extraordinary artist/illustrator Flora Rosefsky has made four gorgeous art prints to celebrate the festive table (the last four prints on this page.) Use the contact form to purchase inexpensive 8" x 10" or 11" x 14" prints. 

UPDATE: 11-16-13 A sequel to the Turkey Menorah saga is here

Sunday, October 20, 2013

Most Fun, Environmental, and Inexpensive Coffee and Tea Quilt Ever!

If you've read this blog before, you might have read of my addiction for combining quilting with coffee and upcycling

Well, I had a chance to indulge that passion bigtime two weeks ago, at the Pomegranate Guild biannual convention. I was extremely excited to take a class with designer/author/quilter extraordinaire Eleanor  Levie, whose innovative work I've long admired. The class was called "Recycled Art Hamsa," and Elly brought along all the raw materials, which for the most part were: 
  • Used, clean, foil coffee bags
  • Used, clean, foil tea bag envelopes
  • Glue sticks
It immediately became apparent that Elly and her donor friends do not suffer from dehydration. She brought a large suitcase filled with  foil beverage wrappers. Our assignment couldn't have been more entrancing. We glue-sticked shapes cut from the colorful side of the wrappers, onto a  6" x 9" silver rectangle, which is the back of a coffee bag. Here's my arrangement:
Elly made many helpful suggestions. That's how the purple got there!
The hand shape is called a "hamsa"; it's an ancient Middle Eastern good luck symbol, and often appears with an eye, for extra protection in warding off the evil eye. Elly had given us each a 4" shrink plastic hamsa (unshrunk), and we used that to trace and cut the central foil hand. 

Gluing everything into position is about how far we got in the two-hour class.  Once home, I machine-stitched the pieces down with invisible thread. Basic secret of working with foil bags: use loooong stitches; otherwise the holes can rip through. Also, don't make stitching mistakes. Holes are forever. No pressure.

The central silver panel was stitched onto dark green felt, which in turn was glued to another layer of felt for extra strength. I hand-stitched a row of buttons along the bottom, in accordance with Elly's design, 
...and stitched a shiny green button in the middle of the hamsa. 
The finishing touch is the bottom fringe made from plastic beverage bottle lids, plus buttons.  They are so fun and make a lovely soft clatter.  
I think Elly told me she used a drill to make the holes in the lids - in a much more dangerous procedure, I used a sharp awl. (Aim the awl away from yourself. or you could hurt yourself badly. Set the hole nearest the open edge of the cap, where plastic is thinnest.) 

See the decorated little white hamsa on the upper left of the picture above?  That's how small it shrank, from about 4" to about 1", after a brief baking in the oven (and after decorating it with "chai", the Hebrew word for "life," with felt tip markers.)

Would you love to make your own? Elly shares the project instructions for free on her website! The PDF is here. Her blog post showing the design variations that my classmates created is here.

And so, in conclusion, my fellow quilters, ask not what your quilts can drink for you. Quilts can't drink. Instead, ask what you can drink for your quilts.

Thursday, October 17, 2013

Going Bananas, Crocheting Again

The past few weeks, I've been too stressed out to quilt. To tell you the truth, I've been going


...bananas. Life and Time are not only giving me age spots, but also...
(Medusa pattern is from the book 'Creepy Cute Crochet' by Christen Hayden)
...a black eye. When the government office unexpectedly closes (or reopens); when dear friends depart; when nuthin', as James Taylor sang, nuthin' is goin' right, it's time to locate the crochet hook, sit down on the couch, and knot the nearest fiber. If you have no yarn, but there is an empty shopping bag and a pair of scissors on your coffee table, perfect. Cut strips of plarn and make something simple:
Quick, tiny basket made from white and pink plastic shopping bags plus blue nylon hardware cord.  This is about 3" tall. 
If you happen to have a beautiful variegated yarn and a mother-of-pearl button lying around, even better...
.
Easy wrist cuff made with Versa yarn by Berroco. if you sew up the sides, it's an electronics case.
This type of therapy works winter, spring, summer, or in the present case, fall:
Worked as a plain sphere, then wrapped to create the ridges. Inspired by http://www.allfreecrochet.com/Halloween-Crochet/Mango-Pumpkin-Pincushion)
Back loop only single crochet, alternating with regular sc, creates the ridges in this pumpkin worked as a rectangle, then base and top drawn in. This approach was inspired by Planet June's donation-ware pattern, well worth the small donation you're encouraged to make if you use it. 
Yes, it's a floppy improvisational menorah, crocheted from self-striping sock yarn. Candles were made on a spool knitter. They're not removable or lightable, alas. Start crocheting now: Hanukah this year coincides with Thanksgiving. 
 Or something elaborate,
I learned to make the crocodile stitch from http://www.youtube.com/watch?v=RUNtrp_Vj4o). It's very challenging. I'm not sure what to do with this piece I've made, which is about 20" long.  (I'm almost out of the yarn, Lang Yarn's Tosca. which is out of production. If anyone has some extra skeins they'd be willing to sell, please email me!)

Or, best of all, something that will make you laugh.
(Felt face stitched on by my DD. If at all possible, find a collaborator and you'll both be surprised). 

If you want to see more of my recent crochet therapy, go to
http://www.flickr.com/photos/20121610@N02/sets/72157636665902944/.