Thursday, November 12, 2020

Almost Ancient: English Paper Pieced Mosaics with Cheryl Lynch's New Fabric

My newest finished piece!
It's a tabletopper or wallhanging, about 20" across, made up of seven English Paper Pieced (EPP) blocks. The faux mosaic fabric - those little pieces aren't separate, they're printed - are from a fascinating new collection by my friend, quilt designer Cheryl Lynch. 

In recent years, Cheryl's been designing mosaic quilt patterns, made by cutting fabrics into small pieces. But even more recently, she designed fabric with the look of complex mosaics - but you can finish in a fraction of the time. 

Cheryl gifted me with these FQs.

First I cut out a bunch of 3.75" equilateral triangles, and moved them around.


For the next test, I pulled a purple floral print from my stash. 
Etcetera. I liked all the options - Facebook and Instagram polls of my friends resulted in no clear winner - so I put those triangles aside and decided to see what this fabric would look like in the smaller, more complicated stars in my EPP book, "Hexagon Star Quilts".

I started by printing seven patterns from the book onto my newest notion, water-soluble "Hugs'n Kisses Applique Paper," by Helen Stubbings. (No affiliation). In the past, when planning to do EPP by machine, I printed designs onto Decor Bond (by Pellon), a medium-weight fusible interfacing, which remains in the project. But I was eager to see how the applique paper would work. Here's one  page printed onto the applique paper - I cut out Star 5 from this page.  
With EPP, each piece is fused to a slighly larger piece of fabric; the fabric is wrapped around it; then everything is sewn together by hand or machine - I used the latter. Here's more or less what Star #5 looked like finished.
I made six more blocks (all 6" high), including the next one which is the centerpiece. This green fabric isn't one of Cheryl's - it's from my stash, and I stitched the white lines to give it a mosaic look. 
The stars surrounding the center include Star 39, below, with the addition of a gold-brown print from my stash:  

Next, Star 56, with my violet print added: 

Star 65: 

Star 28

And last, Star 15

The results are in the photos on top of this post, and the bottom. How did I like the applique paper? Compared to Decor Bond, it's not quite as stiff, and therefore more challenging to fold small sharp-angled pieces accurately.

But I discovered that when I scored the fabric with a sharp-edged piece of plastic - like a credit card - next to the interfacing, it made accurate folding and basting more achievable. The big advantage of applique paper over Decor Bond is that the former will dissolve in the wash, presumably leaving a softer project than the latter. 

Here's the back after all the pieces were sewn together. 
From a distance:
I laid it on batting, traced around the top (with a water soluble marker), then cut out the batting inside the traced line. This results in a slightly smaller piece of batting than the top. 

Next I placed the top on my backing fabric, and cut out the backing fabric about 3/8" larger than the top all the way around. All the concave angles must be clipped, in order to get them to turn under.
Make a sandwich: Backing fabric on the table,  wrong side up;  batting on top of that; and the pieced top on top, right side up. Pin or clamp the edges every few inches. Do a hand whipstitch, stitching the outer folds on the top piece to new folds you create as you go, on the backing fabric. Finally, I stitched around the edges with a machine straight stitch.  You can't see the hand whipstitches in this photo from the back, but you can see the machine straight stitching. 

The entire back:
And the front, all quilted, this time on a white background. 

Very European, esta bien? And thanks to Cheryl's fabric, it took a lot less time to make than, say, Gaudi's Parc Guell in Barcelona. See more of this fabric, and projects made from it, in this excellent new article. It is now available in quilt shops. More information about my EPP book is here. 


Wednesday, November 4, 2020

Pandemic Porch Quilt Show Days 25-28 : Over Japan

 Day #25: Tokyo Life

I made this quilt in 1999, a cathartic project working through memories of living in Japan for a year and a half, in the early 1980s.
Tokyo was indescribably dense, and everything seemed tinier than in the US - cars, furniture, cups, plates, clothes, and especially the people. Most of the women and many of the men were smaller than me - I felt like a massive Barney the Dinosaur, especially when perched on ludicrously petite chairs. Each day, I lumbered through a fascinating shopping street, decorated with strings of artificial flowers. The novelty fabric in the center of this quilt reminded me of those places, and launched me on this quilt.
I added Elvis, plus a couple of more traditional figures. I think the flowers are there to advertise the noisy pachinko (gambling machine) parlors. 

Sometimes, Tokyo's density was intoxicating; but over many months, it became exhausting. I couldn't even begin to wrap my mind around where structures and alleys began and ended. 
There was also an abundance of plastic food in glass cases in front of  tiny restaurants....
And there was as much going on underground as above - not just the subways, but more restaurants, more shops, more vendors, more pedestrian hallways. 

Tokyo's infinite above-ground and below-ground worlds were connected by endless stairs and escalators.

Every scrap of space in Tokyo was occupied. Not one inch  was wasted - and it was also extremely clean. 

Overall, I loved Tokyo. It made NYC feel like a wide-open prairie. So much to learn, see and taste, and above all, endlessly kind, thoughtful and interesting people who did their best to make me feel at home.  

Porch Quilt Show, Day #27.
In the early 90s, I returned to Japan, after an absence of ten years, because my husband had a conference there. In Kyoto, we stopped in a little shop called Aizenkobo.

We found a group of men sitting around; they asked us if we'd like to see a demonstration (or at least I thought that was what they asked), and of course, we said yes. They got busy, dunking and dipping and twisting fabric in massive indigo dye pots. It was just wonderful, right up until the moment that they selected seven pieces of fabric for us, folded them into a little bag, and handed it to us with a bill for I think about $100 US.

I was mortified, but figured I must have agreed to it, so we paid. Those indigo pieces sat in the bag, in my cabinet, for 30 years, until I became an empty nester and had gathered the time and courage to use them. I tried to cut off as little as possible - I may have taken an inch off each piece with this design. Find closeup photos of the Aizenkobo indigos, and other interesting and upcycled details in this quilt, in my blog post here. Below, when I took apart a red polyester kimono in my collection - that's the long rectangle on the far right - I found softer, aged cotton fabric with a gorgeous crane (with purple wing tips), hiding inside (that's the fabric in the middle panel). The blue-and-white panel on the far left is from a light Japanese yukata robe.

Day #26: The Wave
The front of this next quilt was supposed to be the back of the previous quilt. (That's why I put #27 before #26). But I liked it so much that I made it a separate quilt! Along the bottom and toward the top, I created log cabin block reflections of the iconic "Great Wave of Kanagawa" woodblock print by Hokusai, printed on the central banner. Find more photos and information about this quilt in my blog post here.

Day #28: More Japanese Culture
This quilt measures 96" x 75" It features more commercial banners and door curtains. I pieced the vertical side borders from scraps - I especially like the quarter-hexagon design on the left.

Of all the banners on this quilt, the one illustrating sumo positions is my favorite. 
See much more of the vivid Japanese graphics in this quilt in my blog post here. 

More from my pandemic porch quilt show is coming soon!

Friday, October 30, 2020

Pandemic Porch Quilt Show, Days #22-24, New York, Los Angeles and Fantasy Land

Day #22. "NYC, Room 2913". Some buildings in this large quilt are based on real Manhattan buildings; some are pure fantasy. It's from my series of modern, improv cityscapes. 

The fun part of cityscape quilts is brainstorming techniques that convey the essence of a building. The purple structure below is foundation paper pieced, to represent the extraordinary Hearst Tower in NYC. (To see what it looks like in real life - it's not purple - go to Wikipedia, here.)

Day #23, I Love Los Angeles
While hanging this quilt on the porch, our new (indoor) kitty Cleo escaped her enclosure, and came darting out from under the quilt - My DH is laughing in relief that we caught her!
It has some of my favorite LA places and things. Here's a better photo, without the distracting cuties or sunspots. 

The giant teal striped building on the center-right is the Eastern Building (if you ever watch Lucifer on Netflix, you've seen lots of  scantily-clad gorgeous actors cavorting around its rooftop pool. If you were able to tear your eyes away from the beautiful bodies, over to the beautiful building, you saw why it's an art deco masterpiece). In the lower center, the green shapes are Disney Hall.
I later made a second Los Angeles quilt with many of the same structures, and some new ones. I gifted this second one to a friend, so I can't put it out on my porch, but here's a photo. 
 
My favorite building on this quilt is the arched 1960s Los Angeles airport 'Theme Building,' top center, which looks like something from the Jetsons! In this version, I made Disney Hall in shades of blue (on the lower right.)   

Day #24: Scrap City
Arguably even more fun than making a reality-based cityscape, is using the leftovers to make fantasy land! This smallish quilt is called "Scrap City." 
I hand embroidered stars (or possibly alien fighter vehicles) in the sky. 

More photos of this and other city quilts, and my methods, are in my cityscape booklet, here. in my etsy shop, CathyPStudio. 

More porch quilts are coming! 

Monday, October 26, 2020

Porch Quilt Show, Day 21: Magic Door

 Day 21: Magic Door

This may be my first scrap quilt, started in the mid 90s.  I owned very few prints at this point, so it's mostly solids. 
For years, it remained a top, and because of the lack of prints, I considered it very old-fashioned. Then, along came the Modern quilt movement. I realized - as did so many other quilters - that I was ahead of my time! So I decided to finish it, adding the log cabin borders (their edges are inexpertly satin stitched). I quilted it, with walking foot quilting. I liked the results enough to promote it to a prestigious position in my home, as a filing cabinet cover!
See more photos and details of this quilt in a 2013 blog post, here

Friday, October 23, 2020

Pandemic Porch Quilt Show, Day 20: Rolling Pansies

I made this quilt in the 90s, finishing the work of an unknown quiltmaker.

It started as a flea market find: a metal cookie tin, full of petals and leaves. Many petals were beautifully turned under with a lovely, even basting stitch in thick white thread. I couldn't bear to take the maker's stitches out, so I left them in place whenever possible.

This "pansy" is a traditional quilting motif, from the 1930s I think. The fabrics - primarily calico florals - look like they're from the 1960s. Each flower has six components, 5 petals, plus one leaf. The thoughtful quiltmaker, perhaps knowing that she couldn't finish , put one sample block in the tin, with the components basted in place on a sad square of browning white muslin.

Clearly, something more cheerful was needed. I went for broke and took quilt guru Freddie Moran's priceless advice to treat red as a neutral. I hand appliqued each flower to a red square. After quilting, I surrounded each flower with white buttons.

The quilt was lightly hand-quilted. We used this quilt often, on beds and couches. I occasionally had to re-secure dangling buttons. A few months ago, to strengthen the quilt, I machine quilted red swirls in each block's corners.
The sashing is a vintage floral plaid, also from the flea market (but not with this project).
I liked the topsy-turvy energy generated by the plaid lines shooting in all directions!
Many more quilts from my porch show are coming! 

Monday, October 19, 2020

Pandemic Porch Quilt Show, Days 14 - 19: Altered Cowboys and Beyond

My show is going strong! Here's the third batch. 

Pandemic Porch Quilt Show, Day #14: Cowboy Quilt
This quilt was made circa 1998, when my adorable little boy wanted to be a cowboy.
At the time, I was not only enchanted with my growing baby humans, but also my growing baby fabric stash, especially this brown border print:
As a new quilter, I did some reckless things. In this case, I cut the outer edges, on the sides and bottom, into hanging diamonds. What's worse, I chose a relatively thick red denim bandana print to bind them. (On the far left).
Binding and mitering up and down those sharp angles, with heavy fabric, took approximately 7000% more time than binding a straight edge. By the second diamond, I regretted it, but didn't want to rip, so I plodded onward.

The quilt has randomly strewn fussy-cut rodeo scenes, to break up some of the squares - broderie perse with a satin stitch.
I also stitched buttons, in assorted tans, browns and greys, on many squares.
Hot peppers count as cowboy fabric, right?
On the back, I placed all the bandanas I could find in my house, including this very unusual orange-and-turquoise one that my husband's had since high school, at least.
Today, my little boy no longer wants to be a cowboy. He's happy as a 26-year-old scientist in a big city - no horse, no car - but he does have a bike and a dog.

Day 15: Altered Squares
This quilt hung at Quiltcon 2018 in Pasadena, CA - the town next to mine - on my friggen' birthday! Friends overcame many obstacles to attend the show, and line up obediently in front of it when I forced them to. (I'm in the middle back). That may have been the best birthday of my life.

Day 16: She Exclaimed!
This is my exclamation-point shaped quilt, made this year. It's improv paper pieced. Instructions are in my new pattern booklet, "Modern Paper Pieced Log Cabin Triangles," here. Below, it's photographed against a grey background.
Detail:
To my happy shock, this quilt was awarded a second place prize in the Midcentury Modern category, in Mancuso's online Visuals #1 international show. (Find all the winners here.)

Day 17: Counterclockwise
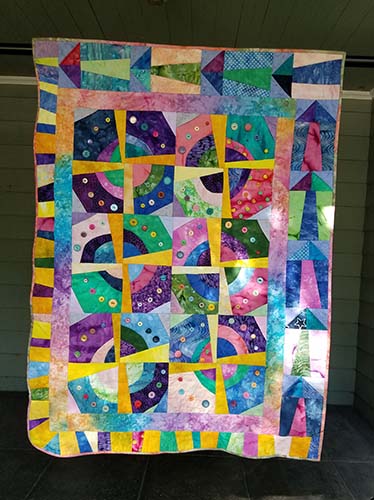
This 32" x 44" quilt, made in 2015, started with an improv circles game in Diane Hires' fabulous book, "Vivacious Curvy Quilts." For the arrows in two borders, I made up my own game - my tutorial is in a couple of blog posts that begin here.

Detail:


At some intersection, I tucked dimensional folded points, to make a whirligig:


Day 18: Dresden Variation

This quilt is an oldie, maybe from the early 2000s, when I was entranced by even older, 1930s-era quilts, particularly one with this unusual color scheme - a hard teal, plus lots of soft pastels. My pastels are reproduction 1930s fabrics. The motif is called a Dresden Plate. The quilt's gently ridged outer edge wasn't nearly as challenging to bind as on my earlier, sharp-angled cowboy quilt.

I do kinda regret the salmon colored fabric between the fans. (I happened to have a lot of that fabric, which, all too often, isn't the best reason to use a color!)


Day #19: That's a Lot of Yellow
I made this quilt in 2012, by playing a game in one of Karla Alexander's "Stack the Deck" books. The basic idea: Stack squares; use a rotary cutter to cut all layers, creating multiple stacks; shuffle each stack; stitch the pieces into multi-fabric blocks. It's perfect for when you don’t want to think much, and just want to sew.

The game that produced this particular quilt is "Razzle Dazzle," from Karla's book New Cuts for New Quilts, More Ways to Stack the Deck. I took my fabric choices not from book's sample (unfortunately), but from the fireworks print in the borders. But I amplified their intensity to a degree that might have been un peu trop.
When finished, I had a fascinating mound of scraps - so I glued them to a felt circle, attached those to extra-large pipe cleaners, smacked orange buttons in the middle, and,- voila! - hyper-daisies!