Sunday, January 27, 2013

A Great Grandma Gift: Hand Quilts

Way back in 1997, there was an awesome quilt exhibit at the Autry Museum in Los Angeles, curated by renowned quilt scholar Barbara Brackman. It was called "Patterns of Progress: Quilts in the Machine Age," and looked at quilts from before to long after sewing machines became commonplace in homes. A fabulous book accompanied the exhibit.

At the time, I'd been  quilting about four years, and was mostly self-taught. I was transfixed by many of the exhibit quilts. One that I couldn't tear myself away from was the red-and-white one here:   http://www.kansasmemory.org/item/224272 .

(Momentary pause while you contemplate it.)  The quilt was made in Indiana or Kansas, by Amanda Elizabeth Garman for her daughter Bertha, born in 1878,  presumably from a tracing of Bertha's little hand.

On the red-and-white quilt, look how uneven those 'flying geese' triangles are.  Check out the upper left corner of the borders, where there's a fragment of a triangle. The improvisational quirkiness brings the quilt its charm and life, though it might peeve today's more traditional quilt judges.

Something else that annoyed 20th century quilters about this quilt is the machine quilting, according to Brackman. The 1878 quilt is machine quilted with straight lines. Some quilters looking at it 100 years later were disappointed that it wasn't hand quilted.

 (Ironic or confusing: machine quilting a hand quilt vs. hand quilting a hand quilt?)

To see the white quilting lines, click on the red-and-white quilt image. The lines are on a grid, putting an 8-line intersection at the center of each hand -  an emanating asterisk. It's waaaaaaay cool, like a palmistry diagram or Spiderman spraying web in all directions.

The quilt world's disapproving attitude toward machine quilting pre-1990 has completely transformed into an enthusiastic embrace by most. (The turning point, historians say, was Caryl Bryer Fallert's spectacular machine-quilted Corona II: The Solar Eclipse claiming top prize at the American Quilter's Society show in 1989.)

At the time of the Autry show, my mother's birthday was coming up. Amanda's quilt inspired me to make a blue-and-white hand quilt from my 3-year-old son's hand.  That's the quilt at the top of this post and below. As the pregnant mother of a toddler, I was way too impatient, busy and tired  to do all those hundreds of triangles, so I skipped the sashing, and the upper and lower borders became squares. For more movement, I had the geese on the left border fly north, and on the right, south.  The hands are raw edge applique (meaning I cut them out and stuck them on, without turning edges under).  I'm pretty sure I used fusible web behind the hands, and stitched a tiny zig-zag to catch the edges.  (I wonder if future museums will do exhibits about how quilts changed before and after the advent of fusible web. You think?)

The quilt was machine quilted, with echo quilting around the hands, then spirals in-between. Half spirals are at the edges. Here's a photo that shows the quilting:

I do wish I'd done the Spiderman  thing. Maybe it's not too late to stitch an asterisk into each one of those hands.

It's one of my pet theories that making things wonky is harder than making them precise... unless you're a beginner, which I was. On my quilt, the border spirals are bizarre, many geese points were cut off, and most mysterious of all of all, the  top horizontal border is 25 little checks across, while the bottom one is only, uh, 24.  How did I do THAT? (Thus the quilt measures 19 1/2" across on bottom, 20" across on top, and 21" high).  It took me years to learn how to make borders the same size. (Hint: Measure both borders, cut to the same size, and THEN attach them. The day I read that tip, my world shook.)

The finished quilt hung in my parents' stairwell  for 14 years. We hung it low, so the kids could reach it. Thus it has a big smudge where one of my babies tried to fit their hand into the outline, so it needs a good washing.

My baby boy is now in college. When we finally closed down my parents' house last year, I took it off the wall and brought it home with me. It is poignant in so many ways.

 The possibilities for hand quilts are infinite. You've probably seen some, and maybe even made one or more. They're particularly popular for children's quilts, because children grow!  Here are some interesting hand quilt ideas I found online:
  • Hands don't have to march in symmetrical rows. Toss them across the surface helter-skelter. Or set the blocks askew, like this 1980 African American quilt  in the collection of the Philadelphia Museum of Art.  
  • Make them into tree leaves, like here and here.
  • Zentangle (advanced doodle) inside a hand, and translate that to freemotion quilting on fabric (Scroll down on this page)
  • Set them into intersecting rings, on a satin background, for a wedding chuppah (like quilter Ruth Harris' chuppah on one of my webpages, here. Third photo down.)  
  • Add names, on or below the hands. You embroider them, for an old-timey look
And much, much, much more. If you do an image search on Google for "hand print" quilts, you'll have more ideas than you know what to do with! If you've made a hand quilt, I'd love to see it!

PS I shared this on Nina-Marie Sayre's Off-the-Wall Fridays, with lots of wonderful art quilts: http://ninamariesayre.blogspot.com/


Monday, January 21, 2013

Bunting on the Brain (arm, neck, etc.)

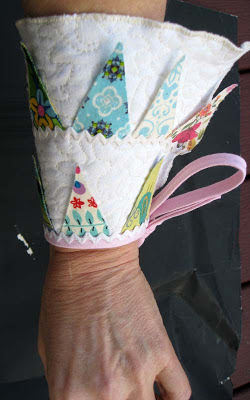
With bunting on the brain from the previous apron project, I fused some more little triangles, stitched them to a length of black-and-white polka-dotted grosgrain ribbon, stitched small mother-of-pearl buttons between the triangles, sewed a large white shank button to one end, and formed a loop at the opposite end.

The result works as wall art, a bookmark (without the small buttons)...

...a Where's Waldo game - can you find the guitar?...

...a neckpiece...

... practice tefillin...
(Collage by Miriam Attia of the wartime 'Rosie the Riveter'  poster with tefilllin  added.  Find a discussion of  this  intriguing image here.  Used with permission.)
...OK, never mind the tefillin. At least it's a low-protection gauntlet/bracelet/quiltlet/:
Mine measures 22" (with the loop closed) and it wraps three times around my wrist. The bracelet shifts as it's worn, so different banners peep out.
That's a Japanese fabric penguin on top. Kawaii, ne?

The banners all have a backing fabric that blends well with the featured sides:


Here's how I made the fused bunting for this project, and also for the mini-apron in the previous post.


The triangles now have fabric, front and back. I do not stitch over the side edges - they just stay raw. These mini-projects probably won't be washed. (If they were going to be washed, and if my fusible web wasn't permanent, I might zig-zag the edges with complementary or invisible nylon thread. It would be tricky - I might scale the triangles to be a little larger, and practice on samples first!)

Once you have enough fused triangles, cut a piece of grosgrain ribbon to 25" (or: Measure around your wrist, add 1"; then add 3" more for the button loop.)

Squeeze a drop or two of sealant (like 'Fraycheck') on both cut ends of the ribbon.

Load your machine with invisible nylon thread, top and bottom.

Choose a large button for one end. I choose a white shank button and stitched it on by hand.

Fold back the other end of the ribbon to form a loop (with the ribbon's good side out). Pin the loop in place and test it until you determine the right size, just big enough for the button to slip through without being in danger of falling out. I folded the end over about 1 1/2", and stitched it down with invisible thread in the machine (Hand tack if you prefer).

Lay out the banners on a flat surface, next to your ribbon, and figure out how to space them evenly.

With a small gluestick or applique glue, glue just under the top edge of the banners, then press them to the front of the  ribbon. Let dry.

With invisible or complementary thread top and bottom, stitch a zig zag all the way down the lower edge of the ribbon, catching all the banner tops as you go.

Stitch mother of pearl buttons between banners, by hand.

I just thought of another use: An absurdly labor-intensive gift-wrapping ribbon!
(That's a Macy's bracelet box underneath).

Also, I was just thinking: Shrink family photos to a tiny size, print them on fabric and cut triangles for a photo banner bracelet.

Do you have any other ideas about what could be done with this creation (or modifications thereof?!)

Wednesday, January 16, 2013

Quiltlets #8: Throwing Down the (Quilted) Gauntlet

And speaking of aprons, here's a recent experiment:
This apron-shaped quiltlet is 11" across at its widest and 5" high. It has a dozen free-hanging banners (also called bunting), each about 2" from top to bottom. The pink tie is 23" long (28" would have been better). The bunting fabrics are from Jane Sassaman, Kaffe Fassett, Amy Butler, a Swiss dressmaker, nobody famous, and more.

It makes an unusual wall hanging, which invites closer inspection...
You can see that the background is quilted. 

It also makes.an excellent 18" doll apron...
(It complements American Girl Josefina's cheerleading outfit perfectly)
It's a bracelet for the brave.... 
... reminiscent of a medieval gauntlet... 
If you should ever need to throw down a gauntlet, shouldn't it be quilted?
Oops, the rear flank is exposed. Watch that during jousts. It may need a tiny snap in the the two corners.

You can tie it around wine bottles, too. (There are many people who dress alcohol vessels, but I don't drink enough alcohol to understand why. Here's an awesome yarn-bombed wine bottle made for a friend by her aunt:
Note the elaborate cabling, the yo-yos along the bottom, and, for a subliminally suggestive touch, an unevenly hanging pair of large metal jingle bells. Plus, it's high-quality yarn. In short, that bottle is better dressed than I am.

We digress. I just pulled out the leftover Passover wine bottle, and tied my apron on:
Don't try this at home. Cutting mats and Manischewitz don't mix.

There are also people who dress their dishwashing soap bottles in aprons. Yes, really.

Throwing down the proverbial gauntlet: Can you come up with any more uses for a miniature quilted banner apron?

(Note: Earlier post on a quilt made up of many aprons is here.)
[Update 1/21/13: A later post that, toward the end, explains how I make the bunting, is here: http://gefiltequilt.blogspot.com/2013/01/bunting-on-brain-arm-neck-etc.html .]

Friday, January 11, 2013

Apron Quilt Inspiration

This is the interactive 3-D apron quilt which hangs above my kitchen sink:
It's about 14" x 20". Each miniature apron (about 4" wide) hangs free from a white square of fabric; the white square is itself a pocket. The pockets are filled with kitchen implements and funny postcards. You can see my favorite postcard displayed in this shot, but you don't need to squint to read it because... 
 
Here's a closeup. The lady has an important message:
That's an Asian stew implement sharing the pocket.

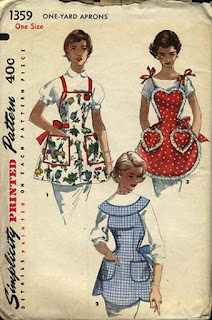
For Baby Boomers like moi, aprons evoke the 1950's and 60's. I rarely wear them (pretty much only on Passover), but my yiddishe Bubbie (grandmother) sure did, and I have a collection of real vintage aprons, plus images of vintage apron patterns. These all helped inspired the tiny aprons I created for the quilt above.

For example, here's a vintage apron pattern with a curly-tailed bird/rooster (?) pocket: 
Which inspired my bird-pocket mini-apron: 

Here's a cascading flouncy apron: 
Mine has a simplified flouncy shape. I went wild with the dreadful shamrock fabric and tiny green rick rack:
Here are two vintage aprons with heart themes, the first with a heart-and-dove pocket, 
And the one on the right below has two hearty pockets, a sweetheart neckline, and bow-tied shoulder straps.  Is that not deeply adorable?
My heart apron is below, right. It has only one heart pocket.
And speaking of dreadful fabric, with the red apron on the left above,  I made maximal use of watermelon print fabric. (The black shapes are watermelon seeds) I gave it a green rind waistband. Let's face it, aprons don't get much tackier than that! 

Or do they? Here are some more vintage apron images from my files that perhaps will inspire a sequel to this quilt (by you or me). 

There's a kitties-peeking-out apron: 
Awwww. My teenager would have loved that when she was 4. I believe the top pocket kitty is an applique, and the bottom pocket contains a kitty-shaped potholder. 

There's the Mexican hat apron: 
Which may or may not cross the line into objectionable ethnic stereotyping.

There's the layered upside-down tulip skirt apron, 
(or is that a crocus?)


And finally, giant happy head aprons: 
(With matching decapitated potholders). 

Except for the white pockets, the whole quilt was made with vintage print fabrics that I couldn't possibly use anywhere else. (Like that shamrock fabric). The rick-rack is also vintage. 

Feel free to use the comments to tell your apron stories!

[Update: I am delighted to share this link on the awesome Nina Marie Sayre's Off the Wall Friday project, at http://ninamariesayre.blogspot.com/. ]

[Update, 1-21-13: If this post makes you want to make a full size apron, here's a long list of free patterns online: http://tipnut.com/free-apron-patterns-tutorials/

And booklets of downloadable patterns can be found at:  http://tipnut.com/56-free-apron-patterns-you-can-make/]

Tuesday, January 8, 2013

Prisoners of Jail, Prisoners of Life

The Rajah Quilt, a 2815-piece quilt made in 1841 by female prisoners en route via ship from England to Australia
A couple of weeks ago, I wrote a tongue-in-cheek post about fabric thieves, prisons, and a prisoner who quilts.

Well, it turns out I could have written a book. That blog entry triggered emails from quilters who described prison quilting projects across the US and elsewhere, today and in history. I was very surprised to learn that hundreds of quilts are being created in prisons every year.


I learned that prisoners of jail make quilts for the same reasons that all of us prisoners of life make quilts - for personal expression and healing, as gifts for loved ones and needy people, to get into the "zone" of intense focus on an enthralling task, which helps pass the time during long prison sentences. (Those of us not in prison must also pass the time during our hopefully long life sentences.) 


What's remarkable is that quilting programs can only exist when brave and compassionate quilters overcome all kinds of barriers - physical and mental - to enter a prison to teach. Here are some tips from a remarkable 'how to' document put out by the Coffee Creek Quilters of Oregon, who for ten years have run a successful prison quilting project:

  • Don't wear an underwire bra. All metal objects are prohibited, except that you may carry one key, your car key. (Purses and everything else can be locked in your car.)
  • Don't wear jeans, blue pants, and/or a lime green shirt (those are the prisoner inmate clothes colors at their facility.)
  • Before class starts, carefully count out the number of straight pins and safety pins each prisoner receives (40 straight pins is suggested). No one leaves the classroom until every single pin is accounted for.
  • Wear a pouch containing rotary cutter blades, machine and hand sewing needles. If a student borrows one, say a hand-sewing needle, her identification badge is put into the pouch until the needle is returned. 
On top of all that, the volunteer should have a non-judgmental attitude, and not share personal details about her life. And more. (Find the entire PDF document by pasting this into your browser window:  http://coffeecreekquilters.org/wp-content/uploads/2012/02/Coffee_Creek_Quilters_Guide.pdf .)

In short, volunteering in a prison is heroic, and there are many heroes out there. 
Here's a quick summary of six projects I learned about: 

1. The Columbia Fiber Arts Guild's program at the women's Coffee Creek Correctional Facility in Oregon. (They published the guidelines above.) Twenty volunteers teach four quilting classes a week to inmates nearing their release date. Some 300 prisoners have participated in the ten-year-old program that inmates describe as life-changing. Prison recidivism rate among the finishers is very low. More than 700 quilts have been made for hospitals, terminally-ill patients, nursing homes, low-income medical centers, and other charities. Each student is also able to make one personal quilt for herself or for a loved one. The program has received a grant from IBM. More information here and here


2. Fine Cell Work. British art quilter Margaret Cooler wrote from the UK, to tell me about this program, founded in 1997. It now involves 60 volunteers, working in 29 prisons, with male and female prisoners. Four hundred prisoners do needlepoint and quilting, and in some cases, are paid for their work. The needlework is "undertaken  in the long hours spent in their cells to foster hope, discipline and self-esteem." Moving prisoner testimonials are here.  


3. Beyond the Barrier. Quilters Karen Musgrave and Lisa Quintana pointed me to a recent art quilting project at the Ohio Reformatory for Women in Marysville, Ohio. The program was launched in 2008 by renowned quilter Vikki Pignatelli and a prison chaplain.  The prisoners made art quilts;  fascinating, heartbreaking self-expression,working through grief, confusion, and tragic personal history. Results are here and here, and there's more about the project from Karen, who interviewed seven of the participants, ("I cried during almost all of the interviews"), here. Interviews are posted at the Alliance for American Quilts, hereThe prisoners' quilts were included in Pignatelli's famed Sacred Threads exhibition  in 2009. Quilting still goes on at the prison - paid work for making charity quilts - but unfortunately, the art quilt project is over. Karen is hoping to revive it. "I am convinced that having these kinds of projects in prisons changes lives," she says.


4. Purdy Project. Quilter Heidi Lund wrote to tell me that the Purdy Womens Correctional Facility in Gig Harbor, Washington has a large quilting group. "They make quilts for charities. The local guild (Kitsap Quilters) helped them purchase a long arm and supplies batting, fabric etc. They even do embroidery & screen printing." For more information, contact the Kitsap Quilters

5. Bedford Babies. Quilter Jeri Riggs, told me about the Village Squares Quilters of Scarsdale, N.Y., which runs the Bedford Babies project at the Bedford Hills Correctional Facility. New mothers with less serious crimes are taught by guild volunteers to make quilts for their babies. Many of the women become avid quilters and go on to create more complex quilts. Fabric must be precut by guild members, because scissors aren't permitted in the facility. Imprisoned mothers have made more than 1,000 quilts since 1997. More information here

6. Minnesota prison quilts. Inmates in three Minnesota prisons - including hardcore criminals and murderers - are avid charity quilters and knitters, according to this article in the Winona Daily News. The best part: "At least 15 hours in the weekly quilting circles are mandatory for St. Cloud prisoners under 18" !!!  (I could use 15 mandatory quilting hours!)


Several readers wrote to remind me of  two renowned prisoner quilts from Australian history. The best known is the Rajah Quilt, made in 1841 by 180 female convicts from England travelling by ship to serve 7-year sentences in Hobart, Australia. (It's the quilt at the top of this post). The voyage took three months, and, on landing, the  pieced, embroidered, and appliqued coverlet was presented to the wife of the governor. A cross-stitched inscription on the bottom center of the quilt reads: 
"TO THE LADIES/of the /Convict ship Committee/This quilt worked by the convicts/of the the Ship Rajah during their voyage/to van Diemans Land is presented as a/testimony of the gratitude with which/they remember their exertions for their/welfare while in England and during/their passage and also as a proof that/they have not neglected the Ladies/kind admonitions of being industrious/June 1841"
Learn more about the Rajah quilt here. Singing quilter Cathy Miller of Vancouver, Canada, has composed a song about it and has a Facebook page for it

Then there are the Changi quilts were made by Australian women taken prisoner by the Japanese when Singapore fell to the Japanese in fall of 1942. A summary, pictures, and links to further information are here

Got more prison projects, past, present, or future? I'd love to hear about them!


[Note: My previous piece on prison quilts is here.]

Tuesday, January 1, 2013

Quiltlet #7: Fabric that Rocks

Northcott's vast Stonehenge fabric line includes prints that look a whole lot like...well, like stone. Beautiful stone, some shot through with mineralesque veins of different colors and shades: 
 
The line must be very popular, because lately, my LQS (local quilt shop) is looking a lot like the Grand Canyon. On first viewing the Stonehenge landscape, I knew I had to use it in a quiltlet. I picked a favorite, and then went wild by buying an entire 1/4 yard!  (That's the great thing about quiltlets. You can be cheap.) 

Here's what I made: 
It's three layers, 8 1/4" x 3 1/4" finished size, with batting on the inside, and a pillowcase finish on three sides (fold on the fourth side). Once the three layers were together and turned right side out, I let the fabric tell me how to embellish it. After several false starts, I figured out what it wanted: 

Buttons. 
Specifically, mother-of-pearl buttons in whites, beiges, greys, silvers and tans. Vintage metal buttons in silver and rust, to match the faux rust of the fabric. There's also a wooden cube bead that looks like copper. The whole thing has a Steampunk feel. 

After the buttons were attached (through all three layers), I did a bunch of hand-quilting with brown thread. Of course, the quilting thread kept catching on various buttons. The large quilting stitches went in circles around the buttons, and in waves across the length, following the mineral vein lines. (If I had to do it over, I'd do hand-quilting BEFORE attaching the buttons.)
I wear this a lot, as a bracelet. It would also work as a bookmark (with the loftier buttons only on one end,  hanging outside of the book). It's an interesting textured wall hanging too. Just hang it from the loops.  

By the way, my LQS won't go out of business because I only bought a quarter yard of Stonehenge for my quiltlet. I also bought 5 or so yards of  extra-wide Stonehenge fabric, to back my recently completed Jerusalem themed chuppah (wedding canopy). The stoney (stoned?) look on back went beautifully with the cityscape on the front. 

So what are you supposed to do with Stonehenge?  Designers are combining the prints in geometrical ways, for results that look like ancient tiled European marble floors. This one, called Pisa, is from Mountain Creek Creations by Kari Nichols:
And here's Moroccan Tile, by Cheryl Phillips
(note: Phillips' wedge tools are also needed to make the latter pattern).

There's a quarry full of Stonehenge fabrics and patterns (including Pisa, above), all on one page, at  http://www.ericas.com/fabric/stonehenge.htm. (I've never shopped at Erica's personally.) Of course, you should check your LQS before buying online - you might get to fondle the merchandise and skip the shipping charge. My LQS carries several Stonehenge patterns, and precut packs, as well as regular-width and extra-wide yardage. (No financial affiliation with Stonehenge/Northcott! Really! I just really like the fabric!)

Have you made anything from Stonehenge?