Tuesday, December 31, 2019

Los Angeles II: A Modern City Quilt

I'm on a roll with city quilts! I've made two New York quilts,  a Chicago quilt, and now, a second Los Angeles quilt. (Photos of  earlier quilts and an instructional booklet are here.) Below is the second Los Angeles quilt: 
It's a wedding present (a scant year-and-a-half late!) for my dear friend Elizabeth and her groom Rick, who whisked her away to the East Coast, leaving her family and friends happy for them, but sorry for ourselves. 

In my first LA quilt, I recreated significant buildings that would be fun to translate into fabric. For this quilt, I consulted  Elizabeth's mom to make sure I included Elizabeth's most meaningful sites. 

My favorite building on the quilt - maybe in the world - is LA's   Eastern Building, an Art Deco masterpiece. If you've watched the TV show "Lucifer," you've seen it. (In the show, supernaturally gorgeous actors cavort at its supernaturally gorgeous rooftop pool). 

Although most of my buildings are fantasy colors, the Eastern Building really is blue-green. Find pictures of the real thing here

My other favorite building on the quilt is the LA airport's Theme Building. It looks like the Jetson's house.
It was built in medieval times, back in 1962. The sci-fi style is called "googie" architecture - completely unrelated to Google. Here's my slightly wobbly interpretation, using bias. 

To the right of the Eastern Building, there's Capitol Records, upon which I planted a green parrot - our area is infested with these screaming birds, which are charming or a nuisance, depending who you ask. (I vote: Both.)

The trendy Hotel Indigo has a major presence on the 110 Freeway; its structure screams "bargello"! In the quilt world, bargello is an easy strip piecing-and-offsetting technique, so I had to include it, 
Below it, Wedbush is a bank which has also an impressive presence on the 110 downtown. There area all kinds of interesting curves, which, alas, were lost in translation....

Below that, I set the remorselessly pink Paul Smith boutique in Melrose, against whose walls millenials flock to take selfies. On the quilt, it serves as the backdrop for Disney Hall, which I interpreted in blues. In the lower left area of the photo below, I set a piece of novelty fabric depicting an orchestra - in the real world, this part of the building often has a banner advertising shows at the hall, including for the awesome, resident LA Philharmonic. 
The angular Broad Museum is made from a new pink diamond print. The Broad is white in real life, but the windows aren't pink. 

Under it is the fanciful Mayan Theater, covered with elaborate tiles. I found some print fabrics that had a similar look. 

The lower left corner includes the Japanese bridge at Descanso Gardens; LA City Hall (which I turned blue); and above it, the  way-out-of-the-box Peterson Automotive Museum, which really is those colors, and shaped like a car

Pasadena's Wrigley Mansion/Tournament House holds the center - I made it green, possibly because of its vast green lawn. 

I parked a white scooter and plenty of roses in front because Elizabeth is a volunteer for the Tournament of Roses parade; she comes home for New Year's, dons a classic white suit, and rides around town on Pasadena's most prestigious vehicle! 

Above, the Angel's Flight cable car, which I recreated in citrus colors; The Greek Theater, in purple, with a cello-playing frog onstage...

...the Alhambra arch: 

...Pasadena's former Red Cross headquarters (aka Cravens Estate), topped by South Pasadena's historic watering trough....

And more! I will miss this quilt - but am consoled because a friend who is an amazing art quilter showed me that I could upload photos to the custom printer Spoonflower.com; they print them onto a lovely organic cotton sateen. I bought a fat quarter. When this FQ started out, it had 8 (full) copies of my quilt, each about 9" across. But Spoonflower lets you adjust the size - obviously, if I'd gone for bigger copies, there would be fewer on my fat quarter. 
 As a "thank you" gift for Elizabeth's mom, I cut out one of the panels, and added borders and cornerstones. With batting and backing, voila, you've made a wallhanging in a fraction of the time it took to make the original!
For another friend who's a Los Angeles expatriate, I made this pillow. 
For her, I put my Chicago quilt on the back; 
If you're interested in making your own city quilt, my methods are in my inexpensive student booklet, "Log Cabin Skyscrapers & Modern Quilt Buildings Student Guide," at https://www.etsy.com/listing/721798858/log-cabin-skyscrapers-modern-quilt

And if you'd like to own a picture of this quilt on a poster, travel mug, or clock, you can buy them here! (Attention quilters: Redbubble -and sites like it - are a way to give away your quilts and keep them too!)


Wednesday, December 18, 2019

Eat Chocolate, Drink Coffee. English Paper Piece the Trash into Holiday Decor

It is not an exaggeration to say that English Paper Piecing (EPP) is one of the most addictive quilt-related activities I've ever undertaken. It wasn't enough for me to do EPP with fabric, first to make quilts, and then to stitch polyhedra.

But then, a couple of years ago, after my DH caved to supermarket displays (always blame the DH!) and bought a bag of Lindt Truffles (no financial affiliation!) I found myself fascinated by the wrappers.  One thing led to another...at parties, I started following people around to collect their wrappers....and here are tutorials for two projects made from them. Both are sparkly, fun, and therefore perfect holiday decor!  These truffles come in so many colors, you can do Christmas, Chanukah, Kwanza color schemes, and more! 

PROJECT 1 Small Pentagon Bowl

Detailed directions are in my polyhedron book, but you can don't need it to follow this tutorial. You will need a regular pentagon shape. 

1. Cut out six cardstock pentagons. Mine are 1.75" high, from the middle of the base to the tip, a good size for this particular chocolate brand.

2. I'll break it to you gently: You must eat six chocolates: One for the base, five for the sides. It's your creative duty. (OK, you can share the burden with someone you love.) I was at Costco yesterday and one of the generous ladies was handing everybody 3 Lindt truffles! Pass her twice! 

3. Wrap each cardstock pentagon with a candy wrapper.

As you fold to the back, figure out where you can trim away extra.
Cut same-size pieces from more foil - I used a holiday coffee pouch and glue-sticked the pentagons to the backs. They don't wrap around.
Lay everything out. 
Zigzag the pieces together on the sewing machine. As my book explains in detail, I first go around the central piece,  attaching the sides; then sew up the seams between all side pieces. I used silver metallic thread in the top.... 
...and the bottom....
I put the inside of the foil coffee bag on the outside, on one panel. I think it creates a sort of spaceship effect. 
Wasn't that fun? If you're still have leftover wrappers, you can make....

BOWL II: Hand-sewn Hexagon & Pentagon Bowl

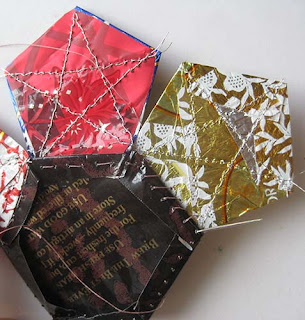
This bowl's a little bigger. This time, you have to drink a lot of coffee as well as consuming six chocolate truffles
The first step is to cut six cardstock pentagons, same size as the project above, 1.75" in height. Wrap each with a truffle wrapper. 
The back. Cut away excess. 
Instead of covering each of the backs with another foil piece,  I tried mashing down some of the backs neatly. (Don't iron, for gosh sakes, the wrapper will melt and attack you with toxic fumes!) Then I stitched a star in silver metallic thread, from the front, to hold everything down.
The smushed backs looked pretty good! 
For the center, you need a hexagon whose sides are the same length as the pentagon's sides, 1.25" in this case. Cut it from cardstock. 

I wrapped one side with a coffee bag piece cut a little larger than the hexagon, so I could bring the edges to the reverse side. 

And in the opening, I slid another coffee bag piece the same size as the hexagon. 
Laid out the pentagon pieces around the hexagon base, good side up. 
Unthread the sewing machine. Use an old needle. Set the machine for a long stitch, even a basting stitch. Send the central piece through the sewing machine, poking more-or-less equidistant holes all the way around. Do the same with the side pieces. 
Hand lace everything together with sturdy thread. I used upholstery thread. 
Hand stitching is a bit awkward. I tried lots of different stitches to see what I liked best. They all worked fine, a whipstitch, a lacing stitch, whatever you like. 

And it's done!
Backside. 
Side view.
But wait! There's more! More chocolate wrapper - and broccoli bag - projects are posted  here. My favorite of all is this hand and machine sewn dish on that page and in the photo below.  
It cuts the sweetness with nutritional information! The base and square pieces are from the bag that holds the candies. The shape is a partial truncated cuboctahedron, and it's another project from my polyhedron book, available on etsy, here, for immediate digital download, or in paperback from Amazon, here

Saturday, December 14, 2019

A "No Apologies" Tutorial for Improv Paper Pieced Log Cabin Triangle Quilts

UPDATE: My book with step-by-step directions for this quilt and its cousins, "Improv Log Cabin Triangle Kaleidoscope Quilts," is available in my etsy shop, here. An on-demand class, which includes the book with this pattern, is here.

When I started this quilt, the idea was to make a rainbow-colored 6-pointed star. I hoped to create a pattern people might use to make a wedding canopy, among other things.  The most relaxing way to do that, I figured, would be to start with log cabin triangles.  
So what you see in the central area of this quilt are a whole lot of log cabin pieced triangles - each center piece is light, and the three "logs" around it are darker. You're also seeing blocks I call "water lilies" - from left to right, the oddball orange, pink and purple blocks, as well as the lavender blocks on the bottom of the photo. These blocks are a log cabin variation, with light triangle corners added.
The problem with log cabin piecing triangles - compared to squares - is that the angles quickly become awkward and confusing, with sharp bias-cut corners. 

That's why I decided to piece all my triangles on clean scrap paper and/or newsprint from the packing store - $6.00 bought me a lifetime supply!  Most triangles were improv-pieced from the top of the paper - stitch-and -flip - with no markings needed on the paper. 

I pieced the water lilies onto scrap paper cut into triangles. Here's how it looked halfway through. 
 Then I stitched lighter colors to cover each corner:

The last step is using my equilateral triangle ruler to trim the excess. (In this photo, I'm doing it on a pink block.) 
My favorite part of this quilt is the six stars in the corners  - spontaneous and irregular piecing makes them vibrate! Here are a couple.


The triangles in the dark outer border are mostly crazy-pieced 

When the quilt reached 67" at the widest by 57" high, still hexagon- shaped, I decided it was finished.  If it were a wedding canopy (a "chuppah" in the Jewish tradition) it would need 6 poles for all the corners!?  Better yet, if someone wants to use this pattern for a canopy, they could sew the top to a square or rectangular background. 

[UPDATE: Several people have suggested that the finished hexagon could be basted to a square of lightweight chiffon. It would create the illusion of a floating hexagon! I love that idea, thank you!]

When it was done, and I counted the number of equilateral triangles, I was astonished. No matter how many times I counted, it kept adding up to 600! How cool is that? Thus the title of this quilt: "Fireflower 600."

Another quilt in this series was shown last week
My on-demand class, which includes a book containing directions for making this quilt, is now here.  If you just want the book, it's in my etsy shop, here.


Wednesday, December 11, 2019

Going Around with Modern Improv Paper-Pieced Log Cabin Triangle Quilts

Here are the projects that have consumed me in recent weeks.  The first started out as this pyramid of 11 hexagon-shaped formations that I call kaleidoscopes: 

I finished it just like that, with the pyramid shape and a dark grey binding. I hoped it was done, right up to the moment that it occurred to me that if I turned the thing upside down, and added another kaleidoscopic formation to the bottom.....
...it would become an exclamation point! 
I love punctuation, so I stitched that "dot" to the bottom. The dot has quilted 60 degree triangles popping out from the edges. I enjoyed looking at this formation for a while, until I turned the whole thing upside-down again....
...and it became a snowflake on a mountain top!? Or the eye on the pyramid, on the US dollar bill? One person saw a Christmas tree; someone else saw a resting diamond with a gleam on top! What do you see? 

Whatever, it's much easier to make this than it looks, and it's one of the three projects in my brand new 54-page e-book, here. The triangles in these projects were mostly improv pieced onto scrap paper; a few of the more complicated ones are foundation paper pieced from the back. Because of the spontaneity, if you try this approach, your quilt will be different from mine, but you will be just as astonished as I was!

Here are some of the 11 "kaleidoscopes" in this quilt. Each is made up of 24 improv pieced equilateral triangles. You can see that some identical triangles went into different formations. These blocks measure about 13" across; If I'd finished each separately, they would have made good wallhangings/table mats. (The book includes directions for a variety of finishes). 


Aren't these fun? My next post has a different quilt made this way. My book with step-by-step directions for this quilt and its cousins, "Improv Log Cabin Triangle Kaleidoscope Quilts," is available in my etsy shop, here. An on-demand class, with 30 plus videos, and which includes the book, is here.