Showing posts with label Pillow. Show all posts

Thursday, December 8, 2022

Clean Your House by Reincarnating Your Freemotion Practice into Psychedelic Gifts!

I've been on mental vacation for the past couple of days, because I just wrapped up a couple of big projects.  So I started procrastinating the next big thing on my list by cleaning up my studio and selected portions of my home. 

But then I wound up procrastinating my procastination with this gift project idea, just in time for the holidays: Wall art/kitchen art/potholders from old freemotion quilting practice pieces! Here's some of what I've made so far, in the guise of cleaning up my house:
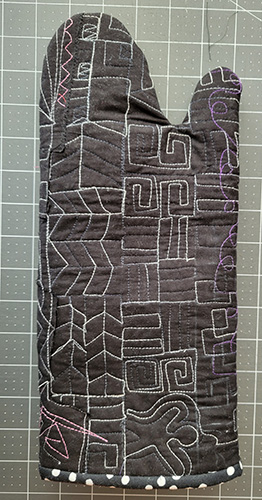
1. An oven mitt made from light-threads-on black practice pieces. 
2. A square potholder made from two different practice pieces: 

And a dark-thread-on-white fabric potholder, colored with  fabric markers:

And you can do this, too! It started with the oven mitt. While cleaning out a cupboard in my sewing room, I found a forgotton stack  of freemotion practice pieces, including this: 

(Here's the quilt it was practice for, made for my next book "Quilted New York".)

You can't see quilting in the black sky above because I used black thread, so that my imperfect freemotion quilting wouldn't detract from the piecing. 

But on the way to that nervous and maybe temporary solution, I did a whole lot of quilting practice on black fabric with conspicuous threads. One of the most striking was a variegated grey which fades in and out as it shifts from light to dark and light again.
Also in my cleanup efforts, I've been throwing out old potholders. This is poignant; I made most of them in the last millenium; but especially because of the one below, a factory-made oven mitt that my daughter decorated for Mother's Day circa 2010. I have loved it dearly, but after a dozen years it's disgusting, greasy, and has a dangerous bald spot. It had to go. But I don't own another decent oven mitt, and, well, this one's got my precious little girl's art on it! 
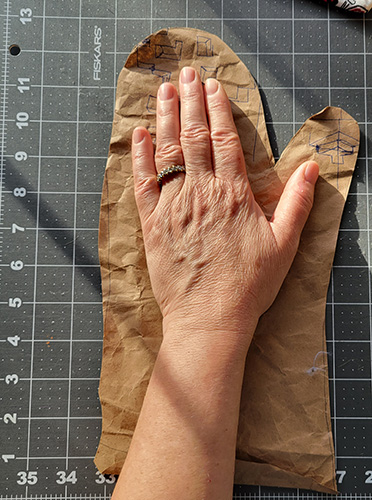
Fortunately, the spirits sent a solution: Reincarnate it. I turned it inside out and traced around it to make a paper pattern. 

If you don't own an oven mitt, you can just as easily trace around your hand. I suggest you make the pattern substantially bigger. My first paper pattern, below, is about 8" x 12", but that was a little tight - my next one will be closer to 9 or 10" at the widest. (The 12" length was good, and you'll see I made another one a little shorter, which was fine too.)
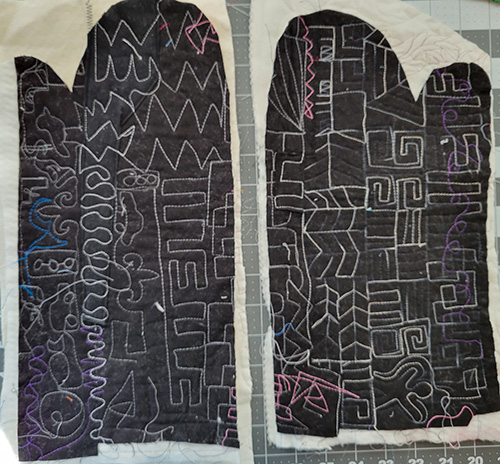
I used that to cut out two opposite oversized mitts from my black freemotion practice pieces. (The one on the left still had gaps where batting showed - the white areas - but I easily covered those with more black fabric and a bit more uninhibited freemotion quilting.)

Now the two oversized halves looked like this. I added one more layer of white freemotion practice pieces under them.
The reverse sides:

I placed black sides together, outlined the mitt pattern closely on the back of one side, pinned everything in place, and sewed on the line. 
Trimmed the seam allowance far back.  Also clipped deep into the angle between the thumb and the rest, cutting up to but not through the seam. 
Then came the hardest part: turning it right side out.  It was a long, unladylike battle involving chopsticks, a metal ruler, bicep-flexing and grunting. 
Eventually I got there, and beat my chest with joy while giving a Tarzan yell. (Never say I'm not ladylike.) 
The other side. (The wiggly wave is the new patch, a slightly greyer black fabric.)
Binding the bottom edge was the last step.
I found leftover quilt binding, and ran it around the bottom to determine length. Then I pulled it off, trimmed back the extra with a half-inch seam allowance, sewed the ends together, and clipped it back in position. 
Sew 1/4" from the edge. Convert your arm to a freearm if you can, to make this step easier. 
Then turn the loose edge inward and hand sew in position. 

Awkward, but doable. And voila, here's the finished mitt, side 1.
And side 2 
That was so satisfying that I made a shorter oven mitt from the same pattern, and a shorter quilting practice piece, with dark thread on white fabric. For this one, I only used one freemotion practice piece on each side (instead of the double layer I used in the black one). That made it a lot easier to turn and I think the protection is still pretty good.  

I followed that with the two square potholders you saw above. This one was made from practice pieces from two different quilts, one grey and one black. I cut their mutual edges straight across, and did a multi-step zigzag to unite them. Can you find the guy shooting out of a cannon? 
The other side features guitars, suns, and a large upside-down cat. The seams criss-cross each other in opposite directions. I added a fried-egg binding.
That led me to dig up more freemotion samples, in this case white ones, to make another square potholder. 
The reverse side had two different white practice pieces zig-zagged together, with the join covered by a strip of popcorn fabric. 
Compared to the others, this one seemed boring. Wouldn't it be great if that white fabric were rainbow-colored? Wait - I can do the coloring myself! (My little girl is now in grad school  and doesn't have time to color these new potholders just because her mother is having a nostalgia fit.)

I dragged out my extensive (and old) collection of markers, pencils and crayons, and tried coloring with all of them. My unscientific findings: 
  • Fabric-tipped markers are much easier to color with than crayons or colored pencils. It's especially helpful if the marker has one narrow and one wider end. 
  • Crayola washable markers were my favorite for lots of courage and minimum dexterity required, but unfortunately they're "WASHABLE," which means the color will vanish with washing! This can be a good thing if you're doing this project with a very young child who also wants to color themselves and the walls.
  • I enjoyed using my old permanent Identi-pen fabric markers, Zig markers, and FabricMate markers. But all those sets were pricey when I bought them new, and they still are.

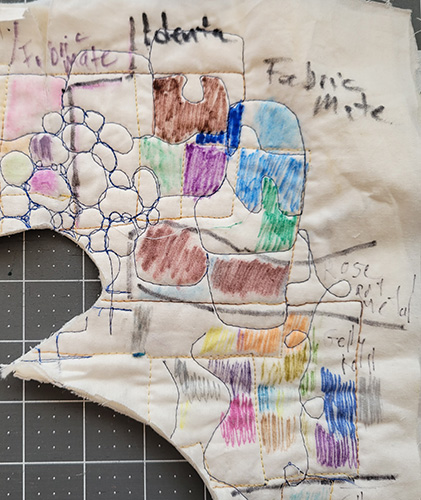
Marker and pen brands come and go, so I did a little online research and found many more choices these days! I was especially overjoyed to discover that Crayola now sells sets of  permanent fabric markers, and they are less expensive than most other brands. I headed for my local Michaels, expecting to find them easily. 

Michaels had at least three different sections with many brands of colorful permanent markers (fine art supplies, fabric supplies, and scrapbooking) - but nowhere did I find the Crayola permanent fabric markers. Here's what was in the fabric marker section:
Most are "Tulip" brand (the ones on the bottom are "Artminds". I decided to invest in a small set of the former, $8.99 for six pens. 
I tried them on my white potholder.
That led to another interesting discovery - the bottom section of the potholder above was quilted on a white-on-white muslin print. The subtle white design on the print was nearly invisible, until I colored it  - then the fabric's subtle leafy print appeared as a watermark-like texture! Kinda cool! 
Meanwhile, the area above it was on a smooth solid white fabric....so no watermark texture appeared, you could just see the strokes. 
I had trouble coloring in the lines and the result was a bit blotchy. But once I colored more of it, it became psychedelic, like Yellow Submarine! I even colored over some of the popcorn, which you can see on the right. 

This would be a fun collaborative gift. Present a potholder, (or a pillow, or a throw) made from freemotion practice pieces, to an artsy-craftsy youngster or adult; along with a set of fabric markers (or washable markers if they're very young and the piece will never be washed). You could even sew a bunch of practice pieces into an artistic coloring book! 

I really want to know: What do YOU do with your old freemotion quilting pieces? 

Commercial postscript: My big projects that I just finished include my new website, and my next book "Quilted New York," which is about to be published!

Wednesday, November 23, 2022

For Quilters Who Love their Scraps Too Much: Upcycle them into Pet Pillows

Here are my latest scrap-filled pet pillows, (photobombed by the Beatles.) I just unloaded a dozen of them! (The pillows, not the Beatles). Here's the the story: 

Nothing focuses the mind like a new grandchild, and one of my instinctive responses to this joyful development is that I'm trying to clear and downsize my sewing room -- so I can fit some baby toys in.

And the area most in need of clearing in my sewing room was a corner stacked with pillows, most stuffed with small fabric and batting scraps. 

Thanks partly to Covid, I had about five years worth of scraps. Before the pandemic, a nearby animal shelter was happy to take them. But then I didn't donate any for a couple of years; and Covid struck, when no one wanted anything from anyone's house. My scrap stash grew. 

Last week, I called the shelter, and to my horror, they told me they no longer wanted pillows! What in the world would I do with them? The thought of sending them into the landfill filled me with despair! (I REALLY love even my tiniest scraps, and care deeply about their future. If you do too, we probably need a therapy group.)

So I posted on Nextdoor marketplace, pet section, that the pillows were free. I got two bites: one from a guy who apparently wanted to use them for humans. I told him that scrap-filled pillows, tragically, are NOT comfortable for human heads. (Wouldn't it be great if they were? Quilters could get rich with a side-hustle making bed pillows from our scraps!) Unfortunately, scrap-filled pillows are too lumpy for human faces. 

Fortunately, the second bite came from a woman who fosters kittens. To my delight, she wanted them all! So the photo on the top shows how they looked on my porch, awaiting   pickup (I wasn't giving away the Beatles photo, it's permanent porch decor).  

For pillowcases, I used a wide assortment of fabrics on hand, including

  •  New fleece featuring the Pillsbury Doughboy, gifted to me by a friend.

  •  A soft knit featuring dalmations on plaid - dots and lines, what's not to love? How I wish this were a woven cotton quilting fabric. 

  • Old (but still strong) sweatpants. Here's one of them:
I cut off the waistbands. Then I cut open the inseam (up and down the inside of the the legs.). Next, I sewed the two front legs together down the middle, the two back legs together down the middle. Sewed up the side seams. Turned the whole thing right-side-out, stuffed the open end with scraps, and folded the opening over twice and sewed it up. Done, cozy, and upcycled! 
  •  Tee shirts, processed in a similar way.
  •  Old pillowcases, sewn shut. These are the easiest.

I am so happy that my scraps went to benefit kittens, and I wish the kitties, as well as my scraps, a very happy, adorable future! In the meantime, my sewing room is positively echo-ey with this vast mountain of scraps removed!

If you're interested in making pet pillows, I suggest you first try to locate someone who actually wants them them. Some shelters do and some don't, but individuals who foster pets might be more likely to take them. Nextdoor, Freecycle, Offerup are all places you can post them. 

I would absolutely love to hear what you do with your smallest fabric and batting scraps! 


Sunday, January 31, 2021

Quilt Your City on Pillows


Out of wall space? How about making some quilted pillows?

I might not have thought of this, if I hadn't been asked. A neighbor saw my pandemic porch quilt show (the subject of my last several blog posts), and commissioned me to make four 18" pillows, including two with scenes from our town, South Pasadena, which is part of Los Angeles. We negotiated a price and a backing color - grey - and I was off. It took about two weeks, and here they are. 

The first one in the lineup above represents the town's Gold Line MTA Train crossing. For research, I took my family on a masked Christmas Day photo safari. Action photography is not my forte; it was surprisingly challenging to catch a shot of a train in mid-intersection. But I got a few.


I also photographed our town's iconic "walking man" statue, next to the station. My daughter did a little leap for me, and she provides scale for just how tall this guy is.

The photos helped me set the scene. 
I imported a walking man photo into my CorelDraw program, and traced it, to make the statue outline. Just for fun, the client and I decided to add a small person with the same profile striding in the opposite direction.
There are two coffee shops next to the tracks, so I created a blue table with coffee and pie in the corner. The small shiny black circles on the railroad crossing pole are tiny, vintage black plastic buttons. 
On the back flap, there's a departing train. 
The second scene that the clients requested was our town's 19th century watering trough. Most of the time, it looks like this.
But on Thursday afternoons and evenings, it's surrounded by a lively farmer's market. So I circled my trough with goodies. Here's how the piece looked flat. 
The ostrich is our town's mascot - 100 years ago, South Pas. was home to an eccentric tourist-trap ostrich farm. Historians say it put  us on the map. 
(The ostriches were not purple, I just did that for fun. The farm no longer exists, which is sad for our town's economy, but happy for the ostriches, who were forced to schlep the tourists around in large wooden carriages.)
Here's the scene as a pillow. 
And I added some more food fabrics to the back. 
The two other pillows that my clients requested were a swimming pool pillow - here it is before assembly...
...and then after the pillow was inserted. 
The clients got the idea from the swimming pool quilt I blogged about a while back, with a tutorial about how I gave the pools depth with sturdy fusible interfacing and reverse applique, HERE

Finally, they wanted a pillow with my tessellating coffee cups design. Before stuffing, it looked like this.
....And after stuffing: 
Showing this pillow on Facebook led to a discussion in which my candid friends agreed that these look less like coffee mugs with handles (my intention), than some kind of bird or alien heads. Whatever you think it looks like, if you want to make your own version, the pattern is in my "Quilts for Coffee Lovers" PDF booklet on etsy, HERE

Have you made quilted pillows?