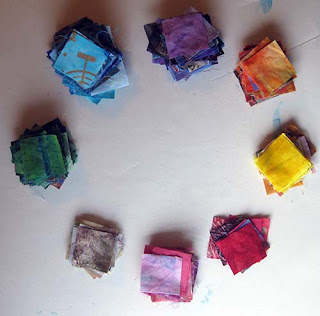
It all started a couple of months ago, when Machine Quilting Unlimited magazine (MQU), announced that, in honor of its tenth birthday, it was holding a 10" x 10" challenge. Cleverly doing the math, I came up with 100, so I cut about 100 1.5" squares from batiks. (A 1.5" square will finish at 1" when stitched.)

Next, sorted them by hue (blue, green, red, orange, pink, yellow). Then I sorted those from lightest to darkest. Made a circle on a large piece of posterboard.
...until I had a 10 square x 10 square grid. Below is the first arrangement. These aren't stitched in this photo, just laid down. Disable the ceiling fan! Don't let the cats in!

Little did I know that this activity would quickly turn into an obsession, resulting in cutting thousands of squares, sorting, then laying out color runs up and down the value scale, to create what I shall call "art quilt color studies" [aka "incredibly basic quilts that even your 5 year old could make."]
Brought this to the sewing machine and speed-stitched the grid together, first stitching down the vertical seams, at which point it looked like this.
Then the horizontal seams. Here it is all stitched together.
That was okay, but I soon found myself fascinated by the back. By now I was working on a few other similar pieces. I initially pressed all the seams in the same direction, as mandated by the quilt police. (This is a different one.)
From the front, the seam allowances facing in the same direction made huge ridges that seem more visible on tiny squares. So just for the heck of it, I tried snipping the threads between squares, then pressing the seams open, something I rarely do because it's a pain in the neck.
Whoa! Now THAT was cool! Suddenly, cute little cubbies appeared - each color square moves to the background, topped by vertical flaps on either side, and horizontal flaps on top and bottom.
Just like my kids' cubbies in preschool, calling out to be filled with clean underwear, these little boxes cried out for something...beads...buttons.....the works!
What's more, the neatly-aligned squares on the front become zig-zags on the back, due to the flipping of seams, giving the whole piece a sort of unfocused Monet waterlily look! How did I miss that all these years?
I fell so deeply in love with the back-with-vertical-seams-pressed-open that I decided to make it the permanent front. I added batting and backing and did a pillowcase turn, with the back of the top facing forward. (The horizontal seams stay flipped.)
I wanted to fill the cubbies immediately, but embellishment would require hand-sewing, and this challenge was - remember? - for a magazine with "machine quilting" in the title. So I held off.
Furthermore, the challenge rules said the number ten had to appear on it somewhere. I rubber stamped the numbers 1-10 and letters A-J on little bits of fabric and stitched them in position.

And that's what I submitted to MQU. In my heart, I knew it wasn't finished, and MQU must have sensed it, it too. As soon as the magazine announced the winners (not moi), I will admit to a pang of wounded pride, but that was immediately outweighed by excitement! Now I could fill those cubbies! I ran for my
Closer:
I picked things that more-or-less blended with their background color, to give the eyes extra exercise. When it was done, I had 100 things stitched to a backwards quilt that was only 10" x 10". And I had a fabulous time doing it.
Plus, if anyone wants to locate something on the quilt, I could simply say to them, "The leaping rabbit golden glass button is located in Square C-7!" and "The Hebrew letter shin is in F-6!" It's like finding Waldo, but on a (nonlinear) grid!
I wasn't done with arranging squares into mini-quilts and other items, not by a long shot. Nor was I done with backwards. Something even bigger and stranger was still to come. (Update: Read the sequel here.)


Thanks for sharing your thought process, it was fun to share your excitement when you "saw" the cubbies, and when your "rejection" allowed you to fill them. I will not repeat the "...happens for a reason" adage, but, you know...
ReplyDeleteYou're right, sometimes cliches are true, Suzanne! Thanks for stopping by!
DeleteWhat a wonderful little backside quilt! i like your progress and the steps to do so! Consequently, as a gift to myself i will enter my studio this day and begin a challenge inspired by your amazing quilt! Really only 10"?
ReplyDeleteI know you'll have fun doing it, Sonja!!! Backwards is fascinating. Thanks for your nice comment!
DeleteI think I've said before that you are having way too much fun! I love your little backward quilt and all the little treasures sewn on. I often like the backs of my free-motion quilted pieces as much as the front and wish they could be shown from both sides.
ReplyDeleteI know! At least at quilt shows, the white gloves people can show people the back! Come to think of it, I might not want people to see the back of MY freemotion quilting - but I'd like to see the back of yours!
DeleteLoved reading your step by step process, what a fun project you created! The saying, "SKY is the LIMIT",
ReplyDeleteis what creativity in any medium term s all about.
Stitch on...
Nannette, thank you for your kind comment!
DeleteLove the texture, the joie de vivre in this little art quilt. I give it 100.
ReplyDeleteIs that like getting an A Eleanor? I love to get A's. Thank you!
Delete