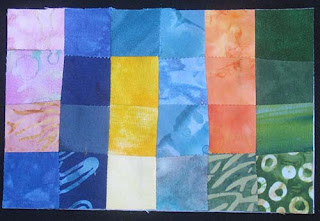
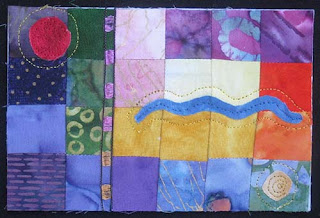
In the throes of this fixation, I signed up to participate in a fiber art postcard exchange. The theme was "Dance of Life." I reinterpreted it as "dancing colors," so I could make my cards from leftover batik squares.
Here are some of the 18 cards I made:

This project was SO much fun, and so relaxing - and no matter what you do, batiks are beautiful, so the results will be beautiful.
Although each card is made up of 24 squares - which sounds like a lot - it really isn't. Cutting 6 tiny squares from a scrap doesn't take that much longer than cutting 1. And the more you cards make, the more you get to play with different compositions! Here's a tutorial:
24-Scrap Mailable Fiber Art Postcard Tutorial
1. Cut two dozen - Start by cutting at least 24 squares (per postcard) to 1.5" square each, so they'll wind up 1" x 1" after stitching with quarter-inch seam allowances.
I used batiks, but solids work, too. You don't have to use 24 different fabrics - it's okay to repeat colors. If you're using blotchy batiks, cutting squares from different areas will create different effects.
2. Assemble the fronts. I designed a whole bunch at the same time. I laid them out on the floor (lock out the cats and dogs!)
For the "dancing" theme, I focused on arranging the cards in a way that set colors clashing and clanging and moving around.
Once you like each composition, stitch it together, with quarter-inch seam allowances.
3. Pick a filling. You can use quilt batting or even cardboard. I usually prefer stiff interfacing with fusible on both sides. Products like Peltex 72F, InnerFuse (in the picture), Fast-2-Fuse - plenty of choices. At the fabric store, some stiff interfacings are sold on bolts, and some are packaged in small quantities with the notions.
After opening, and cutting:
(The crease hasn't caused me any problems. Ironing seems to eliminate it.)
4. Cut interfacing - 4" x 6" per card.
5. Affix the front - Adhere the pieced 24-square front to one side of the interfacing. If the interfacing has fusible, iron it on. If your interfacing has fusible on both sides, place a teflon press sheet or parchment paper under the interfacing, to prevent the back from sticking to the ironing board. when you press the front. If there's no fusible on your center material, apply paper-backed fusible web to one side, or simply use a glue stick.
6. Leave the back of the interfacing blank, for now.
7. Embellish and stitch! The card below has raw-edge appliqués (two circles and a squiggle), plus a swatch of a ribbon ladder yarn (with ends bent and glued to the reverse side). I machine quilted the elements on, and glued the yarn. Then I echo quilted around the shapes.
The next card is also embellished with appliques, same yarn, and machine quilting.
This one is hand- and machine-quilted:
8. Design the writing side. After embellishment, pick a fabric (or cardstock) for the writing side. Fuse or glue it to the back. If you're going to write directly on the fabric, use a light color.9. Print Out a Statement? Because I was making these cards for a large exchange, I wrote up a one-paragraph long artists' statement. Then I arranged the paragraphs (in a graphics program) so that it I could print them out onto sheets of white fabric sent through my printer on a freezer paper backing.
Printed that out, applied fusible to the back, cut it up, and adhered one statement to the lavender fabric on the back of my postcards.

My return address label is above it. (Here are directions if you've never printed on fabric before). You can also print the statements on paper and glue the paper to the back of the cards.
10. Finish the edges. I zigzagged all the way around the edges with a variegated thread. If I wanted it to be neater, I might have done a corded edging. (My corded edging tutorial is at the bottom of this post.)
11. Sign and Send. I signed each, added personal notes. The most spectacular way to mail your cards is in a cellophane envelope. It's incredibly exciting for both the recipient, and the postal service employee.

On the other hand, it can cause the wrong sort of excitement at the post office if the clerk has never seen anything like this before. So if you're using cellophane envelopes, bring the cards to the post office not yet in envelopes.
First, they're probably going to drop your card through their little slot tool, to measure the width, and they'll charge more if it sticks.
At most post offices these days, the employee will tell you to put the stamps on the cards. Then they either will or will not cancel the stamp. (My post office employee didn't cancel my stamps, which made me very nervous. I was sure they'd all wind up back at my house! But they didn't!) NOW you can put each stamped card in its cellophane envelope and mail them off.
If you add 3-D embellishments, that's going to make your visit to the post office even riskier. Consider sending your card in an opaque envelope if it has glued-on elements, or any 3-D elements.
Before bringing my cards to the post office, just for the fun of it, I smushed them together for one last group photo, to see what they would have looked like if I'd made one quilt out of them:
OMG. I loved it. This led to a moment of panic; a little devil appeared on my shoulder and said, "Keep all the postcards! Send everyone a note of apology! Tell them the dog ate them!" But I don't have a dog. So I resisted my selfish side, and shuffled off to the post office to disperse them to the four corners of the earth. Maybe one day I'll recreate it!
UPDATE: Shared on Nina Marie Sayre's Off the Wall Friday, a compendium of art quilters' latest projects! Enjoy them all at http://ninamariesayre.blogspot.com/ .


Hello Cathy! Quite a few years ago, I started a Fabric Postcard Exchange on my blog and it was so much fun and a spectacular success. I do not remember very many details, one though was that you could create it in any manor (pieced, appliqued and so on) plus you could embellish them in any way also. We all had so much fun and continued for over a year!
ReplyDeleteSeeing all of your lovely postcards brought back memories and a lot of the important details we learned along the journey. Like finding out how each individual post office would take them. So thank you for your spectacular post letting everyone know the details and letting them see how much fun it really is! Have a spectacular day!
This is wonderful.
ReplyDeleteThank you so much, JP!
DeleteI tried my first two today. My mother recently died and she had a lot of batik fabric. Cutting out little squares is hard, but i like the results.
ReplyDeleteJP, I am so very sorry for your loss.
DeleteI hope it was therapeutic. Cutting squares gets easier as you go along. Do you have a rotary setup?
Yeah, my local post office simply refuses to accept fabric post cards...I wish I knew how folks were getting them mailed, because they are a joy to make.
ReplyDeleteEvery post office is different, Mary. I've never had them refuse them, but have seen some of them charge a lot more than others. If I want to avoid the hassle - and/or if my cards have beads on them - I put them in an envelope and mail it that way. No stress!
Delete