

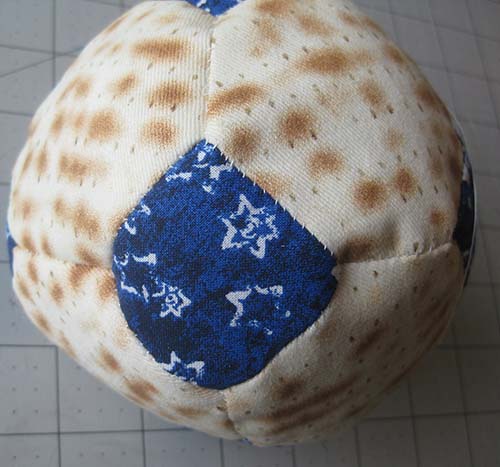
And the second is a light, fluffy, high fiber matzoh ball, aka truncated octahedron, made from 8 hexagons and 6 squares.

The patterns didn't come from a sewing book. They came from a website called "Paper Models of Polyhedra." I've loved polyhedra since I was in high school, when I earned my sole "A" in math class for constructing a half-dozen of them from balsa wood. I especailly harbor a soft spot for stellated icosahedra.
The Paper Models site's author, Gijs Korthals Altes, is a very generous Dutch person, whose free patterns are designed for paper folding and gluing, but can easily be adapted to EPP. In these two tutorials, I'll show you how I did it with my new EPP skills.
1. NOVELTY PRINT DODECAHEDRON TUTORIAL
First, print out Saltes' regular size dodecadron pattern. Start on this page. Scroll down, under the pictures, to the link that says "dodecahedron (.PDF)". Click there.
You only need to print out page 1 of the 3-page document. But you should print out two copies of p.1. The first copy, you can print onto regular paper - that will be your map. Print the second copy of page 1 onto cardstock. That page holds the actual templates.
Number the pieces in both copies identically. It doesn't matter which piece gets which number - the numbers are just there for your reference, so you know you're putting the configuration together correctly. You don't have to use my numbering order, but you can if you want to.


Punch a hole inside each template, to make removal easier. Hold up each template up to a small scale novelty fabric. Cut at least 3/8th" around each.


Use a needle and thread to make large basting stitches; or, use a temporary glue stick and iron to press the edges inward, gluing at the corners. The glue stick method is MUCH faster.

Baste all 12.

Now, following the map, hold 2 pieces right sides together,

...and stitch the edges together with a tiny whip stitch.

I knotted at the beginning and end of each line, using a discreet knotting technique I learned from my EPP Bible, Diane Gilleland's fantastic book, All Points Patchwork: English Paper Piecing Beyond the Hexagon for Quilts and Small Projects. I HIGHLY recommend this book to answer any and all questions you may have about EPP. It's full of terrific tips and insights, and has its own dodecahedron pattern.

Before long, I had constructed Althes' formation.

The back. Don't remove the templates yet!

From here, the project comes together organically. Starting from the central piece, sew outward, one seam at a time, right sides together, squashing the balls to align the edges you need. In the early phases, I try to work outward from finished intersections.


Turn right side out.


(Star Trek is appropriate for all spring holidays.) Close the opening with small whip stitches or a ladder stitch, and voila!


...hedgehogs...


So I reused them, to make a second dodecadron, this one from necktie silks. What fun!
TRUNCATED OCTAHEDRON TUTORIAL
Empowered by my dodecadron, I decided to try something a little more complex, but still not insane. (Stellations will have to wait.) After reviewing many of Altes' patterns, I decided to go for his truncated octahedron. It's made up of 8 hexagons and 6 squares.
Because this shape is more complicated and involves multiple shapes, it's even more important to have a map. I started out by printing out onto regular paper, full size, the PDF pattern that can be found on this page. Click the first link below the color photos. (The larger version in the second link was far bigger than I wanted.) It opens up to something that looks like this:

There are fourteen pieces. I numbered them. But printed out full size, as above, the squares in the pattern were barely an inch, too small for my skills. So I increased the size 150% in my graphic program. It wound up requiring two pages to fit all the pieces.
I printed the two pages of enlargements onto cardstock, then carefully numbered them in the exact same order as my original map. Again, it's not the order of the numbers that's important, it's just being able to find your place as you join pieces. Here's page 1 of my enlarged cardstock patterns:


On the second sheet, there were some repeated shapes from sheet one, so I crossed out the duplicates. (They can serve as extras in case of emergency).
I cut out all the shapes that weren't crossed out, eliminating all the tabs, then used them to cut out fabrics, at least 3/8" from the template edges.


But at some point, you do have to start stitching into finished vertices.

When I only had two empty sides left, I removed the templates.

It's so much floppier without the templates! I am thinking I would like to figure out some kind of washable template (thick fusible interfacing?) to leave in, so the shape remains distinct.


Interesting shape, no? I think it looks like a bear's head. Or maybe an antelope's head. Something with a snout. Maybe it needs antlers?


Interested in more Judaic needlework projects? Consider joining the national Pomegranate Guild of Judaic Needlework! Learn about this wonderful non-profit organization here.
UPDATE: Here's another nice site with paper patterns for polyhedra: https://isotropic.org/polyhedra/
Originally published 4-7-17
It's a matzo ball! ; )
ReplyDeleteIndeed, LynDee, thanks for stopping by!
ReplyDeleteSo very clever! Love that matzo fabric. Thanks for the tutorial. I will save it for another day.
ReplyDeleteGlad you enjoyed it, Norma! Thanks for stopping by! It was so much fun making these!
Delete"(Star Trek is appropriate for all spring holidays.) "
ReplyDeleteYES!
Live long and prosper, Radish!
DeleteLove the matzah ball-so will my grandkids, wish I had more time to make them for this year.
ReplyDeleteCarol, if you have matzoh fabric, you could just glue it to one of the paper patterns, cut it out, and glue the whole thing together!
DeleteDana would like you to make a great rhombicosidodecahedron.
ReplyDeleteKay, that's totally doable! I looked at the model here: https://en.wikipedia.org/wiki/Rhombicosidodecahedron. But what kind of fabric does he want?
DeleteLove the matza balls. I made fabric frogs with my students this year. I really admire your work and thank you for being a rare voice for a seder project. thatfabricfeeling.com
ReplyDeleteElana, I'm so glad you wrote to me. Your blog is beautiful, so many wonderful things! The simple frogs, makeable by kids, are genius and adorable. I love your quilts and their "modern" freshness! I'm a new follower of your blog, thanks for stopping by.
DeleteThere is a stitch n wash fusible stabiliser that's used for appliqué, that might suit your needs. It's called 'stitch n wash', by floriana
ReplyDeleteThank you for the tip, ES, I will check it out. I wonder if they carry it at my local shops....It needs to be pretty stiff!
Delete