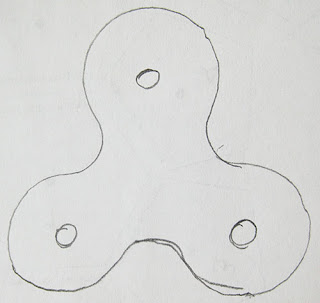
Until a month ago I would have said it's some kind of stylized chimpanzee face. Here's another clue:

One short month ago, I would have had no idea. In those days, I had nothing to do with my hands but make quilts, eat and fling them in the air when startled.
Then I learned about fidget spinners. Specifically, I read an article online about they've taken over the world. I had no idea what the article was talking about, and didn't bother to google it.
Then I was in line at Michaels, and saw a bunch of them on display, each decorated differently. I deduced that those must be what that article was about.
Then my DH and I stood in the cashier's line at our supermarket, where we go every week. On that day, a bunch of fidget spinners with superhero themes were hanging by the chewing gum. On impulse I threw one on top of our groceries.
(I chose the Superman theme, because they didn't have Wonder Woman.)
At home I ripped open the package, and spun it. With just one flick, it spun for a remarkably long time, but I still didn't get it.
But I stuck with it. It became fascinating to spin it and gently roll it around, feeling the gentle push and pull of angular momentum.
Plus has a cool, undulating design. It reminded me of the Weight Watchers ice cream sticks that inspired freemotion quilting designs; and also of Cheryl Lynch's stylish Curvalicious (TM) ruler, which helped me make two graphic quilts.
So yesterday morning, after thinking about this for a while, I tried tracing my FS. Guess what happened? The flippin' thing MOVES when you trace it, no matter how hard you hold it with the other hand. It was hilarious.
My tracing:
Tracing through the small holes is equally impossible...
I decided to draft my own idealized version, using inert objects in my sewing room. First, I traced part of my plastic equilateral triangle template to create a 2 1/4" more-or-less equilateral triangle.
Then I dug out an empty spool. Peeled away paper label on the ends that occluded the view. Peered through the center to place and trace a circle on each angle.
First circle:
All three.
Use the same spool to generate the curved lines connecting the circles.
All three. (Looks like a moon over the mountain block, no?)
Locate a smallish circle I searched my pockets for change, but there was nuthin. I located a bobbin, and traced that. (It still has invisible thread in it.)
Now let's compare - my drafted idealized vision on the left, with my inaccurate, yet folksy tracing on the right. Which would you use in a stitching project?
Both have their charms, but I decided to go with my drafted version. I traced the spool, bobbin, and overall drawing onto the back of paper-backed fusible web (right).
...And leaving them out, which was simpler and kind of sweet in its own way.
Astonishing discovery: With paper on the fusible web backing, you can literally spin these fabric versions on a flat surface, with a flick of your finger! They don't spin as eagerly as the real deal, though.
I wound up making two of them that spun nicely.
Wouldn't a whole bunch of these be a great quilt?
Instead, I made a little pouch to keep my precious. My FS measures 3" at its widest. I cut the navy background fabric to 4 3/4" x 11 3/4". The idea is to fold the strip into a pouch with a flap. Here's the schematic of what goes where on the long raw edge rectangle of outer, featured fabric.
It's a good idea to satin stitch these motifs down before you add the lining. (I didn't, but I should have, so let's pretend I did.)
Put the featured side and the lining right-sides together, and stitch around all four sides leaving a 2" gap along the short edge that's furthest from the two appliques.
Turn it right side out. Fold the bottom edge upward and stitch down both sides of it (I did these two lines of stitching from the wrong side). Then fold the top flap down.
Front with flap up. Back view.
Finally, you must look deep in your soul and ask: Buttons, or no buttons? If you're making this for a kid, you might want to ask them (or their parents) Some children are anti-embellishment.
Since I was making it for me, I went for broke. Here's the new front, with buttons.
If you use the same sealing method as I did, the front of your pouch will need at least one button, on the bottom arm:
That's a piece of purple elastic stitched to the underside of the flap, to hold the pouch shut. On the back I went a little crazier, with three silver-grey buttons, and a strange red button with a cross in the middle.
And that's my fidget spinner story! If you have a fidget-spinner-fan in your life, please run with this idea! I'd love to see your fantasy fabric fidget-spinner!
PS Never give a fidget spinner to a child under 3. There have been problems, even with older kids. http://www.goodhousekeeping.com/life/parenting/news/a44415/moms-share-scary-fidget-spinner-injuries/.


You crack me up! I actually just bought one for my son's 32nd birthday! Does that mean I have to make a pouch now ?
ReplyDeleteOf course, at least a pouch! It's so similar to Curvalicious - maybe you could do a video about how to draw fidget spinners with the Curvalicious ruler?
DeleteIt was slinkys when I was a kid. I could sit for hours just watching it go from one hand side to another. They haven't hit our grocery stores in Vermont t yet. I wanna test one out.
ReplyDeleteI love slinkies! My DH uses them to demonstrate waves in his physics classes. He tells me there's lots of physics in these spinners, too.
Delete