
Everybody needs one! It's a 3" collage, mounted on wood, ready to hang. Each tells a different story. This first one is titled "Alien Reveals Key to Universe: Earth Mushroom!"

It's an ideal gift for people who watch too much "Ancient Aliens" on the confusingly-named History Channel. The piece is mounted with double-sided carpet tape (but consider something stronger*) on a craft store wooden square that I'd painted black. On the reverse side, there's a wire loop for hanging, bent forward, and held on with plenty of glue and black felt.

(Here's how the wire looked before gluing. I made little swirls to maximize the surface area:)

Side:

But wait, there's more! "Flight Over Mt. Fuji, with Daisies" includes a blue volcano, a mother-of-pearl moon, and a dove charm smack in the middle (hard to see). Not to mention the gravity-defying giraffes marching heavenward in the upper right hand corner (I blame ancient aliens.)
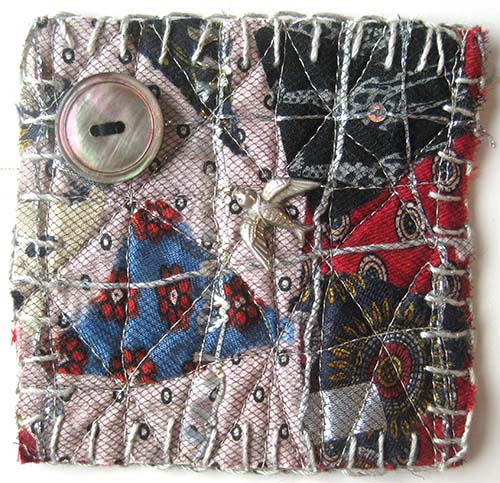
And finally, "The Cat Demands an Allowance"

Can you see the cat charm in the middle? I wish these pieces had more contrast. Next time I'll try using neckties with a more consistent, darker value, so the embellishments pop more. (By the way, the artistic keys came from Kay Mackenzie, the queen of applique - thank you, Kay!)
This all started a couple of weeks ago, when I made some heart-shaped silk scrap valentine brooches by overlaying dupioni silk scraps on black felt, placing tulle on top, freemotion quilting over the whole thing, then cutting out shapes. (Detailed directions in the last post).
This time, instead of dupioni, I chopped up old neckties. First, I fused larger pieces down to a piece of black felt.


I sub-cut several 3" squares (to match the wood pieces that I had lying around the house). Blanket stitched around the edges.

And embellished like crazy. Meanwhile, outside, I painted the wooden shapes, front and back.

I couldn't bear to throw away even a small scrap of my constructed fabric. So I made these two pins from some of the leftovers.


They're a scant 2" across, cut to fit on a wooden oval (although I ended up not putting them on the wood backing. Instead, I sewed a safety pin to the back to make a brooch!

(*One of my giftees informed me in the comments below that the carpet tape didn't hold. In that case, I'd recommend hot glue from a glue gun. Other suggestions welcomed!)
It amazes me that people can call this kind of little textile a 'quilt' - to me 'quilt' is far too big a word to use here ... brooch? amulet? medallion? charm? pin?
ReplyDeleteHmmm...you're right that it's only two layers, felt and topping, though it LOOKS quilted. I like "Amulet", that sounds exotic! Thanks, Alison!
DeleteAs the proud owner of "The Cat Demands an Allowance" I am thrilled to see the process photos and to enjoy looking at my very own piece in person! It delights me daily. One issue, though; the double stick tape did not hold, so I was puzzled to find my quiltlet missing. Did aliens take it? Finally I found it on the floor, and stuck it back on, but the tape had given up. I may have to glue it, but for now a pin holds it to my wall of beauty.My seahorse pin is also very beautiful! thank you!!
ReplyDeleteUh oh, Jeri. I had better change my directions if the carpet tape isn't holding. Maybe a glue gun?
DeleteHow about Aileen’s tacky glue?
ReplyDeleteI'll give it a try, good idea, Norma!
Delete