


The evolution was logical. I was making gifts for summer visits with friends and family. After the first two above, I dared to do something different - cut triangles instead of squares.
They came out about 12" high, and each contained 9 food triangles, plus a strip fabric on the lower level. Below, triangle potholder #2....

...and next is #3, with a citrus print on bottom that's also on the back of all three of them.


Eureka! It looked like a strawberry! So I made another one, this time not from food scraps, but red scraps. (The bow/hangar is rainbow-colored rat tail.)

To drive home the strawberry message, I put this print on back:

I happen to be allergic to strawberries, so this was super-exciting. I embarked on another one - with the addition of three green prints to serve as leaves.

Back:

It's longer than the others, therefore better for hand/arm protection. But I feared it had lost that strawberry feeling, (apologies to the Righteous Brothers.)
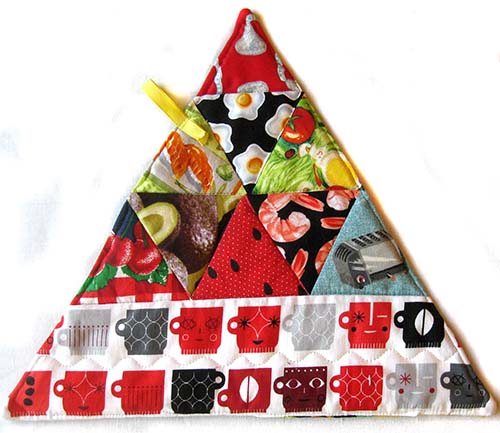
For my last experiment, I used 13 triangles; two at the top are green. I think this is the most strawberry-ish of all, although it may be having an existential crisis, because I slipped in an apple-themed fabric.
Want to make your own? The tutorial follows. My best advice: Sew triangles in horizontal rows, not concentric hexagons, because the latter gets very confusing, very fast.
TUTORIAL: 13-Piece Strawberry Potholder/Kitchen Art
Cut 11 triangles from red scraps, plus two more from green scraps. Choose a variety of shades to create highlights and dark areas.
An equilateral triangle acrylic rotary cutting template makes cutting easy and fast. There are many brands and price points; mine, below, is the “Equilateral 60 Degree Triangle by Darlene Zimmerman from EZ quilting by Wrights,” under $10.00

I used the template line that measures 3.75” from tip to the center of the base (I marked it with painters' tape so I don't have to keep looking for it), but you can go to 4" if that's easier.
Arrange the triangles.

Sew together in horizontal rows. After you add each piece, press the seam allowance to one side. In the top row in the photo below, the seam allowances are all pressed to the right; in the middle row, they're pressed to the left...

...and on the bottom row, they're pressed to the right again. Here's the back:

Match tips and pin the top row face down onto the middle row, face up. Pin at each intersection, halfway across each triangle, and at both ends.

Use a quarter inch seam allowance, and remove pins just before the presser foot reaches them.

Open and press seam allowances upward, so the leaf tips are slightly elevated over the row below.

Add the bottom strip to the middle strip the same way. Press that horizontal seam allowance upward.
Stack two layers of cotton batting - put the stitched unit on top and cut the batting a half-inch or so beyond it.


The gap, directly above, is the width of the base triangle. Press the top edge of the opening down flat.


Reach into the opening, where the two good sides face each other, and gently, pull right sides out.

Use a chopstick to extrude all the corners, and press well.

The back:

*A layer of Insul-Brite may be safer for potholders, and I sometimes use it, but I do find that the double layer of cotton batting plus fabric on both sides, works well for most situations...unless confronted with a searing-hot, heavy pan; in those cases I trust my giftees will use their heavy-duty oversized potholder gloves, and not this kitchen art!
UPDATE: Part 2 of this series, with apples replacing strawberries, is now posted here.
Thank you for taking the time to write a nice tutorial for fun kitchen art. Perfectionists need not apply. One of my favorite ways to add a hanging strip is to sew a piece of rick rack diagonal across one corner. Unobtrusive but cute and works great. Thanks, I will be making some kitchen art. Everyone needs new pot holders so they can toss the ratty old ones. Joy!
ReplyDeleteThanks for this tutorial. I used my long time ago purchased triangle tool, pulled out a few fq's and made a sunset themed piece of kitchen art!! I learned a few things too!!!
ReplyDeleteHow wonderful, DL! Happy to be the prod!
Delete