
I'm been playing around with turning flat quilting templates into 3-D constructions. Here's one of my new experiments
It's 8" tall. I think it's a spinal column vase, and it started with a 2.5" template acquired years ago.

Longtime quilters recognize this as a classic apple core shape. Google "apple core quilts" you'll find books, patterns and kits to make scrappy quilts with hundreds of pieces this shape. Especially "charm" quilts, with a different fabric for each piece.
The results are definitely charming - but never charming enough for me to want to make one. Because of the curves, you have to do a lot of scary clipping on inside seams, and precision sewing.
But the novelty factor drew me to that template a couple of weeks ago. The great thing about making small projects like vases (as opposed to quilts), is that you only need to make a few of the same shape, rather than hundreds!
I start by cutting out the shapes from an old cardboard mailer. I taped pieces together, and played. Here are two candidate formations:


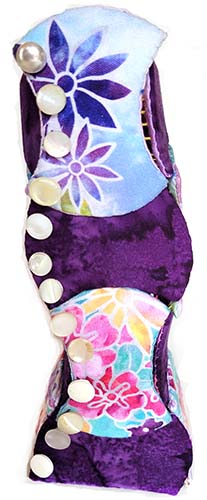
I still wasn't sure where I was going when I started making fabric versions. I pulled gorgeous prints from Michelle Freedman"Fire and Ice" collection from Maywood Studios. (Michelle is a fantastic designer; find her quilt patterns at https://linktr.ee/stitchwellandprosper)

I cut 12 apple core shapes out of stiff interfacing with fusible on one side. I cut an oversized apple core shape out of the featured fabric. I placed it face up on the non-fusible side of each interfacing shape. Then I wrapped the seam allowances around to the back, and fused them in place there. This required a whole lot of scary clipping at each piece's waist line.

On the reverse side, I essentially needle-turn appliqued the "lining", to cover the raw edges that came over from the featured side. Again, abundant clipping.

I made six with Michelle's fabric on the featured side; plus 6 more pieces with a dark purple batik.
(In my polyhedron-making book at the bottom of this post, I make all sorts of bowls and brooches, and more this way; but all those shapes have nice straight sides - hexagons, octagons pentagons, etc. - no clipping required.)
I experimentally sewed the pieces together with embroidery floss and large stitches, doing what English Paper Piecers call the "flat back stitch." I figured I could go over it later to replace the big stitches with smaller ones. (Spoiler alert: that's not going to happen until this thing falls apart!)

I brought the last edges together, and here we are. It not only reminded me of spinal column, but a curvy person...in a corset...of a bridal gown...bridal buttons leapt to mind, so I sewed small vintage shank buttons down one edge.


Which also reminds me of a spine. And in a circle, minus one piece, you'd wind up with this cuff (Imagine it without the binder clips. Although if I could find sterling silver binder clips, they could be a feature!)


No comments:
Post a Comment
Thank you for commenting!