Advice to the fertile: Don't generate offspring 4 years apart! In the 1990s, Mother Nature, my DH and I made that mistake. If only we'd done 5 years. Or 3. Or ANYTHING but 4. Why? Because approximately 18 years later, you might wind up with major graduations on top of each other.
I'd been worrying about May/June of 2016 for years. We finally got the schedules: My son's college graduation on the East Coast was to be 3 days before his younger sister's high school graduation here in Southern California. This all went down 2 weeks ago. We are still recovering.
Both my kids chose East Coast colleges, but most of their friends opted to stay on the West Coast. Three of my daughters's close friends will head for two of the nation's finest universities in the fall: UCLA (aka University of California at Los Angeles), and USC (University of Southern California).
These happen to be the only two schools for which I have college logo fabric - bought many years ago in Los Angeles' fabric district, when I used to buy every fabric I liked, because I might never see it again. (The fabric-shopping Internet was tiny at the time.)
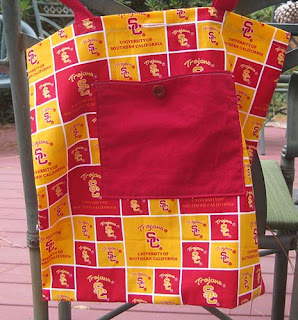
So 2016 became my opportunity to use that old collegiate fabric! I decided to make each of my daughter's three friends a bundle-able tote bag.
Below is the USC bag (the school is affectionately known as SC).
And here's one of the two for UCLA. (Not known as CLA.)
The secret of making these bags bundle-able is the two-sided pocket with an interior button.
The flap side of the UCLA bag, bundled:
The reverse:
SC:
The back of all three.
Below I will reprise my bundle-bag tutorial, which first appeared at the bottom of a long post in 2013. It's somewhat simplified here.
HOW TO MAKE A BUNDLE-ABLE GRADUATION TOTE BAG
Step One: Obtain a yard of collegiate fabric. There are quite a few online stores that offer it, including:
- Fabric.com, at https://www.fabric.com/quilting-fabric-novelty-conversational-quilt-fabrics-collegiate-cotton-broadcloth.aspx
- College Fabric Store, at http://www.collegefabricstore.com/shop-by-school/
- Bear Paw Quilting, at http://www.bearpawquilting.com/cgi-bin/Store/store.cgi
(No financial affiliation with any of these.) And if they don't have the school you need, design your own and have it shipped to yourself via Spoonflower.com!
Phase Two: Find or Invent a Tote Bag Pattern
Phase Two: Find or Invent a Tote Bag Pattern
You need to create a single layer, unlined tote bag with enclosed seams. Don't use interfacing. Make French seams; or zig-zag/serge over the raw edges. If you don't have a favorite pattern, here's an excellent, simple tutorial for a French-seamed bag that will work perfectly for our purposes: Tote 1.
Phase Three: Make the Magic Pocket
The magic reversible pocket explained below can be added before or after the main body of the tote is finished. I prefer to add it after the bag is fully stitched, so I can more easily align the bag, button, buttonhole, and pocket.
Pocket size is up to you. About a fourth of the bag's side or a bit smaller is a good rule of thumb. The pocket size will determine the bundle size.
Start with a rectangle of raw-edged fabric, a little more than twice as high as you want the pocket, x the approximate width you want. That's the first piece below. Then, fold it in half, right sides together.
Students can keep them bundled in their purses and/or backpacks, then pull them out and expand them when needed. Kids, don't leave your dorm without one!


gret post!
ReplyDeleteThank you, Bari!
ReplyDelete