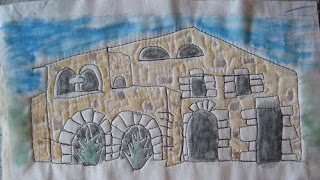
All my pieces had batting on the back, so that the freemotion quilting created contours. Once the outlining was done, I selectively colored some of the pieces. Then I zig-zagged them together.
...Added turquoise binding to cover the seams.
Put felt on the back, and covered the edges with strips of felt (though in hindsight, I probably should have done a simple zigzag edging or traditional binding).
Done!
I gave that one away, and wanted another one to keep. So once again, I stitched out some of my favorite photos.

...Which caused me to reflect on the fact that, no matter how many decades I've been freemotion quilting, I still need to practice with any particular image or motif immediately before the final run. Practicing the week before, or even the day before, only counts a little. You also really have to do it moments before. (Or at least, I do.)
For this round, I did more coloring.
Here's what I have so far for quilt #2.
Here's a procedure for turning your vacation photos into a coloring book quilt:
- Take lots of photos, so you have lots to choose from.
- Pick favorites.
- Sketch out the major lines of the photo on paper. Or print out your photos and trace the major lines onto fabric.
- Strive to connect all the lines. The less you cut the thread, the better, because coloring can dislodge thread ends. At the very least, strive to begin and end at the edges of your piece (rather than the center).
- Draw it again, and maybe a third time. Then stitch a practice round.
- Choose a light-colored fabric with very dark thread (I used dark brown thread on an assortment of tan and gold fabrics). Back the front fabric with batting and (optional) a backing fabric. To minimize tension agony, use the same thread in the top and bottom.
- Go for it. Stitch out your design.
- Gently color inside the stitched lines. You can use school supplies - Crayola crayons and markers work fine.* If you're an art supply snob use the good stuff - for these drawings I used Caran d'Ache Neocolor II water soluble crayons; Prismacolor colored pencils; and some low-quality no-name watercolor pencils which I don't recommend because the points kept breaking. UPDATE: I took a wonderful class from quilter Ana Buzzalino on coloring fabric with Derwent Inktense pencils (and fabric medium (or aloe) to make the color permanent). There are several tutorials now online for "coloring fabric with Inktense pencils," along with the classes Buzzalino teaches here.
- If you used watercolor crayons or pencils, and are ready to start the bleeding, use a tiny brush and small amounts of water. Don't paint all the way up to your stitched lines, or the paint might bleed across the boundary.
My two villa drawings below are colored in watercolor crayons, and I proceeded very, very cautiously in wetting the boundary areas with my teeny brush.
Each finished portrait can turn into a separate wall-hanging. Or, zig zag them together, cover the seams with binding, add a backing and binding around the circumference. Have fun! Let me know how it goes!
* Find a tutorial on coloring fabric with crayons at:
http://sew-whats-new.com/group/welovetoquilt/forum/topics/color-on-fabric-using-crayons
http://www.urbanthreads.com/tutorials.aspx?t=crayon+tinting


No comments:
Post a Comment
Thank you for commenting!