Monday, October 26, 2015

Quick Pumpkin Spice Quilt Scrap Project

Here in LA, a pumpkin patch consists of a bunch of hay strewn over asphalt in a corner of a vast drugstore parking lot. Temperatures north of 100 degrees add to the ambiance.

But I'm not bitter. OK, I am. Even after 20 years in Los Angeles, I still suffer from Autumn Absence Angst, missing the colors and smells of my New England youth. Pumpkin spice-flavored coffee/kale chips/shampoo aren't enough.

I had autumn on my mind last week as I was working on a wall-hanging size batik project.
(Yes, that's a fraction of my Pez collection over my design wall...all quilts go better with Pez!) In any case, I was doing improvisational curved stitching of these blocks (a la Diane Hire's Vivacious Curvy Quilts), and a tantalizing stack of scraps started to pile up. 

Naturally, the scraps became more interesting to me than the main piece. Especially after I started arranging them on my design wall....
OMG it's a modern rainbow quilt!? I could just zigzag those bits down to a large piece of white, grey, or black fabric. Lots of modern quilters are doing a version of this; Google 'tickertape quilts'; here's a lovely example by Tisha Nagel. 

But that would require discipline. Plus, missing autumn, I was especially hypnotized by the yellow/orange/pink/red portion of the spectrum. So I decided to make a seasonal tree (recreated from memory, since there are no trees of this color in my vicinity). Thus, this:
This is a perfect project for sit-and-stitch with the friends (be sure to serve pumpkin spice vodka, really!).  It's relatively fast, incredibly forgiving, and, unlike pumpkin-spiced beef jerky, you almost can't go wrong.

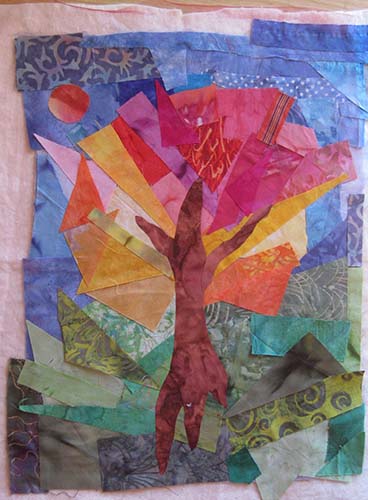
Start with a base. I used a 12" x 15"  gray rectangle. I lay down a kindergartener's background (green scraps down south, blue up north). Third, the leafy portion, and finally, a tree trunk.
I brought this to the ironing board, and applied a dab of glue stick on the back of each piece. 
Next: A decision, and you can help (or you can turn the page.)

Choice 1: Cover it with a layer of tulle, to tone down the raw edges and hold everything in place. Then freemotion on top. This is a technique I practiced most recently in Phyllis Cullen's class, described last week. The problem is that tulle tends to grey things down. Compare the vivid color in the images above to the following tests. Medium blue tulle on top: 
 Dark navy blue tulle on top.
Purple tulle:
White:
Counterintuitively, the dark navy tulle did the least greying down! Weird, huh? Your vote counts... [UPDATE: Three more tulle tests are at the bottom of this post.)

Choice 2: Skip the tulle and very carefully freemotion over everything, The problem here is that the foot will inevitably go under a piece's loose edge, and cause tangles. (I could have avoided this by pressing fusible web to the back of each piece and every scrap, but that's way too boring.)

Any other ideas? Suggestions welcomed! 

By the way, I chose to work at 12" x 15" because I happen to have a stretched canvas that's 11" x 14". When the piece is finished I'll mount it on the canvas, but not while constructing it. More on stretched canvas here
Have you made a pumpkin spice flavored quilt? Five easy pumpkin projects for fabric lovers, are here. There's still time to make them!
UPDATE: I raced to the fabric store and bought three more colored tulles to try on my quilt. Tulle is ridiculously inexpensive. Here's purple: 
Here's something called "Sparkle Mesh," in gold:

And we may have a winner: Red Tulle! It makes the hot colors sparkle! 
What do you think?

Monday, October 19, 2015

Portrait and Stained Glass Quilt Fun with Phyllis Cullen

If you ever have the opportunity to take a class from internationally-renowned quilter Phyllis Cullen, who lives Hawaii, but travels to teach, leap at the opportunity!

Leap is what I did when I found out that Phyllis would be teaching two classes at the Pomegranate Guild of Judaic Needlework's biennial convention last May, in Phoenix Arizona. 

 The classes -  Portrait Quilts, and Easy Stained Glass Quilts - were fun, fascinating, and ran the gamut from coloring book level (the stained glass) to graduate level challenge (the layered portraits.) 

For the portrait quilts, Phyllis had us send her a picture in advance of the class.  I sent this shot of my daughter as Mother Superior in her school's production of The Sound of Music. 
Every Jewish nun deserves a portrait! Phyllis scanned our photos, turned them into greyscale images. She then printed each gradation layer, from dark to light, onto the paper side of Steam-a-Seam fusible web. We pressed the fusible to the different layers, then cut each layer out seperately. It is an intricate process. (And it requires serious photoshop-type skills. You can actually hire Phyllis to do this with your photo.)
 I wasn't  completely sure of what I was doing, but I diligently followed orders, cutting different shapes from three different shades of bluish-grey fabric, After stacking the layers, I wound up with this:
 
WHOA!!!! Never, ever has anything like this ever come out of my hands!

The last step, which I haven't taken yet, is to freemotion quilt over the whole thing. 

Just for fun, I stacked the cutaway pieces (unfortunately, I lost some of the eyeballs), and wound up with this fascinating, albeit sinister photo negative:
I am not sure yet if I want to fix up the missing eyeball, and make a quilt with both images, or just use the positive version. 

The next day, Phyllis presented a class at the opposite end of the conceptual challenge spectrum. She had mapped out a drawing of a pomegranate. 
Phyllis brought suitable fabrics, and we choose from her stash. We cut and placed each piece. It was incredibly relaxing, like adult coloring books. Here's how it looked with all the pieces fused in position.
Phyllis likes to add black tulle over the finished piece, then freemotion stitch over everything. This softens the raw edges. Here's how mine looks with the black tulle on top.
It's a little greyer - I'm not sure if I'd use the tulle if I do this process again. It's now hanging proudly in my home!

In her own work, Phyllis takes these techniques to a high level of color and drama. Check out her glorious portraits here. Her stained glass quilts start on this page. Take her classes, and tell her I sent you! (No financial affiliation!)

For my step-by-step approach to stained glass quilts, check out this post.


Sunday, October 11, 2015

Accidental Gees Bend-ish Jeans Quilt

Don't you love those Antiques Roadshow episodes in which people happened to look around in their attic, spied an old metal helmet, and it turned out to be a Roman antiquity worth $6.2 million?

It happens regularly on AR, but never to me. Until last week.

I opened a seldom-viewed closet near our front door - can't remember why.  I noticed crumbled denim stuffed into the top shelf.  Denim? I don't store jeans or my denim stash in that closet.

I pulled it out and realized it was a giant rectangular tube stitched from jeans parts. What the heck?
 Then I remembered: It was the former cushion cover for our former log porch swing.

To digress a moment, I love log cabins,both fabric and wood. We can't live in a log cabin (rare in Los Angeles), but at an art show I spotted a porch swing much like this one:

We bought it, and of course, it was uncomfortable, So I bought upholstery foam, and cut it to size for a bottom and back cushion. I made  covers from my husband's old jeans.

It made it a great conversation piece, until a couple of years ago, when we noticed neat little mounds of sawdust on the floor below it. Termites! An exterminator assured us that the critters would soon switch over to munching on our house. So he hauled it away,  I tossed the foam, put the denim covers through the laundry, shoved the seat cover into my front hall closet, and forgot about it.

So this was about three years later. I opened my closet, and spread it out.When I ripped the seam that joined the two ends, it looked like this:
It's about 54" x 76". My first thought: OMG, this is a priceless Gee's Bend quilt, except not brilliant!  Gees Bend quilts have had a powerful influence on me (and on the quilt world in general). I could stare at them for hours. I made the cover long before I'd heard of Gees Bend, but there were similarities. Below are three of my favorite authentic Gees Bend quilts, made from old work clothes, Learn more about them and view many more here.

Wonky, check.  Pockets, check. Sun fading, subtle hue changes, assymetry, check, check, check. Genius composition? Well, not in mine! But that's a small matter, no? I wasn't aiming for composition! I was aiming for cushion coverage! 

Also, no wonder that swing was so uncomfortable! We were sitting on zippers and rivets and belt loops, oh my! 
Not to mention labels! 
It weighs a ton. I'm not sure whether to line it. Either I keep it in the back of my car for picnic emergencies, or bring it to Antiques Roadshow. 

A lot of people have made Gees Bend-inspired quilts. They're usually incredibly relaxing. One wasn't so relaxing: An artist was hired to make 65 American flags from recycled Levis. They wound up using 3,000 pairs of jeans and it took four months! Read all about it here.
One of my earlier,  too-symmetrical-to-be-Gees-Bend denim-and-corduroy quilts, blogged here:
Wavy denim stripes, tutorial blogged here:
What have you made from old jeans?

Sunday, October 4, 2015

Old Dog Learns New Trick & Recycles Old Trick for Quilted Stars

Sometimes I think that quilts are just an excuse to show off buttons. Here's a commissioned challah bread cover that I made last week, pre-buttons.

It started when a friend called to ask me if I had any extra challah covers lying around that she could buy to give a family that loves to travel. I looked in my UFO drawer and found three kaleidoscopic stars that I'd made years ago. They looked something like this,

but they were made from this Jewish-themed novelty fabric:

I had used the Magic Star Six by Mace McEligot, a tool that I bought in the late nineties, and which as far as I can tell is no longer made, though you may be able to find old ones on etsy or ebay.

However, you can do the same thing with Sara Nephew's Super 60 tool, which has the exact same configuration of angles, and is widely available. (Find it here. No financial affiliation.)

Start by placing hinged mirrors (an inexpensive notion found in many quilt stores) on top of the fabric, and slide it around til you like what you see. Place the template between the mirrors, with the 30 degree angle inside:

 Remove the mirrors to see the view:

Replace the template, and mark it with a china marker showing where the designs land. With the template in position and a rotary cutter, cut out six identical kite shapes, sliding the template to the correct location each time. Here's how each petal looks (with yet a different fabric! Sorry I keep switching fabrics!)
Now comes the magic: When you fold the petal in half,

and stitch the upper left and upper right sides together,
Press in position:
Trim the seam allowances, then turn the top area right side out (a ball-tipped stylus helps to extrude the point), voila!
The back before the final press
The front. (I know the print is wonky - I just made this for demonstration purposes. Be more careful than I was.)
Rinse and repeat five times. Sew two groups of three petals each. Join the halves, and press the central seam allowance open. You wind up with a neat little six pointed-star frisbee, with finished edges all the way around! Back:
Side:
I'd made three stars from the Judaic print. First, a nearly Celtic star:

A tiny star:

And a white star of stars:

To button or not to button? After some agony, I decided to go for it, with vintage buttons. This elaborate mirror-glass metal button went on the curly star:

A tiny, elegant metal button went on the small star:

And a metal-and-mother-of-pearl and metal shank button went on the white star: 
On the back, I put a travel-themed suitcase tourist label fabric, plus an African fabric with brownish stars. 
So what's the new trick? That blue-and-white fabric around the edges is a facing. Instead of my usual binding or satin stitch, I tried facing for the first time. It creates an edge that's like a pillowcase turn, but no need to stitch together an awkward gap. Facing has grown increasingly popular among art quilters. I found a terrific tutorial on the Silly Boodilly blog, here. Thank you SO much, Victoria, for teaching me how to do this!
Here's the overall cover with the buttons added: 
The freemotion quilting is a cross between leaves and candle flames.

It will be hard to say goodbye to this piece, because I love my kaleidoscopic stars and vintage buttons, like Gollum loves the Ring.  (Except he had only one Ring, and I have approximately two trillion vintage buttons). I hope the new owners will love them as much as I do, or at least not throw them into that Mount Doom lava pit thing.

More of my challah cover ideas and patterns are on my Judaiquilt website, here. I have tried to contact Mace McEligot for this article, but was unable to do so. If anyone knows how to reach her, or if they know a vendor who is selling the Magic Star 6 tool, please let me know.