Showing posts with label Artist Trading Cards. Show all posts

Sunday, July 29, 2018

Stitches from Sorrow, Neatness Doesn't Count: Outsider Art in Lausanne

In my last two blog posts, (1, 2), I talked about quilt-ish inspiration from a week in the mountains, streets, and, of course, the cheeses of the French Alps and Lausanne, Switzerland. Along with ancient sites, one of the most astonishing places we went was Lausanne's Art Brut Museum - "Collection de l'Art Brut."

Art Brut is a term coined by French painter Jean Dubuffet (1901-1985) - in English, it's called Outsider Art. Here's how the museum explains it: 
"Art Brut is made by self-taught people who often live on the margins of society....Among them are prisoners, residents from psychiatric hospitals, eccentrics, loners and outcasts whose creative expression exists for itself, without any concern for public criticism or what other people might think."
Three things struck me after an hour in this museum. 
  1. The incredible "wall power" - these pieces grab you. 
  2. The multiple horrific tragedies many of these artists endured. Abandonment, loss, profound mental and physical challenges (including, in some cases, blindness) - and not just one tragedy, but many. Several went silent for decades. I was also surprised at how many of the artists were Jewish, and grappling with the Holocaust (among other issues.) 
  3. Neatness doesn't count. 
For wall-power, the pieces that knocked me out included this rendition of the 'Birth of Venus,' by Yves-Jules Fleuri:
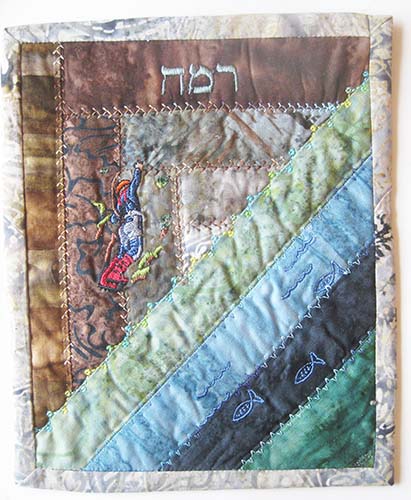
And this, by Brazilian artist Antonio Roseno de Lima.
And a massive floor-to-ceiling piece by August Walla)
That's just for starters - the museum has 60,000 pieces, 700 of which are on display, so I won't try to show everything I photographed. Below are a few photos of pieces that might be especially interesting to quilters and other fiber artists. Starting with jackets by Dunya Hirschter (1954-2008) from Croatia:
And her accessories: 
Next, dolls made by Michel Nedjar, (b. 1947), a French Jewish artist obsessed with the Holocaust, fetish dolls, and much more, here


Also by Nejdar: 


Judith Scott, (1943-2005) from Cincinnati, was born with Downs syndrome, deaf and mute, and sent to an institution at 7. She wasn't freed until her twin sister gained custody of her in 1986, when Judith spontaneously took up creative work. 
"She would hide all sorts of disparate objects - a fan, an umbrella, magazines - to form the heart of each creation. Having assembled such objects, she would wrap them with yarn, string and various fibers as to protect and conceal them completely."
Similarly, Angus McPhee (1916-1997), from Scotland, went as a young man to serve in WWII, became schizophrenic, was sent to an institution where he went silent for 50 years. Returned home in 1996, he started speaking again, and worked in the fields plaiting grasses like his father did to thatch roofs. 
"Angus McPhee hijacked his traditional practice to make various objects and items of clothing: hats, coats, trousers, boots, gloves and shoulder bags among others. He would hang his finished creations from the branches of a tree, hide them in the bushes, or lay them on the ground in a corner of the hospital grounds which served him as an open-air workshop."
Here's one of his handbags (which reminded me of handbags I've crocheted from eyelash yarn.) 
(By the way, a day later, in a fancy Geneva airport boutique, I saw this pricey designer fur tote bag, in the background, and snap purse, in the front:
)
On an upper floor, there were display cases full of recent mail art - pieces mailed to the museum curator over the past 20 years. These were obviously made by lots of different people, and I am guessing these were part of a challenge (but I couldn't find an explanatory label).


And finally, on the very top floor is a tiny room packed with the hallucinogenic work of Paul Amar (1919-2017), born in Algiers, who made massive, dense dioramas from shells.


Born to French Sephardic Jewish and Roman Catholic parents, Amar was a soldier in WWII. At age 55 he discovered objects made from shells in a souvenir shop; that became his life's work. He literally ate shellfish frequently to keep up his stock. 
"He grinds down and carves mussels, winkles and coral and decorates them...assembles them with glue, then covers them with acrylic paint or nail varnish. Finally he attaches them to lengths of wire...in box-type frames. The pictures are presented in the form of high and low reliefs an are illuminated from within by light bulbs that the artist conceals in sea urchin shells. Ornamentation with vivid pearly colors saturates the scenes and makes them verge on the sacred."
Detail of a tree:  
If you don't have any plans for a trip to Switzerland, you can explore the collection here. We also loved the Mudoc museum, by the way (it has an incredible show on now about guns and design which I blog about in my next post.)

P.S. I was just told about ANOTHER outsider art museum in Switzerland. I found its website here. Warning: Adult images in the home page scroll.

Sunday, February 18, 2018

Buttons, Not Bullets

Artist Trading Cards.

All made in 2013, soon after the Sandy Hook shootings.


Art wasn't enough. Nothing has worked. But I have high hopes for the millenials. We must follow them to the streets...and the voting booths.

(Incidentally, artists can obtain spent bullet casings as easily as Florida teens obtain assault weapons. I bought the bullet casings on Etsy, and plenty are still there, in case you need to make your own mass murder-themed art. If nothing else, you'll feel better.)

(Posts explaining Artist Trading Cards, aka ATCs, are abundant on this blog. Click on the term in the word cloud in the right-hand column. Maybe a group ATC-making session, with or without real bullet casings, would be emotionally healing.)

Sunday, July 23, 2017

Mug Rug: Ugh? Or Luv?

Mug rug. Ugh. The name reeks of cute. In the quilt world, a mug rug is a mini-quilt upon which one places a cup and a small nosh, maybe a nice piece of pastry. When someone first explained the concept to me a couple of years ago, I thought it was the silliest idea ever. What's next, Carrot Carpets? Munchie Mats? Fondue Flooring? Borscht Blankets? Toothbrush Tapestries?

And if you image-search mug rugs, speaking of toothbrushes, you'll need to use yours - the results are even sweeter than the potential pastries. A lot of mug rugs out there are decorated with snowmen, mittens, hearts, and flowers - all of which I'm cool with, in small doses.

That's the downside of mug rugs. But despite my prejudice, I deliberately put myself in a position where I had to make one. Because I knew it would be a great way to trick myself. 

One of the hardest things for quilters is to get out of our own way. With every new project, we aspire to make something that's merely better than anything we've ever made, or even seen. That attitude spells creative doom.

So I tell myself I'm just practicing, on something insignificant. Then, anything I do will wildly exceed my expectations!

And therein also lies the  conceptual greatness of potholdersArtist Trading Cardsfiber postcardsinchies, twinchies, betwinchies, and come to think of it, bed quilts - women aspiring to make bedcovers sometimes create museum pieces. Like the Gee's Bend quilts - I rest my case.

Will museums show mug rugs one day? That would have sounded crazy to me,  until I received Esther's.

When I signed up for  my very first mug rug exchange, I was lucky enough to be assigned to receive one from quilter Esther Bartels of Massachusetts. The theme of our swap was "Climb Every Mountain," and Esther made me this amazing piece in batik earthtones, with an embroidered rock climber, fish in a stream, and the Hebrew word  "ramah," for "heights," on top. 
I'm sorry, Esther, but this is no mug rug.  I would NEVER allow a buttery croissant  or a sloshy cup-o-joe anywhere near it. It's a beautiful little art quilt. Thank you!

For this swap, I only had to make two, but I had a special event coming up, and needed gifts. I was also in the midst of my English Paper Piecing (EPP) and handstitching obsession. So I made a pile of 3" cardstock hexagons, and used them to cut hexagons from a bunch of whimsical red, white and black prints. I ended up making a half-dozen mug rugs.  And they turned out....well, darnit, cute. I can never scowl at a sweet mug rug again. 


I hand-stitched the hexagons together, which doesn't take as long as you'd think. Here's the back of one of the hand-stitched tops, with the cardstock still inside. 

The more I made, of course, the more I began to enjoy them. Even handstitched, they are fast gifts. For some, I machine appliqued the tops to a red felt backing, with nothing in-between. The first step was to remove the cardstock templates, then pin the top to felt.  
Straight stitch all the way around the circumference. (I used invisible thread.)
The back:
Cut away the excess, an eighth of an inch beyond the stitching.
So fast! Optional: Machine (or hand) stitch around the central hexagon. 
The alternative way to finish them - with a quilt batting in the middle, and then a turned edge on the backing - is more time consuming. 

Ph.D.s in mugrugology dispute how big one should be. I've seen sizes ranging from 4" to 8" on a side, up to a foot! Usually they're rectangles, sometimes squares, circles, hexagons, even octagons. Bigger than a coaster, smaller than a potholder or placemat, is how I now think of them. 

After viewing the diversity of mugrug shapes online, I realized I had numerous potential mug rugs. not to mention toothbrush tapestries, lying around my house - specifically, in my UFO and orphan blocks department. Like these recent leftover EPP blocks from a quilt project:

Hey, I could just finish their backs, declare them mug rugs, and move them out of my house! But that begs the deeper question: Do our friends who haven't enrolled in a swap really want mug rugs? Will they use them? Do their neighbors and relatives drop in all the time for tea/coffee/hot cocoa/miso soup, like on TV sitcoms? Mine don't. Basically: Shouldn't we just declare them art and encourage our friends to hang them up instead of laying a trip on them that they should start making cocoa and brownies for non-existent hordes of mitten-clad sweet-toothed visitors? (Also: If the neighbors do drop in, and you put your home-baked goodies upon the rugs, how are you going to wash the oil and butter and coffee stains out of these things?) 

While doing my 13 minutes of research for this blog post, with my newfound love of the artform, I saw many fun, artistic, and interesting mug rugs.
  •  I like the scrappy pieces on this page, especially the one made from selvages.
  • An Etsy artisan makes beautiful, artistic mats that look like leaves. They're sold for a ridiculously modest price. Find them here.  Save time, buy them and support her/him! (No affiliation!)
  • Want to learn foundation paper piecing? Do it while having fun making these sincerely adorable octagonal mug rugs here.
Have you made mug rugs? Would you want some? Would you use them?

Sunday, January 22, 2017

24-Scrap Batik Quilted Postcard Tutorial

I have been possessed by a 1" square obsession, ever since participating in a magazine challenge that stimulated me to cut out hundreds of them.

In the throes of this fixation, I signed up to participate in a fiber art postcard exchange. The theme was "Dance of Life." I reinterpreted it as "dancing colors," so I could make my cards from leftover batik squares.

Here are some of the 18 cards I made:


This project was SO much fun, and so relaxing - and no matter what you do,  batiks are beautiful, so the results will be beautiful.  

Although each card is made up of 24 squares - which sounds like a lot - it really isn't.  Cutting 6 tiny squares from a scrap doesn't take that much longer than cutting 1. And the more you cards make, the more you get to play with different compositions! Here's a tutorial:

24-Scrap Mailable Fiber Art Postcard Tutorial

1. Cut two dozen - Start by cutting at least 24 squares (per postcard) to 1.5" square each, so they'll wind up 1" x 1" after stitching with quarter-inch seam allowances.

I used batiks, but solids work, too. You don't have to use 24 different fabrics - it's okay to repeat colors. If you're using blotchy batiks, cutting squares from different areas will create different effects. 

2. Assemble the fronts. I designed a whole bunch at the same time. I laid them out on the floor (lock out the cats and dogs!)
For the "dancing" theme, I focused on arranging the cards in a way that set colors clashing and clanging and moving around. 


Once you like each composition, stitch it together, with quarter-inch seam allowances. 

3. Pick a filling.  You can use quilt batting or even cardboard. I usually prefer stiff interfacing with fusible on both sides. Products like Peltex 72F, InnerFuse (in the picture), Fast-2-Fuse - plenty of choices. At the fabric store, some stiff interfacings are sold on bolts, and some are packaged in small quantities with the notions. 
After opening, and cutting:  
(The crease hasn't caused me any problems. Ironing seems to eliminate it.)

4. Cut interfacing -  4" x 6" per card.

5. Affix the front - Adhere the pieced 24-square front to one side of the interfacing. If the interfacing has fusible, iron it on. If your interfacing has fusible on both sides, place a teflon press sheet or parchment paper under the interfacing, to prevent the back from sticking to the ironing board. when you press the front. If there's no fusible on your center material, apply paper-backed fusible web to one side, or simply use a glue stick.

6. Leave the back of the interfacing blank, for now.

7. Embellish and stitch! The card below has raw-edge appliqués (two circles and a squiggle), plus a swatch of a ribbon ladder yarn (with ends bent and glued to the reverse side).  I machine quilted the elements on, and glued the yarn. Then I echo quilted around the shapes.

The next card is also embellished with appliques, same yarn, and machine quilting.
This one is hand- and machine-quilted: 
8. Design the writing side. After embellishment, pick a fabric (or cardstock) for the writing side. Fuse or glue it to the back. If you're going to write directly on the fabric, use a light color.

9. Print Out a Statement? Because I was making these cards for a large exchange, I wrote up a one-paragraph long artists' statement. Then I arranged the paragraphs (in a graphics program) so that it I could print them out onto sheets of white fabric sent through my printer on a freezer paper backing.
Printed that out, applied fusible to the back, cut it up, and adhered one statement to the lavender fabric on the back of my postcards.

My return address label is above it. (Here are directions if you've never printed on fabric before). You can also print the statements on paper and glue the paper to the back of the cards.

10. Finish the edges. I zigzagged all the way around the edges with a variegated thread. If I wanted it to be neater, I might have done a corded edging. (My corded edging tutorial is at the bottom of this post.)

 11. Sign and Send. I signed each, added personal notes. The most spectacular way to mail your cards is in a cellophane envelope. It's incredibly exciting for both the recipient, and the postal service employee.

On the other hand, it can cause the wrong sort of excitement at the post office if the clerk has never seen anything like this before. So if you're using cellophane envelopes, bring the cards to the post office not yet in envelopes.

First, they're probably going to drop your card through their little slot tool, to measure the width, and they'll charge more if it sticks.

At most post offices these days, the employee will tell you to put the stamps on the cards. Then they either will or will not cancel the stamp. (My post office employee didn't cancel my stamps, which made me very nervous. I was sure they'd all wind up back at my house! But they didn't!)  NOW you can put each stamped card in its cellophane envelope and mail them off.

If you add 3-D embellishments, that's going to make your visit to the post office even riskier. Consider sending your card in an opaque envelope if it has glued-on elements, or any 3-D elements.

Before bringing my cards to the post office, just for the fun of it,  I smushed them together for one last group photo, to see what they would have looked like if I'd made one quilt out of them: 

OMG. I loved it. This led to a moment of panic; a little devil appeared on my shoulder and said, "Keep all the postcards! Send everyone a note of apology! Tell them the dog ate them!" But I don't have a dog. So I resisted my selfish side, and shuffled off to the post office to disperse them to the four corners of the earth. Maybe one day I'll recreate it!

UPDATE: Shared on Nina Marie Sayre's Off the Wall Friday, a compendium of art quilters' latest projects! Enjoy them all at http://ninamariesayre.blogspot.com/ .