Showing posts with label Hanukah. Show all posts

Monday, November 20, 2023

Are Bellydancer Coins Appropriate for Chanukah? And Thank You Target!

Shameless self-promotion, as well as promotion of Target stores (no financial affiliation with the latter):

Chanukah looms! It starts the night of December 7! It just occurred to me that I must locate my quilted fiber art dreidels, but finding them may not be easy. So instead of starting the search, I procrastinated by looking for my PHOTOS of quilted dreidels, to see if I needed to take new shots. I came upon this very nice photo:

The photo was taken in 2018, for my pattern booklet "Quilted Treasure Dreidels". Upon close inspection, I realized the coins I'd used as props were bellydancer coins, featuring  curvaceous humans who don't appear to be wearing a tremendous amount of clothing.


Does this completely defeat the original intent of Chanukah?  Does Judaism have room for, or a history of, bellydancing? (My mom took a bellydancing class in the 1970s, when it was all the rage.) I'm thinking this might have pissed off the Maccabees. 

While pondering this issue, and if you don't have time to make Chanukah presents, consider a field trip to Target. (No financial affiliation). I was stunned and thrilled when we walked into Target/Alhambra (in the San Gabriel Valley of California, hardly a Jewish neighborhood) last week, and right in front of the door was a shelf of Chanukah stuff -- plus, there was another long shelf-full on the other end of the store, right behind the Christmas stuff! Thank you Target! I showed my gratitude by buying one of everything, including a crinkly fibrous stuffed dreidel on the bottom left of this picture, which is a cat toy! (Their wares included had a half-dozen cat and dog toys, it was hard deciding!)

If you might prefer to make your own soft dreidel, see more photos of my quilted dreidels at https://www.etsy.com/listing/652897119/quilted-treasure-dreidel-sewing-pattern. Hag sameach, happy holidays!

Sunday, December 1, 2019

Hanukah Gift Ideas: Paper and Fabric Judaica to Make, Sell, or Fling

Is it a bird? Well, birds are involved....

Is it a plane? No, more like a Frisbee - if you fling it, it flies, but not well enough for a game of  Frisbee golf. Wait, I remember! It's one of the yarmulkes (little Jewish hats) I brought to last week's artisan fair at my nearest synagogue, Pasadena Jewish Temple and Center!

I rarely do fairs - it's nearly impossible for a fiber artist to charge enough for the hours we put in. Nobody wants to pay $60 for a potholder. But someone I adore asked me -  and here she is, Ellen Dinerman, my son's kindergarten teacher (two decades ago), and an accomplished artist who makes extraordinary sculptural jewelry (sold here. No financial affiliation!)

I hoped the event would be a good opportunity to downsize my stash of Judaica seeking forever homes. My table:

Closeup of the top matzoh cover:

Underneath were more matzoh covers. Some, like this one, can do double duty....

If you don't want to use it as a matzoh cover, you can stuff an 11" pillow form into the back...

(The fun fabric above, featuring Maneschewitz wine and other Passover props is sold at 1-800-dreidel.com. They also sell the trompe l'oeil matzoh fabric.) My pile also included challah (bread) covers and mats, like this one, stitched from kaleidoscopically pieced fabric....

....and miscellaneous fiber art, like this wall hanging (now in my Etsy shop.) The Hebrew letters spell "Chai" for "Life!"
 Yarmulke section:

I make them from whatever fabric is feeling spiritual to me - starting at 12 o'clock and moving clockwise in the photo above, there's Mighty Mouse and Hebrew alphabet hats; a Harry Potter Bukharan style kippah; Pikachu; a hat pieced made from necktie fabrics; chile pepper fabric,  and way in the back, chess fabric. Closer:
The perfect kippah for a bishop! For shoppers who look at my hats and say, "Ha! I could make those myself," I heartily agree, and point to strategically-placed copies of my yarmulke-making book (which I sell online in paperback and digital form.)
Ellen gave me a second table for a craft activity with the Sunday school kids.

The supplies are for making paper hats that can also do double-duty - turned over they make festive candy dishes, and if you fling them with a twist, they can fly much better than the fabric version - comparable to a decent paper airplane. Patterns for these hats are in my OTHER yarmulke-making book, "Yarmulke-gami: E-Z Paper Fold Jewish Art Hats."  
I brought a stack of hat patterns for kids to cut out and decorate, printed onto cardstock. 
I made the patterns in my graphics program.  The round hat folding pattern has the Temple's sisterhood logo in the middle. Underneath the hat pattern is a pyramid-folding pattern.
I made about 60 copies of this page. I also showed off a row of samples.
Closer: One of them is a sponge-painted hat, folded into what I call a "Simple Star."
Here's another sponge-painted hat, this one folded in my "Dimple Star" design. Can you see the difference? This star is rotated so it's points don't line up with the darts. 
This basic hat is made from an acrylic painting on a piece of cardstock. 
The next is napkin decoupage. 
Here's my 'Diamond Star' folding pattern, made from textured scrapbooking cardstock.
Below left is a hat made from a map, and on the right, one from a scientific paper. The latter is colored and folded into my "Chickens Over Mt. Sinai" design. (also looks like a hamantaschen.) I twirled a decorative rose from the same paper.
This page was from a wildlife charity catalog.
I channeled my inner third grader to make a sample for the day's project. (The sequins were a test of whether a temporary glue stick holds them well. It doesn't.) 
Along with glue sticks, I provided the kids with lots of multicolored paper, stickers, markers, crayons, and Chanukah paper with dreidels and stars. (No sequins.)
The most popular supply turned out to be these: 
And here's a terrific hat made by a 6th grader who used them well! 
Plus several kids made pyramid gift boxes from my folding pattern.  Here's one I made as a sample:  
Good for holding gelt. Or, they serve as handle-free dreidels - put a Hebrew letter on each side, then toss it in the air. Of course, this being a tetrahedron - aka a "triangular pyramid" - when it lands, you have to wonder - which letter wins?  Three of the four sides are up! Maybe the one facing down at the table? This particular pyramid was folded from a foil coffee bag, with stamped Hebrew letters glued to each side. (I LOVE polyhedra!)
And here's a pyramid made and decorated at the fair by an authentic 6th grader.
Of course, with the pyramid theme, they may fit in better for Passover. My original idea involved covering the outside with brick fabric, and putting a frog inside:
But back to the present(s). I gave each kid three chocolate kisses to insert before sealing the last fold.  I didn't think of bringing candy until the morning of the event - and then, the only kisses I could find at the drugstore were packaged for Christmas, in red and green as well as silver foil. So we all had a good laugh about that. I wished I'd thought this through earlier, in time to buy chocolate coins to put inside. 
Thank you, Ellen, for inviting me to this fun event! I downsized my Judaica stash a bit, and had a blast shmoozing with other artists, shoppers, and creative kids!

P.S. I just saw the following fabulous wrapping paper at my local independent bookstore - Vromans in Pasadena. Wouldn't this make great paper kippot? 


Thursday, November 22, 2018

Happy Thanksgiving! Start Making Paper Dreidels!

Happy Thanksgiving! I don't want to panic you, but it's time to prepare for Hanukkah (starts December 2)! A couple of weeks ago I showed off some freemotion-quilted fabric dreidels. They don't spin well, but they do make good decor, as well as shelter for chocolate coins, dinosaurs....
...and even smaller dreidels...
Now Hanukah looms even closer, making this the perfect project for avoiding stores on Black Friday. If you don't have time to quilt, you can use the same approach to make paper or cardstock dreidels, which spin much better than the button-stem kind if you use pencils with flat sides: 
Above, left to right, they're made out of: an old stationary folder, a box of souvenir Singaporean dried fruit, a birthday card, and a Cheerios box. Closer: 


Alas, with the Cheerios box, I made the unfortunate mistake during construction of ignoring the  Pampers ad on one side....
...Because who doesn't want to think about poopy diapers while spinning dreidels? (or while eating cereal? Cheerios executives: Are you really that desperate?)

Moving from the ridiculous to the sublime...the nicer the paper you use, the better the dreidels. For the next two, I used the 2006-2007 Women of Reform Judaism calendar, with each month a gorgeous cutout collage by Atlanta Artist Flora Rosefsky. 

When I wrote to Flora to ask for permission to show them, she filled me in on the background. The collage series was initiated in 2001.
"...I still enjoy creating new collage work, using the same 'drawing with scissors' method, but now sometimes add mixed materials like fabric, trim, and ephemera (found paper)."
 Find more of her intoxicating work at www.FloraRosefsky.com.  

Of course, you can create your own collage, and then turn that into a dreidel. To make cardstock or paper dreidels, create a pattern like the one below (basically five squares, and four equilateral triangles). Score all the interior lines, cut it out, then fold and tape the outside. Or cut extra tabs along the sides of the bottom triangles, and at one end of the squares. Then you can use a glue stick or hot glue the tabs, from the inside, to close it up. (The right and lower tabs are not necessary for fiber dreidels.)
More information about artsy dreidel construction is in my recent blog post, here. And a word from our sponsor - if you don't feel like drafting it yourself, my instant download booklet for stitching fiber art dreidels- including patterns and Hebrew letters in three sizes, and step-by-step instructions - is available for $3.00 from my Etsy shop, here

Wishing you a healthy, happy Thanksgiving, Hanukkah, and everything else you celebrate!  

Sunday, October 21, 2018

I made some little dreidels. I made them out of scraps. They spin like...

(Sung to the tune of "I had a little dreidel")

I made some quilted dreidels...
...I made them out of scraps (batik scraps, stiff interfacing scraps, gold lamé, etc.)...
...And when I tried to spin them....they spun like cr#p. [End song.] My husband, a physicist, explained that because the buttons and beads are not glued together, they dissipate the energy from the spin, not to mention angular momentum, a phrase I always wanted to type. Oh well. On the brighter side of physics, the lids open and shut...

...one of them has a bobbin at its base....
 ...and inside, you can store small toys...

...chocolate coins and/or wrappers from chocolate coins of yore...
...even (bellydancer) coins... 

....or stuff another dreidel inside!

My little dreidels really fit inside the big ones (because the stems are flexible and dissipate energy) - they're matroyshka dreidels!

I had so much fun making them, that I sat down and wrote up a tutorial, much of which is free below. (Commercial interlude: For people who prefer a clear printout, an inexpensive 13-page e-pattern is now in my etsy shop.)

The Hebrew letters on a dreidel are a nun,

..gimel
hei

...and shin

...Representing the sentence "nes gadol heya sham," "a great miracle happened there." Wikipedia's dreidel basics are here.

Making these didn't take long - I made two in maybe three hours, no shopping required. Below is the plan (developed in hindsight. When I set out, I had no plan).


These are the measurements for the larger dreidel. You can go bigger or smaller. (I made a 1" version, and it was very tricky to sew, but doable. Watch your fingers!)

You'll need small amounts of stiff fusible interfacing (product names include Pellon F2F, Peltex, Peltex2, or Fast2Fuse).

1. Decorate a piece of interfacing that's big enough to later subcut the pieces shown in the diagram above. A minimum to decorate would be about 8" x 10". Or, scrounge up smaller pieces from which you can cut the individual pieces above.

I started out with a bunch of leftover 4" x 6" fiber art postcards backed with fusible interfacing. I fused a streaky batik on as background, then zig-zag stitched fabric strips and ladder yarn on top. 


Then I scribbled over them variegated thread....
and/or gold thread....
[What I should have done, but didn't in my first dreidel: Line the other side. If you want the boxes lined, this is the time to fuse or glue-stick a nice piece of fabric on the reverse side, and cut it even with the edges of the top.]

2.  Cut the individual shapes from the embellished interfacing:  
  • 5 squares that are 2.25" on each side; 
  • 1 small rectangle for the tab that's 2.25" long by about 3/4" high; and
  • Four equilateral triangles (or near-equilateral triangles) that are 2.25" across (= same width as the squares), x about 2" high (height needn't be precise - isosceles triangles work too.)

3. Sew the squares to the triangles. I recommend a satin stitch, though in this case I did a loose zigzag. The satin stitch is stronger. 
4. Do the lettering. Draw out the Hebrew letters - if you have a dreidel around the house,  you can copy those letters, or mine, or those on Wikipedia here. (My pattern has some nice letters) If you choose lamé for the letters, fuse light interfacing to its back, setting iron at the lowest possible temperature for fusing, or you will melt it.  Or use a less fragile fabric, and add fusible web to the back. Cut out the Hebrew letters  Fuse or gluestick one to each square. (You could also paint them in!)

5. Stitch around the letter. I used gold metallic thread:
6. Join the four panels, including the seams that will bring the shape into the third dimension. If you've machine-sewn bowls before, you know this is tricky - go slowly. (You can also hand-sew.)

Line up the panels, tips pointing away from you, next to your machine, in the correct order (follow the diagram above, but in reverse, since they're upside down). Set a wide satin stitch and starting from the bottom tip, stitch forward. This is simple...until you get to the point where the two squares diverge.
7. Gently bring the two corners closest to you a bit towards each other, and take ONE more zigzag stitch, just catching the edges with your needle. Bring the corners closer, and take another stitch, catching both sides. By the second or third stitch, the corners will demand to snap together! Encourage this, pressing the two square sides tightly together. Stitch forward, slowly and carefully (Do a couple tiny straight stitches at the end). You'll have this: 
8. Next, sew the two pairs together thusly: 

9. Cut out the D-shaped tab from extra interfacing - as shown in the diagram. it has the two bottom corners rounded off. Satin stitch it one side of your last square, the lid. The tab really helps hold the lid in place, and the dreidel in shape.

10. Then satin stitch the opposite side of the lid, to the top of one of the panels. Before you attach it, you might want to quilt a spiral into it, like I did! (Pretend the handle isn't there yet.)

11. Satin stitch all the way around all the remaining unattached raw edges, including the lid and tab. (Pretend the tab is on top of the lid in the photo below. Do what I say, not what I did!)
12. The last crucial seam is shown below, running from the dreidel's lowest point, up to the beginning of the lid. You must sew this seam by hand.

For my large dreidel, I did a hand whipstich from the outside with thick variegated thread - you can see some of it on the right edge, below, where the thread is white. On such a scribbly messy dreidel it's not a big deal.

For the smaller dreidel, I hand stitched the last seam with a pink Bottom Line thread, which is strong and thin, so the stitches hardly stand out (on the right, below).
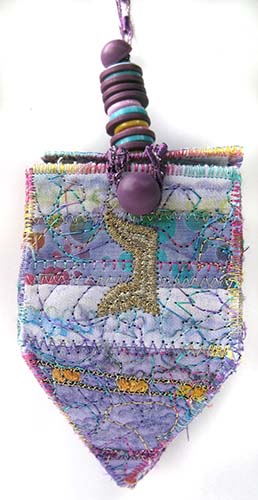
13. A stack of buttons makes the handle. I used 6-strand embroidery thread and a needle longer than the button stack. I sewed up and down through the button holes, a couple of times to get it firm and (relatively) straight.
I also added a button in the front, to use with an optional loop that goes under the handle. 

They work not only as gift boxes, but as hanging decor. I do feel bad that they don't spin well. I couldn't think of a secure way to install a stiff rod in the lid - if you have ideas, please do share!
If you attach a bangle bracelet, they can double as a wristlet. The one below is not large enough to hold a cell phone, but certainly lots of chocolate coins! (It's posing on my backyard rhododendron;  but you could also hang it on a Christmas tree!)
If you can make them from the tutorial above, have at it! I'd love to see pictures. If you'd like more guidance, the e-pattern includes illustrated step-by-step directions, the pattern in three sizes, a one-piece version that's simpler than the one above, a nice Hebrew font for medium and large size dreidels, and embroidery letters for the small dreidel. Find it here. Email me with any questions!