Tuesday, December 26, 2023

Never Too Young to Learn About Black Holes. Or to Make Them.

I've been playing with wrapping quilt fabric around batting scraps, and weaving them into baskets. Just in time for the holidays, I made a couple of black holes this way, including one for this guy:


I was inspired by a talk at Cal Tech last month by Kip Thorne, who won a Nobel Prize in 2017 for creating LIGO, the project that detected gravitational waves emanating from colliding black holes. (My DH works on this project.) 

Instead of resting on his laurels, Kip has been having a blast producing black hole art, including movies (Interstellar, and soon, a sequel); and a massive poetry/art book with fine artist Lia Halloran. It's titled "The Warped Side of Our Universe: An Odyssey Through Black Holes, Wormholes, Time Travel, and Gravitational Waves." Halloran illustrates the elusive concepts with elegant brush paintings, and paints her wife into many of the phenomena. (You can watch the talk I attended here.)

This gave me the courage to go for it, using black-and-gold fabrics from my stash, wrapped around 1" batting scraps. Here's my grandbaby's, looking straight in: 

Here's the entire playset. 


The space entities are fused and zig-zagged to black felt. The green thing is a former parachutist, now an exceptionally brave, strong, dumb, lucky, and immortal astronaut. He dives into the black hole:


...then emerges from the other end...
...Perfectly flat. 

OK, this isn't scrupulous science. For one thing, DH informs me, the black hole would not flatten him (like Flat Stanley's bookcase); rather, it would spaghettify him. 

Other play options include sucking in the Earth, a satellite/death star, Saturn, and lots of other stuff.


I was eagerly anticipating the baby's reaction , and he didn't disappoint! Here, DH provides the scientific narration. (A truncated cuboctahedron matzoh ball makes a cameo appearance.)


Plus, I feel strongly that this same playset could be used to illustrate the miracle of uterine birth. 

Here's the second black hole I made. This one's a little bigger; it isn't open at the narrow end. It doubles as a party purse. I put buttons and a fabric closure around the rim. It's got a handy strap. Unfortunately, at 7" across and 10" long, it's not big enough to hold my cellphone, so it's essentially useless.


Closer: 
And here it is with the lid on: 
Interested in making your own? See my first post about my basket-making technique here,  and the video version on youtube, here.

Monday, November 20, 2023

Are Bellydancer Coins Appropriate for Chanukah? And Thank You Target!

Shameless self-promotion, as well as promotion of Target stores (no financial affiliation with the latter):

Chanukah looms! It starts the night of December 7! It just occurred to me that I must locate my quilted fiber art dreidels, but finding them may not be easy. So instead of starting the search, I procrastinated by looking for my PHOTOS of quilted dreidels, to see if I needed to take new shots. I came upon this very nice photo:

The photo was taken in 2018, for my pattern booklet "Quilted Treasure Dreidels". Upon close inspection, I realized the coins I'd used as props were bellydancer coins, featuring  curvaceous humans who don't appear to be wearing a tremendous amount of clothing.


Does this completely defeat the original intent of Chanukah?  Does Judaism have room for, or a history of, bellydancing? (My mom took a bellydancing class in the 1970s, when it was all the rage.) I'm thinking this might have pissed off the Maccabees. 

While pondering this issue, and if you don't have time to make Chanukah presents, consider a field trip to Target. (No financial affiliation). I was stunned and thrilled when we walked into Target/Alhambra (in the San Gabriel Valley of California, hardly a Jewish neighborhood) last week, and right in front of the door was a shelf of Chanukah stuff -- plus, there was another long shelf-full on the other end of the store, right behind the Christmas stuff! Thank you Target! I showed my gratitude by buying one of everything, including a crinkly fibrous stuffed dreidel on the bottom left of this picture, which is a cat toy! (Their wares included had a half-dozen cat and dog toys, it was hard deciding!)

If you might prefer to make your own soft dreidel, see more photos of my quilted dreidels at https://www.etsy.com/listing/652897119/quilted-treasure-dreidel-sewing-pattern. Hag sameach, happy holidays!

Monday, October 2, 2023

Coiled Scrap Baskets and Mats: Now, Seriously, I Can Never Throw Away Even the Skinniest Batting Strips

For quite a while now, I've been thinking about coiling things. I've seen the 'jelly roll rug' tutorials, where you use 2.5" wide strips from a precut jelly roll, plus 2.5" batting strips (which can be purchased precut to save time--but the idea of me buying precuts when I have so much scrap batting leftover from quilts struck me as nuts). 

I've also seen the tutorials where you wrap fabric strips around clothesline, then stitch down the center and coil into a mat or basket with a machine zigzag. So I thought, why can't we combine these ideas, but use only narrow scraps? 

I can't possibly be the only person who's done this, so now I've done it too. For the past week (after finishing up a major quilt), here's what I've been making. I am almost certainly reinventing the wheel here and if you have a favorite method , tutorial, or pattern for doing this, please let me know so I can send people there!

And speaking of sending, for the details of how I did this, I just put a 30-minute instructional video up on Youtube. It's completely free because I have so little experience with this and need more input! Find it at https://youtu.be/jL_8cALEs68.

As the video explains, you will need a couple of feet of batting into 1.25" strips. Unlike the jelly roll method, you don't have to sew them all together in advance.

Second, cut fabric into 1" strips. You can go narrower if you're using a selvage edge (which doesn't have to be turned under). Examples below include: cotton batik (on bottom); a cotton print; a selvage that is white; a selvage that is the same pattern as the rest of the fabric (the red and white dots); a silk necktie (brown); and cotton scraps sewn together into a strip.

The first thing I made was this highly wonky bowl. All I did was wrap fabric around batting, but I didn't do any quilting on the strips as you'll see in the next projects. That makes it messier and lumpier than my later projects, where I sewed down the center of each strip before winding. 

Side view.

The household royalty enjoyed plopping Herself upon it. Her Majesty preferred it when it was new; a few days later she yawns at it and considers other options. 

The next one was better. It's made from mostly silk neckties (there's a blue striped polyester number from Sears in there, and the last/purple-and-black fabric is silk yardage.)  
 A closer look: I sewed down the center of each cord with silver metallic thread, and zigzagged it together with a variegated blue-and-white rayon thread. Both those choices classed it up!
The next one was made from silk scraps, including a couple of dupionis (blues, orange, magenta and deep gold). The outer fabric was silk pants! Instead of doing straight stitching on the cord, I did a wavy multi step zigzag. Don't get too fancy with the stitching on this cord, or you'll break needles, as I did when I tried to do a decorative satin stitch on these cords. Don't make my mistake! The wavy stitch and the zigzags are metallic thread.
Here's my other favorite, so far -- a combination of batik strips (wrapped around the batting), plus 1" denim strips, cut on the bias from old jeans, and straight stitched. NOTE: I tried wrapping denim around batting but it was too thick and therefore dangerous to put in my machine -- so please skip the batting for the denim area. I used 1" denim strips folded in thirds, and/or jeans seams, with raw edges on both sides. There is NO batting in the denim areas, but because it's folded, it's a similar thickness to the batik areas that do have denim.
Closer. Again, there's metallic thread down the centers, and the blue-and-white rayon thread zigzagging the cords together.


The next bowl was made from some large-scale Cotton & Steel linen-like heavy cotton prints. 

Here's one of the fabrics that went into it:

And here it is with the Kaffe stripe yardage that made up the final rounds. 
It's so interesting to see how prints turn out when they're wrapped and arranged in concentric circles! 

By now I was ready to make the youtube video https://youtu.be/jL_8cALEs68, in which I make this. Not a masterpiece, it's a small coaster, but it shows how this method works.

I am the first to admit that it take a lot of chutzpah to teach a technique I've only been using for about 72 hours, but I am eager to see and hear about projects you've made using an approach like this. 

If you try it I suggest you use a denim or universal needle; don't try to do dense stitching in the cords (that's what broke my universal needles); and don't try to wrap denim around batting. Email me at cathy.perlmutter@tmail.com, and/or if you just want updates, sign up for my newsletter, at  at http://eepurl.com/idjomb

Friday, September 15, 2023

First, Manhattan, Now the World, in Scrappy Quilts

Did you ever want to make a city quilt, but weren't sure where to start (pun intended)? I once trod in your shoes — but now I can help! 

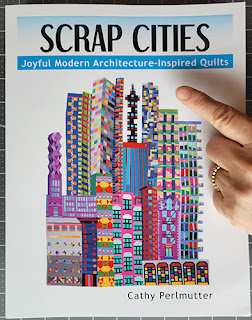
Hot off the press, five years in the making, here's my new 96-page book, 'Scrap Cities: Joyful Modern Architecture-Inspired Quilts.' 

Cities are fascinating in a billion ways, and a quilter could spend a lifetime making city-themed quilts — which I feel like I just did (In fact it's only been about five years).

'Quilted New York,' the book before this one, took me a year bent over a smoldering keyboard, plus before that, happily shlepping around Manhattan, photographing every building (sidewalk, wall, bus, etc.) that struck my fancy. I had a blast, but drove my family, computer and left knee, nuts. What I got from it: meniscus surgery ($ thousands), a new computer drive ($ hundreds), and the following book: 

'Quilted New York, Celebrate the City with Fabric and Color,' was published  in December 2022. It's a love letter (with an occasional 'what the heck?' but a stronger word) to the city where I was born, and which gave my parents a shot at the American dream. 

While working on it, I collected material that applies to ANY city — and I sewed quilted cityscapes of Chicago, Los Angeles, and multiple fantasy locations. (Here's Chicago, for example.)

So, naturally, after finishing the New York book, I wondered, could I turn my mountain of leftover ideas, photos and projects into an any-city book? 

The task seemed infinite...I plodded...I experimented...the days rolled by (water flowing underground)...until a few weeks ago, when I realized it might be done. (The last building I added was this:

...based on this photo my friend Gail Solomon just took while travelling in Holland.)

What the two books have in common: A method for pressing raw edges to the back during piecing, instead of afterwards. This makes fabric buildings strong; when you finish piecing them, their trickiest edges are already neatly turned, you can easily and quickly appliqué them anywhere you want -- especially overlapping OTHER buildings, to replicate the magnificent clutter of big cities.

What's the difference between the two books?

'Scrap Cities' has instructions for 25+ buildings. Some are inspired by real buildings; some are pure fantasy. 'Quilted New York' has instructions for 11 structures, all inspired by real NYC buildings. 

-  There are NO quilt patterns in 'Scrap Cities,' although there are many examples and suggestions. You decide which buildings and how many to make. The book helps you brainstorm ideas and arrangements, to create anything from a 1-building pillow to a 3-building wallhanging, to a 12+ buildings bed quilt. 'Quilted New York' has two different quilt patterns for quilts about 60" square or larger.
 
- 'Quilted New York' encourages you to improvise, within limits. 'Scrap Cities' goes much further. It shows you how to use the book's patterns and ideas as a launching point to design and create your own buildings, whether inspired by a real one, pure fantasy, or a hybrid! There are sections on windows, roofs, stairs; curved buildings, triangle-based buildings, etc. This beach house-themed quilt is in the "stairs" section:
'Scrap Cities' is unique in that it offers a variety of fun ways to create artist's perspective, using strategic cutting of geometric fabrics; and/or value choices; or literally adding a side-view onto a forward-facing building, to give it a  3-D 'wow' factor.

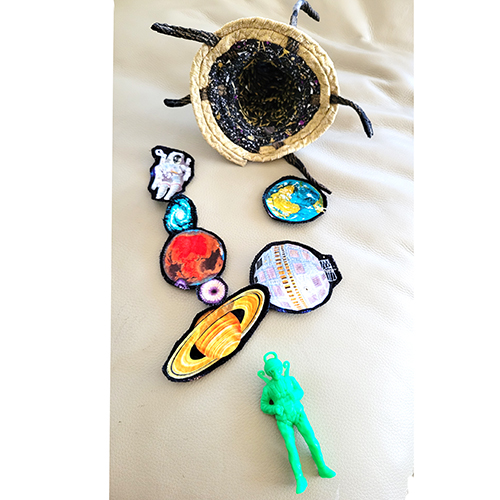
'Scrap Cities' also offers ways to incorporate fun novelty fabrics, for a baby or child's quilt, and/or for an eco-cities quilt; plant flowers, vegetables, chickens, your cat, etc., on balconies and rooftops! Below is a lush rooftop garden of Kaffe Fassett kale, serenaded by a violin-playing angel. It grows on a pieced zigzag plaid building that's a takeoff from real buildings shown in the book. The treehouse trunk is made with fusible raw edge applique, but the cabins are all turned-edge, and appear dimensional thanks to a simplified attic windows trick explained in 'Scrap Cities.' 

(On the lower left, riding the cable car are...The Beatles!) 
“Modern” in 'Scrap Cities' subtitle ('Joyful Modern Architecture-Inspired Quilts') has two meanings—the modern quilt movement, with strong graphics and simplification; and modern/contemporary architecture. 'Scrap Cities' projects take inspiration not only from what's formally called "modern" architecture, but also from elaborate Art Deco structures, turgid grey Brutalism, "postmodern" whimsy, and more! In the last category, here's Frank Gehry's 8 Spruce Street Tower in lower Manhattan, with  inexplicable yet charming stainless steel ripples.

And here's my version, made with an improv curves technique. (This could also serve as a river.)

Where to learn more about either of these books?
'Scrap Cities' in digital (PDF) form is in my etsy shop, here. Find the paperback in brick-and-mortar and online quilt and book shops, or in my etsy shop, here

'Quilted New York', (84 pages), is sold in paperback and digital form. In digital (PDF)  it's here. In paperback, buy it from quilt or bookstores, or directly from my etsy shop here 

Interested in both? A digital bundle to purchase both, with $10 off the total price, is here

See more of my cityscape quilts on my website, here. And everything else in my etsy shop is at https://cathypstudio.etsy.com. 

Now that 'Scrap Cities' is finished, is another cityscape book in the making? I'm torn. I still have a few leftover patterns for Los Angeles buildings....

Which cities would you like to make in fabric?


Wednesday, July 5, 2023

The Eggs Came First: Rubber Stamping a Quilted Chicken "Thank You"

A weird thing I've discovered living just ten miles from downtown LA is that loads of people keep backyard chickens! If you drive through some neighborhoods early in the morning, you can hear the cock-a-doodle doo's! 

The urban farmers include one of my DH's colleagues; he and his wife regularly gift us with a dozen beautiful eggs, in assorted sizes and colors. I truly never knew a plain old unseasoned egg could taste so good. 

This is my thank you gift to them. The message is one they included in a note that came with one of their kind deliveries. They adapted it from milk commercials. It reads, "Happy Chickens Lay Great Eggs." 

I rubber stamped the words onto vintage bias ribbon. Rubber stamping is incredibly easy to mess up, so it's a good idea to stamp out duplicates, just in case. Here's how they looked right after stamping. 
 
Both versions came out okay, except "chickens" in the third strip down has a shadowed "I", so I didn't use that one. To prevent ravelling at the ribbon ends, I dripped a bit of 'Fray Check' on each. Once it dried, I hand-sewed them in position with thin thread and a running stitch.
I also did a little hand-quilting with perle cotton, wending my way through the raw eggs (above) and the fried ones (below).

The chickadee on the right is from a vintage border fabric that I suspect is from the 1960s or 70s.

I used the ink pad below, "Crafter's Acid-Free Pigment Option Pad," by Color Box. In theory, after heat setting, it should be permanent. 
I've had the pad for  years; and I keep it stored in a sealed plastic bag - so most of the colors still stamp out quite well. (Can you buy the same thing today? I searched but couldn't find this particular configuration online - but I did find very similar pigment stamp pads from Color Box, one of them with the eight colors arranged like a flower.)

For the letters, I used these tiny, quarter-inch, adorable stamps. 
(I accidentally stamped the wrong end of the "E" into the pad, and it may never recover.) The brand is Studio G, and they still make these! 

The green chicken is from a fabulous African fabric gifted to me by my friend Alexandria (Thank you!) The back of the piece shows what it looked like before I surrounded it with eggs! 
So which came first, the chicken or the eggs? In life, the eggs came to us first, but in this wallhanging, I started with the chicken in the center, so I'd say the question is still up in the air!