Showing posts with label dishes. Show all posts

Sunday, January 31, 2016

It's a Wallhanging! It's a Dish! It's Color Therapy!

I made quite a few of these jewel box wallhangings last year. Composing and stitching the little squares is pure, joyous, non-toxic color therapy.
Each square takes on a personality of its own.
But I have to say I was getting bored of making them into wallhangings. How about doing something different? How about making them like Transformers, so that they CAN be wallhangings, but they can also be, say, DISHES! That, to me, is profoundly exciting. (My life is trés dull).  So on my most recent hostess gift, I stitched pairs of snaps on either side. 
Snap shut one pair, and you get an assymetrical dish: 
Snap both pairs shut, and you wind up with this partially symmetrical dish: 
Or, your giftee can leave it flat as a trivet/table runner, or hang it on the wall flat, or, come to think of it, hang it partially or fully snapped! 
Don't forget a hanging sleeve on the back, behind an non-snapped edge. 
Interested in making jewel box therapy? Here are three posts to how incredibly therapeutic these are to make:  (123

Sunday, August 16, 2015

Woven Quilted Dishes

Sometimes you just need to weave. I made a bunch of woven batik wallhangings a few months ago (Basic technique here). 

More recently, while rummaging through my silk stash, I found an assortment of cotton/nylon blend fat quarters, in gorgeous colors, with a hand-dyed look and a silken sheen. I cut strips. and wove them on top of a piece of muslin backed with batting. The resulting strip measured about 9" x 18"
I zigzagged over all the raw edges with holographic thread: 
Cut the weaving into two pieces, each about 9"x 9". 
On the first piece, I freemotioned spiral circles with holographic thread, and added a binding. 
 No, I don't know why my work always comes out wonky. The back:
Then I started playing. I stood it up...
...pinched the corners,,,
....flipped it to the reverse....
...Caught opposite corners with a button...

'
...Pinched the midline and folded into a bowl....
...underside of the bowl..
...reversed it...
I'm still deciding! 
Here's the saga of piece 2. After cutting the long weaving into two, it looked like this: 
I covered it with a layer of medium blue irridescent tulle. It grayed out the colors, but created a nice consistency.
Next, an angular stipple with gold metallic thread over the tulle...
...laid floral wire along each edge, and overcast with variegated thread: 
...bent it like Beckham (whatever that means)...
...Bent it a little differently, with the four corners in the air. I really like it! 

It's a sort of dish! I might add tassles or solo earrings to the corners. It can hold, um, my daughter's guitar picks, Jelly Belly's, spare change, and other dry substances. like acorns, if we had any around here.

Finally, piece 3. It started as a small weaving on muslin and batting. I used several very narrow strips: 
Unlike the first two pieces, I did not stitch over the strips' raw edges. I tested sparkly gold tulle on top: 
Perfect gift for Hansel and Gretel - everywhere they take it, the glitter leaves a trail. I hastily returned the sheddy tulle to its airtight pod, before it could infect relatives and medical devices, then sloooowly freemotion stippled without any tulle: 
(Slowly because, if you move fast and there's no tulle on top, your presser foot will catch under raw edges.) Trimmed it square...
...pinched the side centers...
Tried only two midline pinches - an interesting asymetrical dish: 
The edges are also overcast with variegated thread, but not wired. Tacking stitches hold everything in place (I took out the pins).
 Finished with buttons:
 Here's the bottom.
I lined them all up for a group portrait, and realized that I have an art installation here!? Ahem. It makes a statement about the joys of shrivelling. Growing shorter, grayer and more wrinkly is good as long as you keep vintage buttons and shiny fabrics front and center. Also, tulle does wonders for the complexion.
More fabric strip weaving at 123). 

Tuesday, August 11, 2015

Scrap Adventures Hit It With Everything You've Got

Last week, I turned a silk ear into a sow's purse, in the form of a squarish silk scrap dupioni piece that turned into a barely tolerable bowl
At about the same time I created a long strip in a similar way - laying silk scraps on muslin, then freemotion stippling on top.  Like the bowl, the initial results didn't impress me.
But then I happened to go through my yarn stash, searching for a take-along crochet project for our Hawaii vacation. I came across a bag of yarn scraps, including lots of metallics and tinsel and embroidery thread and what-not.  I started peeling it apart and strewing mini-clots with abandon:
Next, from my sheer stash, I dug out an old garlic bag (the lavender netting), and various strips of tulle - sparkly blue, gold with glitter, off white, etc, I distributed them on top. 
The more I buried it, the more I liked it: 
You can't just start stitch over this. The presser foot will catch under every thread.  If I owned a felting machine, it could have just pounded the layers together.  Fortunately, there's a cheap and effective alternative: Cover the chaos with water-soluble stabilizer (I use Solvy)...
...Then freemotion stitch on top with a decorative thread....
...Once the stitching is done, soak it to remove the Solvy. Since I didn't stitch too tightly, I decided to just tear the Solvy away.
By the time I was done, I didn't just like it  - by gosh, I loved it! 
The back was a non-colorful mess (I ran down random bobbins), but I had to do one more thing before covering my tracks. I crossed two 18" pieces of floral wire on the back and hand basted them in place. They fit perfectly, from corner to corner. 
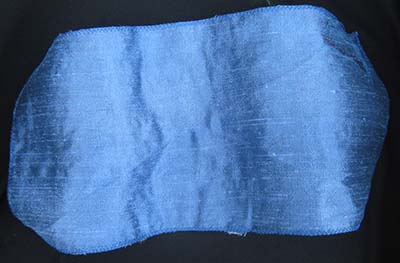
When we returned from Hawaii, I fused a blue dupioni silk to the back side: 
And I bent....
...and bent...
It felt like an oceanic seascape. Iridescent algae, tropical fish, and seagull shadows? Plastic bags, water bottles, lost jewelry? I tossed a broken rhinestone necklace on top. 
That looked poignant, and made me think of the Titanic. It also reminded me of the expensive prescription glasses I'd just mysteriously lost on a Hawaiian beach, possibly abducted by the local chickens or dolphins (Somewhere off Kauai there's a fortunate farsighted dolphin wearing Transitions (r) progressives). Going with the lost valuables theme,  I tossed on a few vintage metallic buttons. 
...and tested different bends: 
The more I bent it, the more I realized I had something else stuck in the back of my head. It finally came to me - in Hawaii, we not only experienced multiple H2O waves, but also glass ocean waves. I saw these glass sculptures in several galleries, first in Kela's Gallery, a fantastic glass shop just up the street from Vickie's Fabric in Kapaa (described in my blog post two weeks ago). Here's one from  Kela's. (Google 'glass ocean wave sculpture' and you'll see many variations by many different artists.)
Eureka! My piece wanted to be like that. I curled under one end and found a netted produce bag to pin on for the foam.... 

That's a definite maybe! I'm also going to experiment with lace. When finished, it can serve as an elaborate gigantic coaster: or a nightstand piece to park my replacement Costco eyeglasses (insurance isn't paying); or as a coffee table conversation piece.

Or not. There are other choices as well. If I hadn't put in wire,  and folded two edges to the middle,  I could have a  hypothetical cocktail purse:
Hypothetical, because I am so rarely invited to cocktails (Pause for pity party ). Or, I could roll it and set it sideways and make a base, as a vase/basket
Or, I could cut it apart to make a more structured vessel.  A pillbox hat? A doormat? Speculation welcomed!