
Showing posts with label Framing. Show all posts

Sunday, March 18, 2018

Teeny Quilts: Ancient Aliens Ate My Necktie Scraps

Everybody needs one! It's a 3" collage, mounted on wood, ready to hang. Each tells a different story. This first one is titled "Alien Reveals Key to Universe: Earth Mushroom!"  
It's an ideal gift for people who watch too much "Ancient Aliens" on the confusingly-named History Channel. The piece is mounted with double-sided carpet tape (but consider something stronger*) on a craft store wooden square that I'd painted black. On the reverse side, there's a wire loop for hanging, bent forward, and held on with plenty of glue and black felt. 
(Here's how the wire looked before gluing. I made little swirls to maximize the surface area:)

Side: 
But wait, there's more! "Flight Over Mt. Fuji, with Daisies" includes a blue volcano, a mother-of-pearl moon, and a dove charm smack in the middle (hard to see). Not to mention the gravity-defying giraffes marching heavenward in the upper right hand corner (I blame ancient aliens.) 
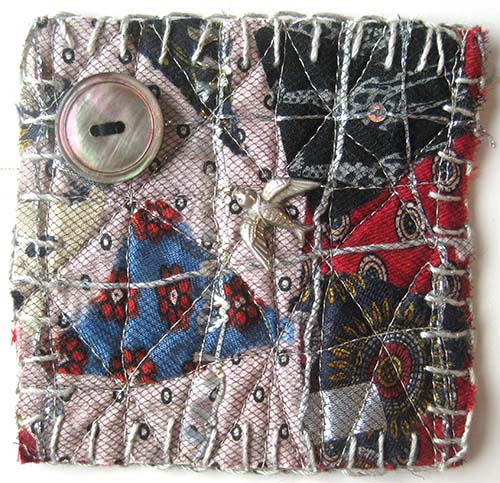
And finally, "The Cat Demands an Allowance"
Can you see the cat charm in the middle? I wish these pieces had more contrast. Next time I'll try using neckties with a more consistent, darker value, so the embellishments pop more. (By the way, the artistic keys came from Kay Mackenzie, the queen of applique - thank you, Kay!)

This all started a couple of weeks ago, when I made some heart-shaped silk scrap valentine brooches by overlaying dupioni silk scraps on black felt, placing tulle on top, freemotion quilting over the whole thing, then cutting out shapes. (Detailed directions in the last post). 

This time, instead of dupioni, I chopped up old neckties. First, I fused larger pieces down to a piece of black felt. 
Then I cut smaller, triangular pieces and strewed them about. A temporary glue stick held them in place. Next I laid a gridwork of silver and white yarn and crochet cord (inspired by Fran Harkes' wonderful brooch tutorial here.)
I smoothed a piece of dark navy tulle on top - hard to detect, but you can see it along the right edge.  Pinned the cording intersections to hold them in place.
 I straight-line quilted everything in a grid, diagonally and vertically through all the rectangles created by the cords.
 Back:
 Cut the piece edge into a large rectangle.
I sub-cut several 3" squares (to match the wood pieces that I had lying around the house). Blanket stitched around the edges.
And embellished like crazy. Meanwhile, outside, I painted the wooden shapes, front and back. 
I couldn't bear to throw away even a small scrap of my constructed fabric. So I made these two pins from some of the leftovers. 
They're a scant 2" across, cut to fit on a wooden oval (although I ended up not putting them on the wood backing. Instead, I sewed a safety pin to the back to make a brooch! 

 Too much fun! Again, my initial tutorial about how to do it is here.


(*One of my giftees informed me in the comments below that the carpet tape didn't hold. In that case, I'd recommend hot glue from a glue gun. Other suggestions welcomed!)


Sunday, February 1, 2015

Attaching Stuff to Quilts, and Vice Versa

Do you put unusual stuff on your quilts? I've been embellishing in earnest lately. A few weeks ago, I wrote about stripping this 8" x 8" quilt from scraps. The key and the hawk charm came with holes, making stitching easy. The yellow fish, from a vintage necklace, had a broken hole, so I glued a brooch finding to his back (he can be unpinned from the quilt and worn, a bonus!)
I wanted to put two polished rocks, a piece of beach glass, and a tiny shell to the lower pebble stripe.
How to attach rocks, shells, and beach glass? I'm not good with a drill (it's an aspiration, tips welcomed). So I decided to glue 'eye pins' - lengths of wire with a loop at one end, intended for jewelry making - to the back of the stones and the shell:
Wow, that looks like a tooth, but it's the shell. It's held on by Liquid Fusion Glue, which is strong and dries clear (but shiny, beware). (BTW, I do see now that I need a new cutting mat.)

I left the glue to dry for a day or so, and then used a large safety pin to put holes in the quilt where I wanted the rocks and shell. Cut the non-looped end of the wire to about 2", stuck it through the holes to the back, then, on the back side, with a wire pliers or by hand, swirled the wire around in a circle and flattened.

Here's how the back looked:
Not pretty, but don't worry, because I then stitched the 8" x 8" quilt to the center of a 14" x 14" hemmed piece of coordinating fabric, and wrapped it to the back of a stretched canvas. 
I think I'm going to take out the thumbtacks and use a staple gun instead. 
How do you attach stuff like rocks to quilts? Or quilts to stuff? 

Sunday, September 14, 2014

Increase Your Quilts' Self-Esteem With Stretched Canvas

In our last installment, I performed the following 12-step highly-effective in-home psychotherapy:

1-11. Cut out colorful batik squares, rectangles, and strips, and stack them on top of each other. Use a few dots from a school glue stitck to affix. (For a 'modern quilt,' use solids instead of batiks, and a newer glue stick.)

12. Zig-zag around all the edges.

That's pretty much it. Oh, you should quilt it. Embellishment is then an option. I decided to go for it:

Old metal stag button:
Glass "evil eye" protection bead.....

Pen spring, with seed beads threaded through....
This:  
 Tiny dice from a Vegas rosary, so there's already a hole, plus faux pearl:

The final size was 15" x 15" After embellishment, I fooled around with mounting it on a 12" x 12" stretched canvas that happened to be lying around the house....
...Something I've never done before. Several people wrote to me with excellent suggestions. I'm especially grateful to Bethany Garner, a Canadian quilter who makes stunning art quilts and a fantastic blog at http://www.bethanygarner.blogspot.ca/. She explained her technique, developed by another awesome art quilter, Cathy Breedyk Law, whose art quilt blog is here. The technique (too long to relate here) involves cutting squares out of the corners of the quilt, minus a seam allowance, then stitching the cut edges together (like boxing corners on a purse). Bethany answered many of my questions and I will definitely try it in the future. But I didn't want to cut into this particular quilt. 

So instead I very carefully tucked in the corners, like wrapping a gift. My thumbtacks weren't very strong, so I wound up using mostly a staple gun.
It's not perfect, but still, wow!  I can't stop looking at how slick this is! DH says I can add 400% to the price (but I'm not selling this one).

However, speaking of sales, I was so pleased with it - and I have a community gallery auction coming up - so I decided to make another one to sell:
Instead of zig-zag stitching around each fabric, like in the first piece, I quilted a grid over the whole thing with gold metallic thread. (Embellishment came after that). The cut edges remain raw. 

The backing canvas is 12" x 12" so I made this quilt the same size, to avoid wrapping.  I painted the stretched canvas to match (painting the front of the canvas was unnecessary, but I did it anyway). Here's the first coat:

After a couple of coats, I stitched the quilt onto the front through the back, with strong silamide beading thread: 

Here's the back:
(Ignore that paint thing on the lower left.) A curved needle didn't work at all. I wound up stitching through the back, through the quilt, under the outer edges of the appliqued squares on the front. I don't know how I would have done this if the edges of the squares had been stitched down. How does one sew so the stitches don't show from the front? 

I'm calling this piece "Earth, Wind, and Fire" because of the wild diversity of embellishments. There's a teardrop-shaped dichroic glass bead:
 A silver plated branch:
A lightly-toasted wooden button: 
Four lapis stone cubes: 
 A metal charm and a sequin:
An 'evil eye' glass bead: 
African rolled copper beads: 
 And another one of these.  
And more. Wouldn't this be a great project to do with kids?

Now I'm collecting stretched canvases for future quilts (cheap at Big Lots and Tuesday Morning, but limited sizes there). This new-to-me presentation has changed my quilting/life forever! It definitely makes a small quilt look less like a shmata/potholder and more like capital-a Art!

Monday, July 21, 2014

No Pressure! Just Potholders! Or, Coffee Madness, Continued

When I find creativity blocked by the need to impress myself (or, worse, others!), the go-to game is potholder. Just make a flippin' potholder! It doesn't have to be great Art! In fact, forget the A word!  I imagine it with burned corners and embedded egg whites, and that soooo takes the pressure off. NOW we can play!

Motivation increases if I need gifts. No agony over gifting old friends with the masterpiece they deserve. Everyone needs another potholder!

So last week,  I made a slew for our upcoming travels.

I started with this amazing  fabric.

I'd been eyeing it at my LQS for months, so imagine my joy when I found it on the 40% off shelf. Why is this magnificent fabric on sale? Doesn't every caffeine-blooded American quilter need some? (Also on the sale shelf: Same fabric with the values reversed, with the figures in white).

I surrounded a square of that fabric with a red coffee cup fabric,
but the results were sort of plain. Time to drag out the fusible-backed scrap bin!
This is the purgatory to which all my leftover fusible-backed fabrics - especially small novelty items - go. Once I pull everything out, it is very difficult to push it all back in again.

I did some free associating, finding ready-to-fuse objects to place on my potholder base.

For this first potholder, I created a fully bodied, sensuous appreciation of my favorite drink by adding coffee-appreciating body parts: Lips on the upper left corner,
... a hand making a victory sign on the lower left...
 .....and a guy with caffeine-induced delusions of superpowers on the lower right. 
 (Yes you've seen this strongman edited onto on a coffee cup before, here.) The cup also has clouds of decorative steam.

For the next one, the steam cloud is multicolored:
and there's a collaged redundant fantasy label on the lower right. 
 
The whole thing:

 For the third, I added an Earth-like marble on the upper left, a rocket ship on the lower left... a
and a small color cloud on the lower right corner. 
The backs are mug fabric that's been in my stash for decades. 
 To  see more coffee creations, click "coffee" in the word cloud on the right of this post. And remember: If you're feeling intimidated by the need to make a masterpiece, go for a  potholder instead. (You never know: Your friends might frame it.)