Showing posts with label Diane S. Hire. Show all posts

Monday, October 19, 2020

Pandemic Porch Quilt Show, Days 14 - 19: Altered Cowboys and Beyond

My show is going strong! Here's the third batch. 

Pandemic Porch Quilt Show, Day #14: Cowboy Quilt
This quilt was made circa 1998, when my adorable little boy wanted to be a cowboy.
At the time, I was not only enchanted with my growing baby humans, but also my growing baby fabric stash, especially this brown border print:
As a new quilter, I did some reckless things. In this case, I cut the outer edges, on the sides and bottom, into hanging diamonds. What's worse, I chose a relatively thick red denim bandana print to bind them. (On the far left).
Binding and mitering up and down those sharp angles, with heavy fabric, took approximately 7000% more time than binding a straight edge. By the second diamond, I regretted it, but didn't want to rip, so I plodded onward.

The quilt has randomly strewn fussy-cut rodeo scenes, to break up some of the squares - broderie perse with a satin stitch.
I also stitched buttons, in assorted tans, browns and greys, on many squares.
Hot peppers count as cowboy fabric, right?
On the back, I placed all the bandanas I could find in my house, including this very unusual orange-and-turquoise one that my husband's had since high school, at least.
Today, my little boy no longer wants to be a cowboy. He's happy as a 26-year-old scientist in a big city - no horse, no car - but he does have a bike and a dog.

Day 15: Altered Squares
This quilt hung at Quiltcon 2018 in Pasadena, CA - the town next to mine - on my friggen' birthday! Friends overcame many obstacles to attend the show, and line up obediently in front of it when I forced them to. (I'm in the middle back). That may have been the best birthday of my life.

Day 16: She Exclaimed!
This is my exclamation-point shaped quilt, made this year. It's improv paper pieced. Instructions are in my new pattern booklet, "Modern Paper Pieced Log Cabin Triangles," here. Below, it's photographed against a grey background.
Detail:
To my happy shock, this quilt was awarded a second place prize in the Midcentury Modern category, in Mancuso's online Visuals #1 international show. (Find all the winners here.)

Day 17: Counterclockwise
This 32" x 44" quilt, made in 2015, started with an improv circles game in Diane Hires' fabulous book, "Vivacious Curvy Quilts." For the arrows in two borders, I made up my own game - my tutorial is in a couple of blog posts that begin here.
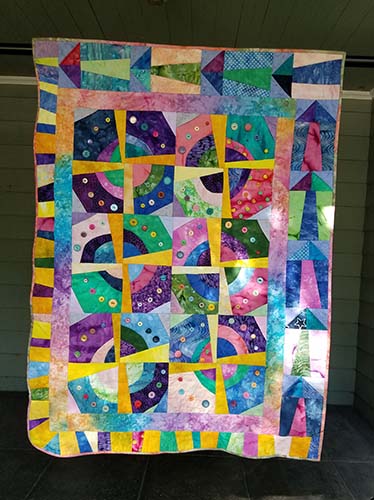
Detail:


At some intersection, I tucked dimensional folded points, to make a whirligig:


Day 18: Dresden Variation

This quilt is an oldie, maybe from the early 2000s, when I was entranced by even older, 1930s-era quilts, particularly one with this unusual color scheme - a hard teal, plus lots of soft pastels. My pastels are reproduction 1930s fabrics. The motif is called a Dresden Plate. The quilt's gently ridged outer edge wasn't nearly as challenging to bind as on my earlier, sharp-angled cowboy quilt.

I do kinda regret the salmon colored fabric between the fans. (I happened to have a lot of that fabric, which, all too often, isn't the best reason to use a color!)


Day #19: That's a Lot of Yellow
I made this quilt in 2012, by playing a game in one of Karla Alexander's "Stack the Deck" books. The basic idea: Stack squares; use a rotary cutter to cut all layers, creating multiple stacks; shuffle each stack; stitch the pieces into multi-fabric blocks. It's perfect for when you don’t want to think much, and just want to sew.

The game that produced this particular quilt is "Razzle Dazzle," from Karla's book New Cuts for New Quilts, More Ways to Stack the Deck. I took my fabric choices not from book's sample (unfortunately), but from the fireworks print in the borders. But I amplified their intensity to a degree that might have been un peu trop.
When finished, I had a fascinating mound of scraps - so I glued them to a felt circle, attached those to extra-large pipe cleaners, smacked orange buttons in the middle, and,- voila! - hyper-daisies!

Sunday, November 29, 2015

More Improvisational Fun with Arrows

Last week I showed a quilt I made with arrows along the top, and down the right border. 
That post includes a detailed arrow-making tutorial. I had so much fun with the arrows that I made lots of extras. I set eight extras into blocks of four: 
Eureka, it's a mini recycling quilt! I also discovered that the arrow tips can line up with the central red square, as in the block above; or not, as in the block below:
Can you see the difference in the alignment? Here are the two blocks snugged up together. 
With 8 more arrows, you could wind up with a fine frenzy: 
I didn't do a lot of measuring with my first arrows, but quickly discovered that if I wanted them to chase each other in blocks of four, I had to measure. (The first part of the tutorial below repeats some of the pictures from my last tutorial, but with specific measurements.)

1. Cut the arrow tips from 3 1/4" squares cut diagonally in half.  You'll need a background color (mine is lavender), plus two tip colors (Polka dots and turquoise fabric in the upper arrowhead, navy and orange for the bottom arrowhead). 
Join each tip triangle to a background triangle. Then join two of those units together, side by side. Stitch four pairs.  

2. For the shaft, start with strips that start out 3" x 6". Each shaft needs 2 colors (one for the shaft itself - green in the image below - and another for the background - rose in the image below.) 

3. Stitch the three pieces together at the angles of your choice, as described in detail here in last week's tutorial. Cut the shaft unit down to a square that is 5" x 5". (or the width of your tip unit x itself.) 


4. Join the tip and shaft pieces. 

5. Trim the shaft edges so they line up with the tip edges. Each finished arrow should be 5" wide x about 7 3/4" long. 

6. Place the four arrows in position, pointing clockwise or counterclockwise. Cut a middle square to 2 3/4" x 2 3/4".  (It's red in my example). 

7. Fold the middle square down, right sides together, along the top left corner of the bottom horizontal arrow.


8. Stitch most of the way across the top of the center piece, but not all the way. 
9. Open the central square. It will look like this, with only a part of the red square's lower seam sewn.  Place the next arrow in position, to the left of your unit.
10. Flip the left arrow on top of the red square and the arrow below it. 
6. Stitch ALL THE WAY down the left vertical seam. 
7. Open the second arrow now that it's all sewn. 
8. Align the third arrow  - that's the piece along the top. 
9. Flip the third arrow down, right sides together, with the arrow and red square below it, and stitch in position. 

10. Align the fourth arrow, on the right. Flip it right sides together onto the arrow and the central square next to it. Stitch all the way down to the loose lower right hand corner of the central square. 
11. The only unsewn seam is the one on the lower right of the red square. Flip the red square and the upper right arrow downwards, on top of the lower horizontal arrow. Pin the right sides together. Begin stitching an inch or so before the existing line of stitching ends, overlap those first stitches, then continue stitching all way out to the end.  Here's the finished block, again.  
Of course you can play around with this idea by aligning the arrow tips with the central square, and varying hues and values, making long chains of arrows for borders, and much, much more! Maybe something for Valentine's Day? Arrows to the heart? Circular targets? Bows and arrows? Whatever you do, have fun with them! Send pictures!


Sunday, November 22, 2015

Improvisational Quilt Games with Diane Hire

Here's my latest, another batik scrap quilt, hot off the sewing machine, but before embellishment.
If it seems familiar, it should, because this is the kind of design taught by Diane Hire, one of my favorite quilt authors, and a pioneer in improvisational quilting, Her books Vivacious Curvy Quilts. and Quilters Playtime - Games With Fabric, are prized possessions (no affiliation!)

A couple of weeks ago, I felt a yen to cut some improvisational curves, so I pulled out Vivacious, and started stacking, cutting, and resewing. Following Hire's detailed instructions, I came up with blocks like this:
Put them together:
Joined those: 
Used the scraps to make wonky piano key borders down the left edge, and across the bottom (an idea from Quilters' Playtime):
And made up my own game to create the arrows that go up the right side and across the top. When I was finished with the arrows, I thought they also looked like pine trees, mushrooms, circus tents, and/or  um, testosterone thermometers.
(A friend also told me she thought they looked like 'pathways to pyramids'! Love that!) A tutorial showing how these arrows were made is at the bottom of the post.

My final step was to add 92 buttons. Ta daa, here it is done. I'm calling it "Counterclockwise."
Closer. The dotted batik block on the upper left didn't need buttons!
Diane's books have directions for most of it, except the arrows, so here's my quick quilter's game for arrows.

1. Cut a bunch of half-square triangles (I started with 3" squares, cut in half diagonally, but any size works).  Dub one color the background, and two other colors as the arrowhead. I happened to have the lavender triangles leftover from another project. Stitch a bunch thusly: 
Ideally, the seam allowances should be pressed towards the arrowhead, but as you can see, it didn't always happen for me. 

2. Collect three strips for the shaft,each a little narrower than the top piece. (I chose about 3" wide and 6" long for each). 
3. Fold the right strip onto the middle one, good sides together, at an angle, and sew the length of the strip at the angle. 
5. Cut excess from right side of middle strip: 
6. Open up and press the right piece on the right side. Then repeat with the same color strip on the left side. Press the seams inward.
 7. Stitch tip units to base units at the narrow end of the long triangles. 
8. Open. 
Put them on the wall and contemplate. Definitely circus tents.
9, Option: Trim the excess base fabric straight across, to the width of the arrowhead. (Or angle the cuts, if you prefer). 

Now you can try them out as borders for your quilt.  My average arrow came out to about 8 1/2" x 5 1/2". If you're math averse like me, you can can always make a few arrows extra-short, or extra long, to fit your border.

Along with the arrows, I pulled out another trick that I learned long ago, although I don't remember where. I placed 3-D inserts into one corner of each block, which creates a pinwheel and furthers the circular illusion. 
These start out as the kite shape on the left side of the photo below. It's widest angle is 120 degrees,and the opposite angle is 60 degree. 
Fold in half the long way, as shown on the right side of the picture above. Then baste each one with a 1/8" seam allowances into one corner of each block, with the narrow tips facing in the same direction (clockwise or counterclockwise - just be consistent!), and the fold facing the center.  When four of these meet at the corners of four blocks, they form a 3D pinwheel! So easy! So fun! Here's another pinwheel. 
Have you played any fabric games lately?

UPDATE: Part II of this post, with a detailed arrow-making tutorial that includes measurements, can be found in the next installment, here.