
The downside is that the practice pieces accumulate in towering snowdrifts, looking something like this:

So here's a project that can upcycle some of them! Especially if you practice on denim! With the holidays coming, it's a fun gift. It's a denim and crochet cross-body purse. I showed one off two weeks ago (here), but this one is different because it is made from quilted pieces. Front view:

And back:

The back piece, unfolded below, measures about 5" x 10" (not including crochet). It's quilted with experimental vines/feathers, relics of my eternal Sisyphaen quest for a neat, convincing vine.

The smaller front piece is about 5" wide x 6" high, not including crochet:

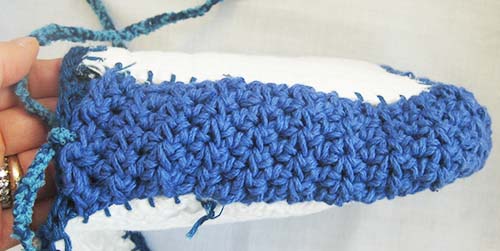
Grids compliment vines; and they're a lot easier! Here's the back of the flap.

I crocheted the gusset, too...

...but you can improvise a different solution, or skip the gusset completely and sew the front to the back. Go with the flow and see where you wind up! Here's a tutorial/reconstruction of how I made mine.
DIRECTIONS
1. Practice quilting on a sandwich at least 6" x 18" if you want to make a purse about the same size as this one. If working with jeans, don't include thick seams, to save yourself aggravation! My backing fabric in the example is white, but on second thought, you should choose something a lot darker and/or busier, so dirt doesn't show.
2. Cut two pieces from the quilted piece: a small front (about 6" high x 5" wide) and a long back-and-flap (about 10" high x 5" wide). Whatever measurements you use, widths should be the same for the two pieces.
3. Use an "edge skip" rotary cutter blade to cut equidistant holes a generous 3/8ths of an inch or more from each edge of both pieces, all the way around. ('Edge Perfect' is the brand I've long used, but now there are a lot of similar blades out there.)

4. Do a blanket stitch all the way around both pieces through the holes created by the blade. I used a blue linen yarn.
5. On the long quilted piece: Crochet all the way around it 2-3 times. For the short edge that will be the bottom of the flap, do a long stitch, like double or treble crochet, so buttons can be buttoned through them, shown in the photo below. With such small buttons, I didn't need extra gaps beyond the hole created by double crochet.

For the remaining three sides, do single crochet.
6. Do the same number of rows all the way around the smaller quilted piece. Then, only crochet down one side, across the bottom, and up the second side. Turn and do it again, just those three sides. Make the rows a tight stitch (like single crochet) and DON'T INCREASE. After a few rows, the stitches will start to pull in, creating "fabric" parallel to the piece, which will become the gusset. If the crocheting isn't tight enough for a purse, you can either add a lining later, or add an additional crocheted gusset (the latter is shown below).
7. Once the gusset is at the width you want, stitch the outer edge of the crochet that's on the smaller quilted rectangle, to the crochet stitches along the sides and bottom of the larger rectangle.
8. Because my crochet was loose, I crocheted another, tight, gusset strip to the inside, about 2" x 17", with a thicker yarn. I hand-stitched it in place along both edges using yarn. This serves as backup, to keep anything except maybe toothpicks securely in the purse. The neater alternative: install a full fabric lining.

9. Chain a strap to the width you want (I used three different yarns), and tie it to the gusset. Since this purse will be a gift, I only did a single knot, and will have the recipient retie it to the length they want, with a double knot.
12. On the front piece, stitch on buttons that will fit through the crochet on the bottom of the flap. I used smallish shank buttons.

So much fun! Call it done! More projects that upcycle freemotion practice pieces - into Artist Trading Cards, Valentine's Cards, and a purse pocket - are here. My previous denim-and-crochet purse is here.


