Friday, November 30, 2018

My New Book! English Paper Piece a Polyhedron!

I am having an out-of-body experience - after two years in the works, my new book just went live on Amazon! And on etsy, too! It's not about quilts...it's about the joy of stitching polyhedra! 

What, I hear you asking? Polyhedra? You probably haven't given a dodecahedron or icosahedron much thought since high school (unless you play Dungeons and Dragons).  Neither did I, until last year. So how did I get from quilts to polyhedra? 

Through English Paper Piecing.

If you're a quilter who's tried English Paper Piecing, you know it's a fun, addictive way to make a quilt. It involves wrapping fabric around individual paper shapes, sewing the pieces together along the edges, then removing the papers.
 Voila, it makes tricky quilt blocks easy and accurate. 
English Paper Piecing a polyhedron is accomplished is almost exactly the same way - by machine or by hand. Individual papers - or for bowls, thick fusible interfacing - are wrapped with fabric, then stitched together.  The paper is then removed. But instead of laying flat like a quilt, polyhedra curl into the third dimension.
Results? Stuffed balls, which make fascinating toys, ornaments, and pincushions. And open forms, which can become bowls, baskets, toys, purses, and decor. 

I became completely obsessed with polyhedra, and once I started, I couldn't stop. Here are some of my favorite projects that are laid out in the book.

- A dodecahedron that includes Spock, Kirk....
...Little Red Riding Hood...

...and, of course, Franklin Roosevelt.

Another dodecahedron, but done in sophisticated necktie silks, with mother-of-pearl buttons:


I fell in love with the truncated octahedron - 14 sides, a fascinating combination of hexagons and squares. One of my pattern testers, the talented Andrea Shlasko of Venice, Florida came up with this awesome "Blah Blah Cats" polyhedron. Her squares are cat fabric, and the hexagons are "blah blah" fabric! 
Here's the same shape  - in an open form, with stiff fusible interfacing inside, turned into a  basket/bowl. It's a beaded planetarium for my husband's desk (he's an astrophysicist.) It's about 6" high. 
 Seated in the planetarium is a tiny baby in a rocking chair: 
Next, a truncated cuboctahedron, with hexagons, squares, and octagons - as a  pincushion....
...and another truncated cuboctahedron, using candy wrappers instead of fabrics (The book explains how to use upcycled materials.)
Here's an icosahedron zip-up purse/basket to wear or place on a table, or even hang from a bush?
Next, an icosidodecahedron - I call this one Jane's Dish, because it's made from Jane Austen text fabric. 


The most complex form in the book is the truncated icosahedron, aka soccer ball. 

  One of the many odd things I learned while making stellated dodecahdrons is that they stack nicely without any additional support.
One of the most fun aspects of writing this book was feedback from pattern testers. Along with the blah blah ball above, Andrea Shlasko made these, some of which she's selling at craft fairs,


And Glenise from Australia made these. 

This 71-page sewing book is available in paperback form from Amazon, or in PDF form for instant download, from my Etsy shop, here. The projects are fairly easy, but you should have some sewing experience. They can be entirely hand-sewn; or mostly machine sewn with just a little bit of hand sewing to finish. More photos of projects from the book are on this page.  Contact me if you have questions!

Thursday, November 22, 2018

Happy Thanksgiving! Start Making Paper Dreidels!

Happy Thanksgiving! I don't want to panic you, but it's time to prepare for Hanukkah (starts December 2)! A couple of weeks ago I showed off some freemotion-quilted fabric dreidels. They don't spin well, but they do make good decor, as well as shelter for chocolate coins, dinosaurs....
...and even smaller dreidels...
Now Hanukah looms even closer, making this the perfect project for avoiding stores on Black Friday. If you don't have time to quilt, you can use the same approach to make paper or cardstock dreidels, which spin much better than the button-stem kind if you use pencils with flat sides: 
Above, left to right, they're made out of: an old stationary folder, a box of souvenir Singaporean dried fruit, a birthday card, and a Cheerios box. Closer: 


Alas, with the Cheerios box, I made the unfortunate mistake during construction of ignoring the  Pampers ad on one side....
...Because who doesn't want to think about poopy diapers while spinning dreidels? (or while eating cereal? Cheerios executives: Are you really that desperate?)

Moving from the ridiculous to the sublime...the nicer the paper you use, the better the dreidels. For the next two, I used the 2006-2007 Women of Reform Judaism calendar, with each month a gorgeous cutout collage by Atlanta Artist Flora Rosefsky. 

When I wrote to Flora to ask for permission to show them, she filled me in on the background. The collage series was initiated in 2001.
"...I still enjoy creating new collage work, using the same 'drawing with scissors' method, but now sometimes add mixed materials like fabric, trim, and ephemera (found paper)."
 Find more of her intoxicating work at www.FloraRosefsky.com.  

Of course, you can create your own collage, and then turn that into a dreidel. To make cardstock or paper dreidels, create a pattern like the one below (basically five squares, and four equilateral triangles). Score all the interior lines, cut it out, then fold and tape the outside. Or cut extra tabs along the sides of the bottom triangles, and at one end of the squares. Then you can use a glue stick or hot glue the tabs, from the inside, to close it up. (The right and lower tabs are not necessary for fiber dreidels.)
More information about artsy dreidel construction is in my recent blog post, here. And a word from our sponsor - if you don't feel like drafting it yourself, my instant download booklet for stitching fiber art dreidels- including patterns and Hebrew letters in three sizes, and step-by-step instructions - is available for $3.00 from my Etsy shop, here

Wishing you a healthy, happy Thanksgiving, Hanukkah, and everything else you celebrate!  

Sunday, November 18, 2018

Textile Hugs: Star Ornaments for Pittsburgh

Handcrafted tokens of love appeared on bushes, trees, lamp posts, statuary, street signs and benches in Pittsburgh last week - more than 2,000 six-pointed Jewish stars. Each incorporated a heart, and they were made from: twigs, or popsicle sticks, or yarn, or felt, or other stuff.  They were crocheted, knitted, stitched and/or glued, by people of all ages, from elementary school classes up. My contribution was made from quilting fabric and a large button. (OK, maybe the button is too large, but I liked that it's transparent).
The back is felt: 
Two articles about the project were just published; one in the Pittsburgh Post Gazette, here, and another in the Jerusalem Post, here. The Pittsburgh paper explained the origins:  
...[T]he stars were the inspiration of Hinda Mandell, an associate professor of communications at Rochester Institute of Technology in Rochester, N.Y. A former Boston Globe journalist, she is editing an anthology titled 'Crafting Dissent: Handicraft as Protest from the American Revolution to the Pussyhats.'
"Ms. Mandell’s determined, energetic handmaiden is Ellen Dominus Broude, a dedicated crafter and saleswoman who lives in Hastings-on-Hudson, N.Y. After Ms. Broude saw an online post by Ms. Mandell, the two women set up a Facebook group on Oct. 30 called Jewish Hearts for Pittsburgh. That was just three days after 11 people died when a gunman opened fire before Shabbat services at Tree of Life/or L’Simcha. Ms. Broude set up a post office box to accept the handmade stars. Soon, contributions arrived from 12 countries, including New Zealand and Qatar. " 
The newspaper photos, and those on the group's Facebook page, may put you in the mood to make a star heart ornament. The project is continuing; and it's adding  another dimension, inviting participants to make visual representations of community (get details when you join the Facebook page ).

Or, you just might want to make one as a gift for someone who needs a textile hug for whatever difficulties they're enduring. After I posted my star on the group's FB page, several people asked me how I made it. I steered them to a blog post from 2015 that explained how I used a specialized kite-shaped acrylic template, which not every quilter owns. 

But a simpler method that doesn't require a specialized template, is English Paper Piecing.  

All you need is a regular diamond-shape (two equilateral triangles base to base), which you can draft yourself. Print or trace six of them on cardstock or paper, and then trace it one more time onto translucent template plastic.
When planning the star, maximize fun by sliding a double-sided hinged mirror (an inexpensive sewing notion), opened to about 60 degrees, around on the print fabric until you find a location you like. Here's an example of how it looked on my star fabric. (You don't HAVE to have the mirrors to do this project, but it is the most fun part!)

The hypothetical fabric below is much simpler, for demonstration purposes. Once you like the location, place the plastic template there, and with a  pencil (erasable!), trace a few lines from the printed motif onto the plastic. You don't have to trace every line, just enough so you can find the same location again. 
 Cut out six pieces, 1/2" bigger than the template all the way around (the red line above). 
Place a paper or cardstock template on the back of each fabric piece, center it, and baste the raw edges inward.

In English Paper Piecing, "basting" means folding each edge inward, being consistent about which side you fold in first. (Move clockwise or counterclockwise, and stick with that decision for all six pieces.) Some people like to baste with long stitches on the back (and an extra tacking stitch at each fold). I find it's easier and faster to use a glue stick and an iron to turn and hold edges, at the ironing board. Tip tip: my favorite way to baste diamonds is to fold the sharp ends inward first. (no need to do this with the two remaining non-acute angles.)

Then go clockwise, or counter clockwise, to fold in the four edges. I went counter-clockwise in this example.
(Other people prefer not to turn in the sharp points first; they will have dog ears at each acute angle, which they can turn under later.) 

Sew the points together in groups of three. By hand, whipstitch the edges; by machine, sew from the good side, with a zigzag stitch and matching or invisible thread. I start with a middle piece, then attach a diamond to its right and its left side.  
Once you have two groups of three, stitch them together along the midline. 
Now you can remove all the templates. Lay the star on top of a piece of felt. Then straight stitch, 1/8th inch from the edges, most of the way around, leaving a gap along one edge. If there are "dog ears" sticking out from the outer angles, tuck them in just before your needle reaches them.
Cut out the felt carefully, just beyond the edges of the star. Stuff, and hand- or machine-sew the gap closed. 

To learn more about the ongoing Jewish Hearts for Pittsburgh project, see photos of many more stars, and sign up, join their Facebook group, here

Sunday, November 11, 2018

An Afterlife for Vintage Embroidery Mysteries

If you're a quilter, I bet we have a happy problem in common: People bring us fabric. On the one hand, I love it. On the other, I already have too much - if I stuff their offering into my stash, it may never come out!

This problem gets even better when people bring me interesting vintage textiles. So here's one solution: Enjoy processing it immediately, then give it right back, in a form they can use.

That's what a happened a couple of months ago when my friend Marian went to a store closing sale, where she bought some fascinating embroidery fragments, each $5 or less, a price that reflected their not-great condition.

First, there were these three log cabin foundation pieced-blocks. They're silk and so frail  - some of the silk was already shattered. I think they're from the US, but let me know if you know better!
Then there were two thick, sturdy panels with vivid flowers, one of which is below. They look handstitched (from the back), and were marked "Guatamala." I wonder what their original destination was - bags? Shirts? (If you know, please tell me in the comments!)
Next was the following mola-esque strip, which I'm guessing could be Asian, or could be South American?
And this worn, beautifully embroidered strip, with tiny stitches, which I think is Thai. 
What to do? I decided to skip the storage phase, and immediately make something Marian could use. I added two pieces from my own collection. In the photo below, the blue-and-white strip is kantha from India, gifted to me by friends who bought it at a quilt show (thanks, Saraj and Miriam!). On bottom, the pink-and-orange is an elaborately embroidered strip from Thailand, gifted long ago from another friend, Steve, a Buddha dealer. (The resemblance to the strip above is why I think it's Thai.)
I sewed them all together. Then I added strips of embossed gold velvet ribbon to the short ends. I added a hanging sleeve to the back of one short end. Here's the result (lying on my brick patio). It's about three feet long.
I told Marian that if she used it as a table runner, the black silk would probably rip sooner, whereas if she hung it, it might last a bit longer. If I thought any of the pieces were valuable, I would have suggested she frame it. But now she can just enjoy it for as long as it lasts. And after the log cabin blocks fall apart, the sturdier pieces may survive - and hopefully turned into something else!

Thank you, Marian, Saraj, Miriam, and Steve, for your contributions to this international mashup!

Monday, November 5, 2018

Break Out the Pom Poms! Eye Candy from a (Mostly) Knitting Show

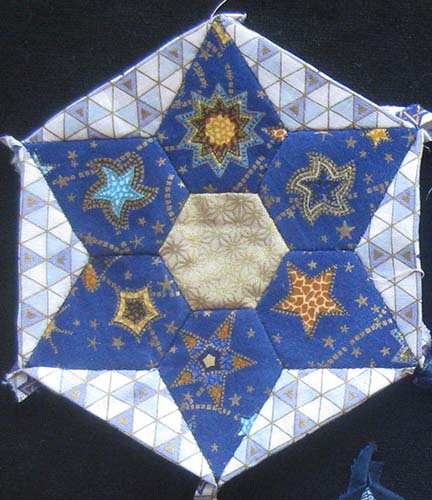
Stressed out by the upcoming election? Here's some eye candy from a fabulous yarn show, to distract you while waiting in line to vote, and/or awaiting election results. What could be more enticing than this?
From The Yarn Guys booth
Or these: 
   
Or this: (It's a wall of beads from Bead Biz, of Guilford, CT): 
The nice thing about beads sold at yarn shows, I discovered, is that the holes are relatively large - one could conceivably attach them to quilts by machine. 
Or this joyously geeky tableau at the Dizzy Blonde Studios booth (creative hair color was abundant):
Or Art, a lovely guy from Needlepoints West (an LA shop), who supervised a children's swimming pool full of luscious bargains: 
I resisted the urge to dive in and roll around: 
And that's just the beginning of the sensory overload that was Stitches SoCal, one of many Stitches shows that, I learned, that take place across the country. This one was in Pasadena, CA last weekend. (Other show sites include Northern California, Georgia, Illinois, Utah - complete list here.) 

I can barely knit; I love crochet, but my shoulder doesn't, so I don't do much of either. I might never have heard of Stitches if my friend Jeri Riggs (Ravelry name: Knitbird), who lives in Massachusetts, hadn't told me she was heading my way and among other things, planned to attend this show. Jeri is a master quilter, knitter and, for as long as I've known her, a mermaid of azure beauty: 
She knitted that incredible peacock shawl with gradated yarn. The vest? She knit it in white yarn, and then dyed it green and blue. Between the shawl and the vest, Jeri literally stopped traffic at the show as people admired them and asked her questions.

For your relaxation purposes, here are some more sights that astonished and/or taught me something related to quilting. This show was mostly knitting and crochet, with just a handful of quilt-related vendors, guilds, and mini-shows (including the Cherrywood Quilt Challenge honoring the singer Prince, as you'll see toward the end).

Lesson 1. I was in Color Heaven. I overheard a man saying, "So is this knitter's heaven?"  I had no idea that there are so many amazing artists out there whose art form is painting and dyeing stunning variegated yarns. Below, the skein on the left was inspired by Japanese wisteria; and the one in the middle was inspired by Harry Potter (The company with the inspiration is Forbidden Fibers).  Also note the project bag on the right made with Harry Potter fabric (more on bags later.)
This hefty hank, from Black Cat Fibers in Milwaukee, is about 3-feet high: 
Here's its massive, autumnal neighbor: 
Noti Yarns, LLC, from Texas (notiyarn.com), also sells hand-painted yarns. Look the color combinations in their display shawls. (Their website is as delicious as their booth.) 
Lesson 2. Green is In. Not just the shawl on the upper right - there was a lot a green - would you call it chartreuse? - that, by itself, is remniscent of my middle school corridors. But combined with other colors...and sometimes, intricate patterns...it becomes...sublime. Here's another green-and-purple confection: 
Next, from Stunning String Studio, this Interpolate kit shawl is to die (dye?) for:  
Lesson 3. The Inventiveness of Knitters is Boundless. Cindy of Alamitos Bay Yarn Company showed me this loop scarf that switches from woven to crochet, and back again. Cindy told us that in when she wears it in airports, fiber arts people stare at it for long periods before throwing up their hands and approaching her to ask how the heck she did it. (She did it by picking up yarns from a loom and knitting them! That's all I understood.)
Speaking of green, Cindy's sweater/shrug was lovely too. 
Lesson 4.  Colorways Make All the Difference. There are fads in the knitting world, Jeri explained to me, just like the quilt world. Jeri told me about this popular Butterfly Papillon Shawl, designed by Marin Melchior. The first booth that we saw it in, it was knitted in psychedelic colors: 
Jeri showed me the yarns that could be used for a similar effect...
Then we saw it in another booth, with a gentler colorway.  It's no longer Peter Max....
...it's more Art Deco! And then we saw another one, made using the same technique, in black and gold:
 It's spectacular formal evening wear! 

Lesson 5: Knitters Love Bags, but Don't Make Them. Handbag-sewing patterns are popular at every quilt show I've visited (as are  zippers and other purse hardware). At this show, I saw zero bag-sewing patterns; and few patterns for knitted bags. But there were tons of ready-made fabric bags and backpacks, from tiny to vast, designed to hold knitting projects. Here's the booth of Atenti Bags, a family-owned business in La Crescenta CA, with an eye for delightful fabrics. 
Check out the kooky fur - the red-and-pink poofy bag, and the hairy yellow one above it on the far right, the white ones on the far left in the photo above. Atenti only sells wholesale online, but you can find shops that carry their bags on their website

There was a smattering of African fabric, yardage and products made from it. Below, some fabulous purses from Handspun Hope, a Christian charity that produces knitting wares in Rwanda. (www.truevineyard.org.). Loved the large round zippered bags; 
A missionary project in Uganda, Project Lydia, was also selling finished bags, including this tote. (The round embellishments aren't shells - they're rolled-paper beads.) 
Other booths had racks of bags sewn from novelty fabrics - everything from Star Trek to Sailor Moon was featured in this booth by Seven Sisters Arts of Maine. (sevensistersarts.com). 
The shawl on the lower left is from a knitting pattern called "Prime Directive" by Sara Wilcox, inspired by a Star Trek Bird of Prey.
More novelty fabric bags in a different booth:
Next, project bags sewn from faux knitting fabric (looks like knitting, but it's fabric.)
And the bags below, in the Knit Picks booth, feature clever sayings - I especially like the top one that says, "I'm working on my PhD - Project Half Done." (Also, "Socks To Be You," and below that, "Alpaca my bag.")
Lesson 6. Cherrywood is Rich. Cherrywood (www.cherrywoodfabrics.com) makes glorious, sueded hand-dyed cottons. The only problem with Cherrywood is the same problem I have with chocolate truffles - I can't just eat one piece. I have to buy all of it. I am not worthy. But I'm getting there. It was impossible not to stroke the wares.
Lesson 7: Like Quilters, Knitters Grapple with the Grandma Stereotype How many articles about contemporary quilts and quilters have you read that begin with the words, "These are not  your grandmother's quilts!"?  The knitting community is fighting the same battle. Except the Twisted Skein in Bakersfield CA, a shop that decided to embrace the stereotype. Here's one of their tee shirts:
Lesson 8. "The Fade" is Big, Jeri explained this to me and then I saw it everywhere, colors fading to light or dark, or fading into other colors. In the quilt world, we call it gradation. Here's a gorgeous knitted skirt that I wish I could just buy....
And here's a mind-boggling op art scarf by Alasdair Post-Quinn of Falling Blox Designs. How did he do it? Jeri explained that the gold-to-grey effect is from one color-gradated skein of yarn, while the other skein is black. 
Lesson 9: English Paper Piecing is a Crowd Pleaser In the midst of all the knitting and crocheting, there was an EPP  experimentation station. The Glendale Quilt Guild sponsored some EPP activities in the show's "Playground" area. Everyone can learn to love EPP!
Lesson 10. Quilters and Knitters are Cat Crazy.  Awwww. This cute pattern was in the booth of Knit Picks, from Vancouver, Washington. 
Lesson 11. We're All Button Lovers. Knitters love buttons, even more than quilters - after all, most sweaters require buttons, whereas quilts don't (except mine). This show had only one button booth, a company called (believe it or not) Buttons! from Calistoga, CA (website at unbuttons.com). Good buttons, good prices. 
Lesson 12. Pom Poms. That is all. There were lots of them. These faux fur pom poms were from Knit Picks. Now I'm wondering whether judicious pom-pom placement on my quilts would make them less washable, let alone less respected.
Lesson 13: We Have Technical Challenges in Common. Check out the star sweater below, in L'Atelier Art Yarns booth. For quilters, joining 12 seams in the middle of a six-pointed star is hard enough; I can't even imagine what it involves in knitting. 
Lesson 14:  Knitters Think About Socks a Lot More Than Quilters Many quilters make Christmas stockings, but that's about all in the way of quilted footwear. But knitters, omg, the gorgeous yarns and designs knocked me out. Like this, from discontinuedyarns.com. 
The Purrfectly Catchy Designs booth, below, offered charming carved wooden sock blockers, each with a different cut-out - cats, dachsunds, dragons, dots, lobster, squirrels, you name it. (They sell knitting wares from their ebay store.)
Lesson 15: Who Doesn't Love Hooked Rugs? Occasionally at quilt shows I've seen rug hooking vendors. At this show, Wooly Walkers offered wonderful punch needle embroidery projects. 
They even worked it into a collar of a felted garment:
PART TWO: THE QUILTS! 
 Artist Page Wood, of Sherman Oaks CA, displayed both prints and his machine appliqued quilts. This one's stitched: 
 And this one's a print: 
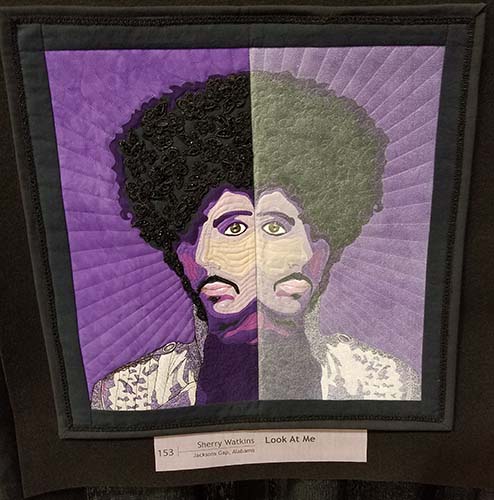
Perhaps the most exciting part of the show for a quilter was the 75 pieces from the Cherrywood Challenge 2018, themed "Prince." It was a sea of purple. 

 ...each so heartfelt...
The next one is by Sherry Watkins....
Below was one of the prizewinners. The workmanship in this little quilt by Robin Gausebeck was perfection. 
Karen Collins made the stunner below, "Purple Reign," which won a judges' choice ribbon.
The Glendale (California) Quilt Guild had a fun exhibit that included this beautiful Australian-themed quilt: 
It's called "There's an Emu on my Quilt," by Terry Simon. Awesome detail:
Next, I loved the fabric embellishments and vintage pieces in "Fiesta" by Cindy Caldera: 
There was also a small but powerful show of quilts by Lynn Carson Harris. She writes, "My most recent work is a series of small-scale abstract designs inspired by the experiences of someone I love and care about who is in an abusive relationship. My wish is that these pieces of art can help to prevent domestic abuse by increasing understanding an awareness...." The first piece is a large black expanse (most of what you're seeing below  is the quilt, not the black curtain).

 The next quilt she calls "Crepuscular."
This set of 11 small quilts represent different aspects of abuse. 
 The sign on the middle right breaks it down: 

IN CONCLUSION
The show that most quilters are thinking about this week isn't Stitches - it's Houston. Stitches was the next best thing. I recommend a Stitches show to needleworkers of all kinds. They also offer classes (including several quilting classes.) Learn more at their website, here.

NOTE: I have no financial affiliation of any kind with any of the organizations, artists, vendors or products in this article. 

UPDATE: For even more images from StitchesSoCal 2018, enter the term in Instagram.