Showing posts with label steampunk. Show all posts

Sunday, July 2, 2017

Stitching and Gluing for a Steampunk Wedding: Agony, Followed by Ecstasy

When I first heard that the daughter of a dear friend, Caitlin, and her wonderful fiancé Nathan were having a steampunk/time travel wedding, I was taken aback and began kvetching loudly to no one.

First, because the wedding was in April. Aren't costume weddings for Halloween?

Second, who ever heard of a costume wedding?

Third and the real problem: What would I wear? I have enough trouble shopping for acceptable contemporary attire, let alone swathing myself convincingly in garments of the past.

But then I recognized this invitation for what it was: A stitching/crafting/destashing opportunity. Specifically, to use up my teensy pile of rusted watch gears that I'd purchased years before, when Steampunk first became a thing. I'd paid $10 for maybe a half-gram of old watch parts like this.
My DH is also costume-challenged. It came to me that if I made us couple of Steampunk brooches, they could serve as 98% of our costumes. I mean, we'd go fully dressed in SOMETHING, but the brooches would automatically make us Time Lords (That's a Dr. Who thing.)

I also wanted to give the happy couple something beyond the check. They are such nice people that they would probably thank us sincerely if we gave them yak manure for their garden (if they had a garden). But time travel is such a great theme. Surely I could whip up something from my fabric stash, much of which has travelled over a very long time and distance to reach my house.

I went through my UFO pile and dug up this denim and lace composition, that I'd agonized over last year.
A tutorial for laying down the denim background and auditioning embellishments is in an earlier blog post.  In the last paragraph I grumbled that I didn't know what to do with it.

But now its destiny was clear! Everything on it was vintage: the jeans, the mother-of-pearl  buttons (and some made of ye olde plastick); the intense lace, especially those corner cut-out squares, which make me swoon!
(What were these lace pieces originally intended for? Collars?) Come to think of it,  I convinced myself, the piece was old, new, borrowed and blue - perfect for a wedding gift. 

I felt it needed something more - everything does - so I tried scattering my pile of rusty watch gears over it, but the result wasn't great, and what the heck would people do with a textile that had rusty old things glued to it?  (Don't answer that.)

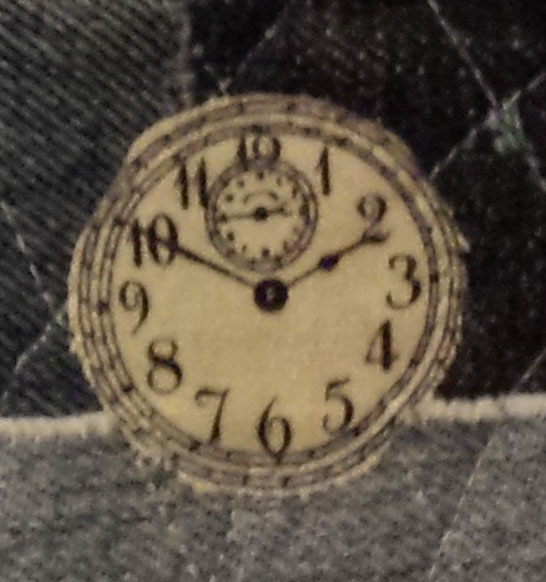
I dug out my last fragment of a wonderful millenium print fabric, bought in the year 2000, with clocks printed all over it. I cut up some clocks and lined them up in the border. Not bad! I appliquéd them in place with (very modern) invisible thread. 
A little closer: 
A lot closer: 
So easy! So fun! Better present than yak manure! And it ended too soon! But by now my Steampunk pneumatic cylinders were churning. I dug out a circular and and an oval wooden shape, glued batting on top, and covered them with  plaid silk from an old upholstery sample book. I then glued my overpriced watch parts on top. I sprinkled on some buttons, keys and a cool old toy compass for good measure. Glued pins to the back. (Detailed tutorial, see below.) Here's brooch #1, which I wore to the wedding....
And here's #2, which I only took a really bad picture of (sorry), which my husband wore: 
As the wedding wound down, we pinned this one to our gift, as an additional present.  

Along with the brooch, I wore my mother's 1980s-era fringed white cowboy shirt. Thus I was a time travelling steampunk cowperson who was also my own mother (That happens a lot with time travel). My DH wore the other brooch, my mother's trench coat, my Dad's Irish tweed cap, and my daughter's large red bowtie (leftover from her Halloween stint as Dr. Who). He did look Whovian. 

The wedding was an absolute delight.  Any doubts I had about the idea of a costume wedding vanished the moment I set eyes on the bride and groom.
Are they not gorgeous? And it was soooo much fun to see the guests dressed creatively. Some eras were particularly popular. There were a half-dozen Starfleet officers, include the bride's tiny 93-year-old grandmother sporting realistic Vulcan ears, along with her Federation uniform.  She's an interplanetary firecraker! 
The mother of the bride, and several other women wore flapper costumes that they'd cleverly bought on AMAZON! I wish someone had told me that costuming could be so easy! Here's mother and daughter: 
There were gears hanging from the ceilings and strewn on the tables, along with pages from old books. In short, it was waaaay too much fun! Thank you for inviting us, Nathan and Caitlin, and mazel tov to you both! 

Want to make your own Steampunk time traveller's brooch? Start by rounding up all your metal things, ideally old, broken,  and rusty....Don't neglect bobbins. If you don't have vintage embellishments, you can buy fake vintage at the craft store. Here are three small Steampunk-themed wallhangings I made years ago for an online craft swap.
Yes, that's a sewing machine light bulb, a broken bobbin, and some fake gears from Michaels....
A bow made from metal screening....
...A nest made from wire and a fake pearl....and whatnot.

Create a wearable backing. For the wedding, I used wooden shapes, but cardstock, fusible interfacing, or even faux leather or Kraft Tex(TM)  can work.  Cover with batting, and then interesting fabric cut larger than the shape, with edges pulled and glued to the back. Next....

1. Trace around the entire shape onto a piece of faux leather, real leather, or felt....(I really really should have done this before gluing the stuff on it). 
2. Cut out the shape....
 3. Plan the pin location, then mark where the sticky-outie parts are....
 4. Use an xacto knife to cut slits....
 5. Pray while pushing the tip of the pin and then the critical parts through....(sometimes it takes a couple of circles and cuts to get it right)....
 6. Smear glue liberally. Be more frugal as you reach the outer rim.
 Smack that thing on the back!
Let it dry and add glue as needed. Now you are a potential Time Lord, so have fun with your inter dimensional travels!

Sunday, March 16, 2014

Wrist Candy: Denim Seam Bracelets

How fun are these? (A: Very fun, to make and wear.)
They are, of course, jeans seams, embellished with a lot of things: Embroidery thread, leather, vintage watch face, vintage buttons....

This shows all five before a final round of embellishments. Below you'll see I added a bit more to some.

1. Cross stitch with colorful thread (sorry that's hard to see), leather wrapped and glued ends, hook and loop twisted from wire.

2. Vintage brass/gold metal buttons, new chain attached at ends and in center, hook and loop from twisted wire at the ends.

3. Scrap leather wrapped ends (from a cut up old leather jacket), vintage watch face, wire hook and loop.

4. Vintage rhinestone buttons over a broken rhinestone necklace. Toggle and lobster clasp with ribbon ends. I used ribbon crimp ends on either side and they worked well for me, but you've got to get the height of the crimp ends just right.

5. Vintage silver-colored metal buttons, new chain, lobster clasp and jump ring at ends.

Other than stabbing myself multiple times with large, sharp needles (this activity is not for the thin-of-blood), making these is seriously satisfying. You should know a little about opening and closing jump rings and attaching findings (so you need a couple of jewelry pliers). Use an extra strong thread, like button and carpet thread or some other version of "heavy." If you want to form your own wire hook and loop, practice with scrap wire. After making the first several by bending wire (not particularly expertly), I vowed to make future bracelets using jump rings and clasps - I think they'll last longer, and stay on better. 

UPDATE, 5-24-14: You can make matching rings, too! Go to http://gefiltequilt.blogspot.com/2014/05/denim-rings-upcycling-tiny-bits-of-jeans.html

Above all, have fun! (And send me links to what you make!)

Wednesday, February 5, 2014

More Upcycled Denim Jeans Valentines

In my last post, I showed this valentine made from upcycled jeans (dedicated to Pete Seeger):
Well, I can't seem to stop! Here are some more. The first one works as a keychain. The key goes into the pocket. I stuffed the larger heart, and crocheted an edging. 
The key can also hang out....

The next heart has it's own waistband hanging hole....
The heart part is detachable and has a pin backing.
Next, instead of white buttons and lace, this one celebrates metal, for a bit of a steampunk look. It actually was cut from the zipper area of a pair of jeans. (Shades of Erica Jong!)
Too much fun!
Here's another steampunky zipper inclusion heart:
It includes genuine vintage broken watch parts (purchased for a ludicrously large amount of money at a bead show), plus buttons, beads, rick-rack, and the zipper in its original position.
UPDATE, 2/8: Here's what I'm wearing to a Valentine's party tonight:
Too bad I can only wear it 1-2 days a year.

General directions for embellished valentines like these are at the bottom of the last post.

Sunday, April 7, 2013

Beyond Charming - Embellished Hoarder's Bracelet from Jeans


I wore this bracelet yesterday to a crochet gathering. It was my first visit to the group, and, though not crocheted, it immediately became a conversation piece. One person who examined it proclaimed, "Now that's a charm bracelet!"

Before her declaration I would have described it as an extreme embellishment wearable mini-quilt. I became fascinated by 'encrustation' four years ago after reading an article by quilter Frances Holliday Alford titled 'Outrageous Embellishment,' in the 12/07/1/08 issue of Quilting Arts magazine. 

Alford piles objects on top of objects - charms, toys, buttons - in strange and fascinating ways. You can't stop looking. She lays them down so close that it's difficult to see the background. Compared to her encrustation, my project is restrained!

As a base, I used a strip of aged denim, starting at about 4" wide by about 11" long. It's folded the long way in thirds, so it's only about  2" wide finished, and there's a 2" strip of interfacing inserted inside. All the pieces are stitched on with grey pre-waxed Silamide (size A), through a layer of denim and interfacing, before the sides and ends were folded in to the middle back.

I added not just beads, buttons and sequins, but also snap halves, hardware washers and nuts, a ball chain lamp pull, single earrings, broken vintage rhinestone shoe buckles, and, of course, a piece of a bobbin [bobbins = best embellishments ever]. Old and new, as long as it was mostly silver in color, it qualified. 
(Come to think of it, the silveryness gives it a shot of steampunk). That sandal in the center of the shot below is a scrapbooking tchotchke. The oval above it is a sew-on beveled mirror. There's an alphabet cube bead next to the sandal.
In keeping with the upcycling theme, I finished the inside with a strip from a blue patterned men's necktie, fused in place. It covers the seams. 

As I was working on it, I thought not only about Alford's work, but also about "folk art memory vessels." (Google it, you'll be glad you did.) Renowned quilt artist Terrie Mangat made some amazing quilts inspired by memory jars, including this one.  I saw a genuine memory jar in person, a decade ago at a flea market, and still haven't recovered from its greatness. 

So try some extreme embellishment! You'll not only have a ton of fun, but it will take a significant bite out of your junk drawer!

I admired Terrie's fabric in an earlier post.
Update II: Shared on Nina Marie Sayre's Off the Wall Friday. Check it out for creative quilt art! 

Tuesday, January 1, 2013

Quiltlet #7: Fabric that Rocks

Northcott's vast Stonehenge fabric line includes prints that look a whole lot like...well, like stone. Beautiful stone, some shot through with mineralesque veins of different colors and shades: 
 
The line must be very popular, because lately, my LQS (local quilt shop) is looking a lot like the Grand Canyon. On first viewing the Stonehenge landscape, I knew I had to use it in a quiltlet. I picked a favorite, and then went wild by buying an entire 1/4 yard!  (That's the great thing about quiltlets. You can be cheap.) 

Here's what I made: 
It's three layers, 8 1/4" x 3 1/4" finished size, with batting on the inside, and a pillowcase finish on three sides (fold on the fourth side). Once the three layers were together and turned right side out, I let the fabric tell me how to embellish it. After several false starts, I figured out what it wanted: 

Buttons. 
Specifically, mother-of-pearl buttons in whites, beiges, greys, silvers and tans. Vintage metal buttons in silver and rust, to match the faux rust of the fabric. There's also a wooden cube bead that looks like copper. The whole thing has a Steampunk feel. 

After the buttons were attached (through all three layers), I did a bunch of hand-quilting with brown thread. Of course, the quilting thread kept catching on various buttons. The large quilting stitches went in circles around the buttons, and in waves across the length, following the mineral vein lines. (If I had to do it over, I'd do hand-quilting BEFORE attaching the buttons.)
I wear this a lot, as a bracelet. It would also work as a bookmark (with the loftier buttons only on one end,  hanging outside of the book). It's an interesting textured wall hanging too. Just hang it from the loops.  

By the way, my LQS won't go out of business because I only bought a quarter yard of Stonehenge for my quiltlet. I also bought 5 or so yards of  extra-wide Stonehenge fabric, to back my recently completed Jerusalem themed chuppah (wedding canopy). The stoney (stoned?) look on back went beautifully with the cityscape on the front. 

So what are you supposed to do with Stonehenge?  Designers are combining the prints in geometrical ways, for results that look like ancient tiled European marble floors. This one, called Pisa, is from Mountain Creek Creations by Kari Nichols:
And here's Moroccan Tile, by Cheryl Phillips
(note: Phillips' wedge tools are also needed to make the latter pattern).

There's a quarry full of Stonehenge fabrics and patterns (including Pisa, above), all on one page, at  http://www.ericas.com/fabric/stonehenge.htm. (I've never shopped at Erica's personally.) Of course, you should check your LQS before buying online - you might get to fondle the merchandise and skip the shipping charge. My LQS carries several Stonehenge patterns, and precut packs, as well as regular-width and extra-wide yardage. (No financial affiliation with Stonehenge/Northcott! Really! I just really like the fabric!)

Have you made anything from Stonehenge?

Monday, December 3, 2012

Quiltlet #4: Pledge Allegiance to Steampunk Nation

Presenting Quiltlet #4!  [What's a quiltlet? Explanation here.]
Before I show you the whole thing, here's a detail:
Are you up on Steampunk? It's a Jules Verne dark-visionary-retro-futuristic look, involving gadgets, gears, and rust. At first Steampunk didn't do much for me, but then - as with millennium quilts and even  Sunbonnet Sue  - it started to intrigue, and finally, obsess me.

Unfortunately, the fever coincided with a visit to a bead show, where I passed by innumerable shiny brand-new beads, to hand over ten bucks (!) for the rusty watch innard above.

I combined it with a bunch of other elements, old and faux old, to make this cuff:
See how it vaguely resembles an American flag?

Can you guess what's new and what's not? In the closeup below: the round buttons in the upper right, lower right, and lower left corner are vintage. The "gear" in the upper left corner of the brown square is a new scrapbooking tchotchke. The bronze arrowheads are new, iron-on embellishments, from my LQS (local quilt shop).  The brass chain and the jump rings are new, and the hanging metal key is old.

They're stitched and glued to a  2 1/2" brown leather square, cut from an old men's jacket (acquired from the thrift shop).

Also on the front of this quiltlet, there's a large oversized brass eye,  new from the sewing store notions department. It's about 3/4" square.

Corresponding to an oversized hook on the back of the bracelet, sewn on thusly with brown embroidery thread: 
The two pieces of homespun fabric, in coordinated colors, came in a fat quarter pack from a quilt shop, quite a while ago. The colors are way more rustic than I'm used to working with, but perfect for the gloomy Steampunk atmosphere.

Homespun also frequently has stable fringed selvages, and I placed those edges for maximum effect, to create a fringe along the bottom and one short end. Here's the back:
This thing is a bit heavy, so I think I like it better as a horizontal wallhanging than a cuff. In a pinch, if there's no American flag in sight, I can pledge allegiance to it.

It's constructed in such a quirky way that I don't even think I can or should repeat the directions. If anyone wants directions badly, please email me, and I'll make up a more efficient route.

The cuff isn't my only Steampunk creation. Several months ago, as part of a Fiber Arts Trader swap, with a 'Steampunk Ice Queen' theme, I made these three things: (Brooches/Pendants/Wallhangings!):

Here's the third one closeup:
Clockwise from the top: Broken bobbin, perforated rusty street find (maybe the top of an old salt shaker?), metal snap half, tree-branch shaped silver plate bead, gear from the same source as above, vintage metal button, dead sewing machine bulb. The 'Grow' message, admittedly, is excessively cheerful for the dark and broken Steampunk mood.

Steampunk brooches or quiltlets make unique holiday gifts. But beware: you  and/or your giftee may become addicted, and find yourselves pledging allegiance to Steampunk Nation.

Have you made a Steampunk quilt/wallhanging/anything else?

P.S. I was delighted to be able to share this project on Nina-Marie Sayre's weekly creativity compendium, Off the Wall Fridays. Check it out!