

For quite a while now, I've been thinking about coiling things. I've seen the 'jelly roll rug' tutorials, where you use 2.5" wide strips from a precut jelly roll, plus 2.5" batting strips (which can be purchased precut to save time--but the idea of me buying precuts when I have so much scrap batting leftover from quilts struck me as nuts).
I've also seen the tutorials where you wrap fabric strips around clothesline, then stitch down the center and coil into a mat or basket with a machine zigzag. So I thought, why can't we combine these ideas, but use only narrow scraps?
I can't possibly be the only person who's done this, so now I've done it too. For the past week (after finishing up a major quilt), here's what I've been making. I am almost certainly reinventing the wheel here and if you have a favorite method , tutorial, or pattern for doing this, please let me know so I can send people there!
And speaking of sending, for the details of how I did this, I just put a 30-minute instructional video up on Youtube. It's completely free because I have so little experience with this and need more input! Find it at https://youtu.be/jL_8cALEs68.
As the video explains, you will need a couple of feet of batting into 1.25" strips. Unlike the jelly roll method, you don't have to sew them all together in advance.

Second, cut fabric into 1" strips. You can go narrower if you're using a selvage edge (which doesn't have to be turned under). Examples below include: cotton batik (on bottom); a cotton print; a selvage that is white; a selvage that is the same pattern as the rest of the fabric (the red and white dots); a silk necktie (brown); and cotton scraps sewn together into a strip.

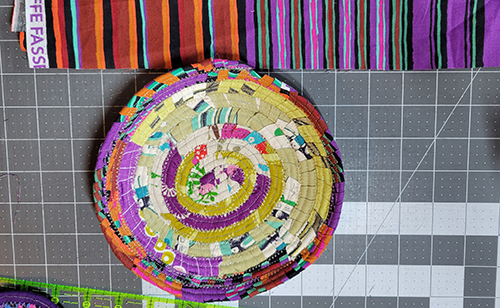
The first thing I made was this highly wonky bowl. All I did was wrap fabric around batting, but I didn't do any quilting on the strips as you'll see in the next projects. That makes it messier and lumpier than my later projects, where I sewed down the center of each strip before winding.

Side view.

The household royalty enjoyed plopping Herself upon it. Her Majesty preferred it when it was new; a few days later she yawns at it and considers other options. 


The next bowl was made from some large-scale Cotton & Steel linen-like heavy cotton prints.

Here's one of the fabrics that went into it:

By now I was ready to make the youtube video https://youtu.be/jL_8cALEs68, in which I make this. Not a masterpiece, it's a small coaster, but it shows how this method works.
I am the first to admit that it take a lot of chutzpah to teach a technique I've only been using for about 72 hours, but I am eager to see and hear about projects you've made using an approach like this.
If you try it I suggest you use a denim or universal needle; don't try to do dense stitching in the cords (that's what broke my universal needles); and don't try to wrap denim around batting. Email me at cathy.perlmutter@tmail.com, and/or if you just want updates, sign up for my newsletter, at at http://eepurl.com/idjomb