Sunday, November 26, 2017

Chanukah/Christmas Decor from Neckties: Use the Nice Ones!

Black Friday weekend is almost over! Enough with the shopping! Instead, stay home and make free winter holiday decor/gift card holders using old neckties!

There's nothing new about necktie Christmas decor; do an image search for "necktie wreaths," and you'll find plenty. At the bottom of this post, after the tutorial, there's a bulleted list with some I liked best. If you're not a craftsy person, you can buy beautiful, professional necktie wreaths on Etsy. I've also seen crazy-quilt style Christmas stockings made from neckties. If the ties come from a loved one, they make extra-meaningful decorations.

And for Chanukah (which starts the evening of December 12 this year), you can easily make something like this:

Necktie dreidels! They are not my original brainstorm. The idea came from Jessica Wilson, of the Scrumdillyoo blog, who brilliantly perceived the resemblance between neckties' widest end, and dreidels. She created the garland in the photo below (and gave me permission to use it - thanks Jessica!)
Jessica's tutorial is here. In a nutshell, she cut off the wide end of the tie, rolled the top  to the back, and then fastened a loop made from the narrow end to the back. She shows how to do it with tacky glue, but stitching goes faster, as would hot glue.

I might not have found the project if I weren't a member of the San Fernando Valley, California chapter of The Pomegranate Guild of Judaic Needlework. Our dedicated chapter president, Jo Anne Leeds, introduced us to Jessica's project, brought old neckties to share, and we sewed or glued them together, during a lovely evening in a backyard sukkah.

As I was playing with my tie that night, it occurred to me that I could make the dreidels multi-use by installing a pocket. That way, they could also work as gift card holders, and maybe even hold something larger - like a cellphone. I improvised a folding maneuver on the back to create the pocket. Here's the one I started at the meeting, from the back.
...and front:
There are two sew-in snap pieces: 
The pocket's in front of the flap. 
I had so much fun, I've now made two of them: 
From them, I learned:

  1. Don't start with a thin necktie, like the red one above. The wider, the better.
  2. Don't start with a hideous necktie, like the red one above. Turning it into a dreidel isn't going to make it any prettier. Save it for a monster next Halloween.
  3. The more you make, the better they look. To a point. 

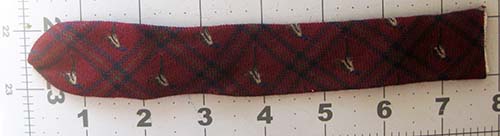
With those caveats in mind - I photographed the tutorial below with my second practice dreidel. I didn't want to ruin a nice necktie - that's why I made the unfortunate choice of scratchy wool adorned with pheasants (partridges?) on a burgundy plaid.
It doesn't exactly scream Chanukah. As you can see, at it's widest point, this tie is less than 3". Don't make my mistake - the bigger, the better. At LEAST 3", ideally more.  Fold the necktie thusly, with the fold underneath reaching down to where the wide tip starts.
Cut the end, leaving a 1" extra for folding under. In this photo, I cut two extra inches, but had to cut that back further.
I tried turning it over twice, but that white lining peeping out made it difficult. You may want to trim it back.
I stitched the end under with my sewing machine, but of course glue or handstitching would work.
Back: 
Bring the side edges together and stitch by hand.
One side sewn 

...and the other...
Cut a flap from the other end of the tie. Play around with it first to figure out how much you want to show on the front, and how much on the back. Cut a half inch longer, for the turn-under - it only needs to be turned under once.
Again, you may want to cut back the lining to make turning easier. That may mean releasing a few stitches on the tie. Trim back at least a half inch. 
Without the lining, it's much easier to turn. 
Hand or machine sew the roll in place. I used my machine. 
Experiment with placement. Make sure you like the length on front. If you have a cellphone handy, use it to test for length.
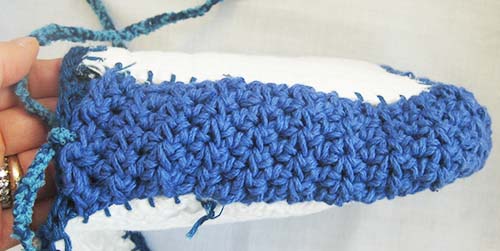
Hand sew the back in place, stitching down one long edge, across the bottom, and up the other edge, stopping at the top rim, as shown by the white arrows. 
Figure out where the snaps will go and stitch the two parts in place. 
Sew a statement button to the front of the flap. I stitched it slightly below the snap behind it. 
Open it up and tuck in a gift card.
Or hang them on a string, like Jessica did!
And what if you're celebrating Christmas? I did a lot of google searching for necktie wreath projects and tutorials. So many fun ideas! Here are some of my favorites:
  • A simple necktie wreath, using only 7 neckties
  • An even simpler wreath, with fewer neckties. 
  • And this one may be even easier. 
  • On the other end of the time-consuming spectrum, here's a no-sew wreath you can make with any kind of fabric scraps. 
  • And here's someone who wrapped their entire tree with identical neckties. (This may be going too far!)
Wreaths can be Chanukah decorations, too. Here's one I made several years ago for my mom's assisted living apartment. Hmm, I could have used neckties instead of ribbon!

UPDATE: One of my Canadian friends, Roz Agulnik, of Montreal, just sent me pictures of a  Chanukah wreath she made, using Judaic fabrics stitched onto yo-yos. Isn't this gorgeous?
Closeup, you can see the Judaic prints, purchased from Sunshine Sewing in Florida (no financial affiliation).
Roz overcame some physical issues to make it. "Since I don't have feeling in my hands," she writes, "making the yo-yos was a huge challenge for me. I have have a hard time threading the needle and holding onto it. I used straight pins to keep them attached to the Styrofoam shape. I hang it on the door leading to our condo." Thank you so much, Roz, for sharing this!

And for Halloween decor which are okay to make from aesthetically-challenged neckties, check out this post from last month!

If you try one of these ideas, (or you've done it in the past), I'd love to see how it turns/turned out!

Wednesday, November 22, 2017

Happy Thanksgiving! Nostalgic for Thanksgivvukah!

Remember Thanksgivvukah? It seems so long ago, 2013 to be exact, when a once-in-77,000 year coincidence brought Thanksgiving to the same night as Chanukah. To celebrate, I used up many Chanukah fabrics to make this unbatted banner....

...with a turkey doing oversight....

...and a million Judaic prints.

I also frantically crocheted flocks of turkey menorahs...

AKA "turkorahs" or "menurkeys," with lightable tails....


And the occasional ethnic headgear..
Every night, I crocheted an additional flame.
For non-Hanukah Thanksgivings, it can be adapted to be a non-menorah, like this peacock turkey. 
The pattern for the crochet turkey/peacock with menorah option is available - email me for a free copy (cathy dot perlmutter at gmail dot com). My blog posts with more details about all of the above are here, here and here. Wishing you and your family a happy, healthy Thanksgiving!


Sunday, November 19, 2017

Another Denim & Crochet Purse, made from Freemotion Quilting Practice Pieces

When it comes to freemotion quilting, practice makes not-so-bad. Never perfect - not me - but certainly more tolerable. No matter how eager I am to start FMQing, the more time I take to practice, the better I will like the results.

The downside is that the practice pieces accumulate in towering snowdrifts, looking something like this:

So here's a project that can upcycle some of them! Especially if you practice on denim! With the holidays coming, it's a fun gift. It's a denim and crochet cross-body purse. I showed one off two weeks ago (here), but this one is different because it is made from quilted pieces. Front view:

And back:

The back piece, unfolded below, measures about 5" x 10"  (not including crochet). It's quilted with  experimental vines/feathers, relics of my eternal Sisyphaen quest for a neat, convincing vine.
The smaller front piece is about 5" wide x 6" high, not including crochet: 
Grids compliment vines; and they're a lot easier! Here's the back of the flap. 
 I crocheted the gusset, too...

...but you can improvise a different solution, or skip the gusset completely and sew the front to the back. Go with the flow and see where you wind up! Here's a tutorial/reconstruction of how I made mine.  

DIRECTIONS
1. Practice quilting on a sandwich at least 6" x 18"  if you want to make a purse about the same size as this one. If working with jeans, don't include thick seams, to save yourself aggravation! My backing fabric in the example is white, but on second thought, you should choose something a lot darker and/or busier, so dirt doesn't show.

2. Cut two pieces from the quilted piece: a small front (about 6" high x 5" wide) and a long back-and-flap (about 10" high x 5" wide). Whatever measurements you use, widths should be the same for the two pieces. 

3. Use an "edge skip" rotary cutter blade to cut equidistant holes a generous 3/8ths of an inch or more from each edge of both pieces, all the way around.  ('Edge Perfect' is the brand I've long used, but now there are a lot of similar blades out there.)
4. Do a blanket stitch all the way around both pieces through the holes created by the blade. I used a blue linen yarn. 

5. On the long quilted piece: Crochet all the way around it 2-3 times. For the short edge that will be the bottom of the flap, do a long stitch, like double or treble crochet, so buttons can be buttoned through them, shown in the photo below. With such small buttons, I didn't need extra gaps beyond the hole created by double crochet.
For the remaining three sides, do single crochet.

6. Do the same number of rows all the way around the smaller quilted piece. Then, only crochet down one side, across the bottom, and up the second side. Turn and do it again, just those three sides. Make the rows a tight stitch (like single crochet) and DON'T INCREASE. After a few rows, the stitches will start to pull in, creating "fabric" parallel to the piece, which will become the gusset. If the crocheting isn't tight enough for a purse, you can either add a lining later, or add an additional crocheted gusset (the latter is shown below).  

7. Once the gusset is at the width you want, stitch the outer edge of the crochet that's on the smaller quilted rectangle, to the crochet stitches along the sides and bottom of the larger rectangle. 

8. Because my crochet was loose, I crocheted another, tight, gusset strip to the inside, about 2" x 17", with a thicker yarn. I hand-stitched it in place along both edges using yarn. This serves as backup, to keep anything except maybe toothpicks securely in the purse. The neater alternative: install a full fabric lining. 
9. Chain a strap to the width you want (I used three different yarns), and tie it to the gusset. Since this purse will be a gift, I only did a single knot, and will have the recipient retie it to the length they want, with a double knot. 
12. On the front piece, stitch on buttons that will fit through the crochet on the bottom of the flap. I used smallish shank buttons. 
So much fun! Call it done! More projects that upcycle freemotion practice pieces - into Artist Trading Cards, Valentine's Cards, and a purse pocket - are here. My previous denim-and-crochet purse is here