There's nothing new about necktie Christmas decor; do an image search for "necktie wreaths," and you'll find plenty. At the bottom of this post, after the tutorial, there's a bulleted list with some I liked best. If you're not a craftsy person, you can buy beautiful, professional necktie wreaths on Etsy. I've also seen crazy-quilt style Christmas stockings made from neckties. If the ties come from a loved one, they make extra-meaningful decorations.
And for Chanukah (which starts the evening of December 12 this year), you can easily make something like this:

Necktie dreidels! They are not my original brainstorm. The idea came from Jessica Wilson, of the Scrumdillyoo blog, who brilliantly perceived the resemblance between neckties' widest end, and dreidels. She created the garland in the photo below (and gave me permission to use it - thanks Jessica!)
Jessica's tutorial is here. In a nutshell, she cut off the wide end of the tie, rolled the top to the back, and then fastened a loop made from the narrow end to the back. She shows how to do it with tacky glue, but stitching goes faster, as would hot glue.
I might not have found the project if I weren't a member of the San Fernando Valley, California chapter of The Pomegranate Guild of Judaic Needlework. Our dedicated chapter president, Jo Anne Leeds, introduced us to Jessica's project, brought old neckties to share, and we sewed or glued them together, during a lovely evening in a backyard sukkah.
As I was playing with my tie that night, it occurred to me that I could make the dreidels multi-use by installing a pocket. That way, they could also work as gift card holders, and maybe even hold something larger - like a cellphone. I improvised a folding maneuver on the back to create the pocket. Here's the one I started at the meeting, from the back.
...and front:
There are two sew-in snap pieces:
The pocket's in front of the flap.
I had so much fun, I've now made two of them:
From them, I learned:
- Don't start with a thin necktie, like the red one above. The wider, the better.
- Don't start with a hideous necktie, like the red one above. Turning it into a dreidel isn't going to make it any prettier. Save it for a monster next Halloween.
- The more you make, the better they look. To a point.
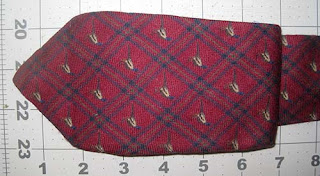
With those caveats in mind - I photographed the tutorial below with my second practice dreidel. I didn't want to ruin a nice necktie - that's why I made the unfortunate choice of scratchy wool adorned with pheasants (partridges?) on a burgundy plaid.
It doesn't exactly scream Chanukah. As you can see, at it's widest point, this tie is less than 3". Don't make my mistake - the bigger, the better. At LEAST 3", ideally more. Fold the necktie thusly, with the fold underneath reaching down to where the wide tip starts.
Cut the end, leaving a 1" extra for folding under. In this photo, I cut two extra inches, but had to cut that back further.
I tried turning it over twice, but that white lining peeping out made it difficult. You may want to trim it back.
I stitched the end under with my sewing machine, but of course glue or handstitching would work.
Back:
Bring the side edges together and stitch by hand.
One side sewn
...and the other...
Again, you may want to cut back the lining to make turning easier. That may mean releasing a few stitches on the tie. Trim back at least a half inch.
Without the lining, it's much easier to turn.
Hand or machine sew the roll in place. I used my machine.
Experiment with placement. Make sure you like the length on front. If you have a cellphone handy, use it to test for length.
Hand sew the back in place, stitching down one long edge, across the bottom, and up the other edge, stopping at the top rim, as shown by the white arrows.
Figure out where the snaps will go and stitch the two parts in place.
Sew a statement button to the front of the flap. I stitched it slightly below the snap behind it.
Open it up and tuck in a gift card.
Or hang them on a string, like Jessica did!And what if you're celebrating Christmas? I did a lot of google searching for necktie wreath projects and tutorials. So many fun ideas! Here are some of my favorites:
- A simple necktie wreath, using only 7 neckties
- An even simpler wreath, with fewer neckties.
- And this one may be even easier.
- On the other end of the time-consuming spectrum, here's a no-sew wreath you can make with any kind of fabric scraps.
- And here's someone who wrapped their entire tree with identical neckties. (This may be going too far!)

UPDATE: One of my Canadian friends, Roz Agulnik, of Montreal, just sent me pictures of a Chanukah wreath she made, using Judaic fabrics stitched onto yo-yos. Isn't this gorgeous?
Closeup, you can see the Judaic prints, purchased from Sunshine Sewing in Florida (no financial affiliation).
Roz overcame some physical issues to make it. "Since I don't have feeling in my hands," she writes, "making the yo-yos was a huge challenge for me. I have have a hard time threading the needle and holding onto it. I used straight pins to keep them attached to the Styrofoam shape. I hang it on the door leading to our condo." Thank you so much, Roz, for sharing this!
If you try one of these ideas, (or you've done it in the past), I'd love to see how it turns/turned out!


No comments:
Post a Comment
Thank you for commenting!