Showing posts with label Strip piecing. Show all posts

Sunday, October 14, 2018

From Tree to Shining Tree (With 3 Tips)

In our last installment, I showed off a commissioned tree-themed quilt. Sending it to its new owner broke my heart! It also lacked buttons. So I rapidly made the following three quilts, each about 15" square. A winter tree:

An autumnal tree (or maybe a summer citrus?)
Can you find the bra clip?
 Next: Winter again? The trunk is white.
But the leaves are green, so let's call it early spring!
The trunk is Jane Austen text so I added a metal heart charm (the text below it says "heart is really attached")...
...and a squirrel from the cake-decorating store.
Want to make your own tree quilt? Two tips:
1. Practice is important, but I like my designs better if I don't draw them first - use scissors to cut trunks from paper. I grab every bit of junk mail and scrap paper in the vicinity to cut out practice trees. Below is a draft for last week's tree quilt, cut from the paper that comes with batting.
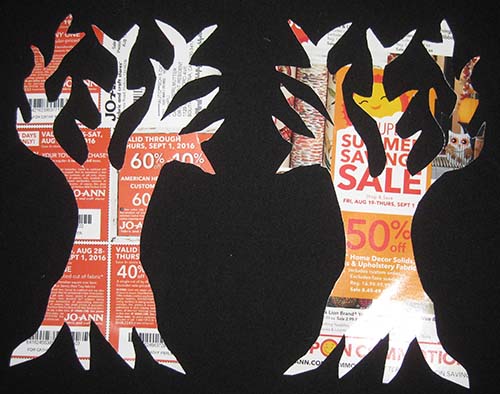
And here are two smaller trees cut from a double layer of an old Jo-Ann Fabrics fliers. 
2. To give fabric tree trunks extra dimension, back them with Decor Bond, a medium-weight fusible interfacing. A layer of DB isn't strong enough for, say, a fabric box, but it is thicker than interfacing you'd use for most garments. I pencil-traced my papercut trees onto DB's non-fusible side, rough cut it out (beyond the pencil borders), then pressed the fusible side to the back of the trunk fabric and cut out the two layers together along the pencil line. DB also controls fraying. I then used a glue stick to lightly attach the non-fusible DB side to the background fabric. In the squirrel picture above, you can see the slight but satisfying ridge that raises the trunk above the background. (No financial affiliation with DB.)

3. Combining batiks with prints is always a gamble. The immediate background for two of these tree quilt is a bunch of batik strips I sewed together a couple of years ago, in my Ann Brauer phase
If you want to combine batiks with prints, it's often better to choose prints that have a watery near-batik quality. The postage stamp print below was pretty watery. The button print and text print, not so much. 
As with almost every other decision in quilting, combining batiks and prints means auditioning things next to each other to see if they work!

Sunday, January 7, 2018

Creative Time Bomb: Sort your Stash

How do you organize your quilting fabric? Creating categories not only makes fabrics easier to find, but can also jumpstart future creations. Here are my categories, jammed into 8 small shelves plus 3 plastic boxes:

1. Human and human-like entities (including cyborgs, smiley faces, plus the occasional human underwear):
2. Food and beverages:
3. Animals, real, extinct and imagined:
4. Mostly inedible, inanimate objects, including florals and geometrics:
5. Blue and green solids and monochrome prints, not including skies, but including lakes, rivers and oceans...
...and green leaves (Unless the leaves are edible - the fabric on the lower right looks like collard greens to me, so sometimes it travels to category 1):
6. Yellow, orange, red and gold solids and monochrome prints:
7. Purples, lavenders:
8. Black, whites, greys & brown prints and solids, and black-and-white prints
9. Batiks, all colors, all patterns, plus all sky prints.
10. Patriotic and American history
11. Judaic prints:
12. Miscellaneous, and polka dots The huge pieces of the fabrics below - vintage housewives and pre-Obama US presidents - that don't fit in my packed "human" shelf, so they're in miscellaneous:
Quite often, when going through my stash, I will fling a fabric to a different category. Take fish, for example: Animal or food?
If it looks like it would be tasty broiled with butter and garlic, it goes into food, but if it could be in an aquarium or a deep sea, it usually goes with the animals. Same problem with cows:
Just looking at their yearning faces and thinking about where they're headed makes me want to become a vegetarian (at those moments, it goes to animals.) When craving a burger, it travels to food. And what about this print with dog astronauts - animals or humans?
This fabric has been commuting back and forth between categories for decades.

Jack-o-lantern fabric is even more elusive. Edible, human, animal, or inanimate? I should just sew it into a trick-or-treat bag and donate it to a thrift shop, so I don't have to agonize over it anymore.
The best reason to sort your stash is that you find unexpected relationships, and group  fabrics with common traits together. Even if you don't do something with the groupings and subgroupings at the moment, they can serve as messages to your future self - creative time-bombs - that will save you time and spark ideas.

Like a month ago, when I was looking through my stash for holiday gift ideas. I found the following fabrics grouped together in the "Prints: Non-Human, Non-Animal, Inedible" box.
(I know, that on the upper right looks a bit like hard-boiled eggs, but not enough.) They were piled on top of these, which you saw above:
The fabric on the far left was cut from a beautiful Swiss dress that a friend gave me after her baby outgrew it. The two on the right are fat quarters that my well-trained DH bought me for a birthday.

Plus there was this heavyweight Japanese print:
...which sent me running to the "food" shelf, where I knew I had another piece of heavy fabric purchased from the same quilt show vendor: a pastry fabric that says "petite gateau," which means "little cake" in French, even though the fabric is Japanese:
Now I had an extended family of fabrics, near-pastels with a lot of pink and a happy, air-tossed mood. I did a little improvisational cutting, sewing, and slicing, and wound up with four of these: 
Vintage rick rack made a nice punctuation. The music fabric went on the back.
I used Insul-Bright batting inside. so they can function as real potholders. For hanging loops, I found the following embroidered ribbon in my parents' tablecloth drawer. I am guessing my paternal grandmother, my beloved Bubby, bought it, maybe planning to embellish aprons? She died in 1974, which makes this ribbon over 40 years old. It's in perfect shape, perhaps because it was encased in a long narrow plastic viewing sleeve:
The plastic sleeve says "Shrinkage CONTROLLED" and "Perma-Trim". They were right, 40 years is pretty Perma!

Along with four potholders, I made a couple of table mats:
To the table runner, I added borders of a pastel Liberty of London print (also from "Prints: Inanimate"). 
I like to take a group picture of related creations, so here they are, four potholders, two table runners jammed together. If I squinch my eyes, I can imagine what it might look like if I'd made them into one quilt: 
Meh, it would have been a low-contrast quilt. (Speaking of contrast, can you find Waldo's sock in the picture?) Once photographed, I put my shoe back on, broke up the set, wrapped each in festive holographic  cellophane, and distributed them to friends for holiday presents - my daughter asked for one, too - leaving me with the good memories and a little bit more space in my stash! 

Yes, I really would love to hear about how you categorize your quilting fabrics!


Sunday, November 12, 2017

Celebrate Catastrophe! Turn UFO's into FrankenQuilts!

Presenting my new FrankenQuilt! 
Yes, sort of like that, except in fabric!
It's stitched together from old body parts stashed in my UFO* cupboard, a freakin' scary place. Said cupboard contains 25 years worth of aesthetic outrages, piling up since I started quilting.

I normally avoid this cupboard, to preserve my sanity and self-esteem. Occasionally I squint my eyes and shove things in, slamming the door shut quickly so nothing escapes.

But the demise of my computer forced a confrontation. The computer was behaving so badly that my DH had to send it to a computer meditation retreat, where it contemplated the ways it had wronged me, and gradually repented.

Without my computer, endless hours yawned ahead. I was in the middle of several writing projects that I couldn't do on my phone. I was creatively stuck on a major quilt.  I tried, how you call it, "vacuuming the house," but that only took a half hour.

So I was forced to the cupboard. Among the better offerings was this top. (Pretend it's not quilted).
It's made up entirely of wedge-shaped pieces, cut circa 2001, when I was obsessed with Marilyn Doheney's wedge rulers. My kids were little and I made a bunch of hyperactive medallion quilts for gifts and our preschool's auctions. Here's one I donated:
The medallion includes chopped flamingos, tigers, zebras, alligators, manatees, and polka dots....
I liked that so much I made another one to keep....
When these and others like them were done, I had a thick stack of leftover wedges, like this: 
They sat on the UFO shelf for many years. Somewhat recently - maybe within the last three years - I sewed them into another medallion, 
and raw-edge zigzagged that onto a teal background fabric....(pretend this isn't quilted)....
...plus made four borders out of strip-pieced wedges and solid fabric wedges....
 ...And then restuffed this whole thing back into the cupboard....

...where I found it last week.  Also in the UFO cupboard, I also found a stack of blocks from my much-more-recent hashtag obsession. (i.e. earlier this year).
My tutorial about how to make these blocks is in this blog post.

I decided to lay my spanking new hashtag blocks around my spanking old wedge medallion.  Although the colors didn't match, I kind of liked the effect!  There weren't quite enough hashtag blocks, so I whipped up some more...


...below, a half a hashtag is better (and faster) than none....

Plus some of my original hashtag blocks were insanely boring, so I shattered them....
....and surgically enhanced  others: 

 The border quilting, as you saw in the shots above, was straight-line quilting. The corner blocks were quilted with curly loops. I quilted a sun in the middle....
...and did a whole lot of freemotion wiggling on the teal background....

I think the uneven wedges look like the stitching on Frankenstein's neck! With or without wedges, you can make a Frankenquilt too! Just follow this simple tutorial:

 1. Await a mild catastrophe that forces you away from as many electronic devices as possible. At the very least, your PC should crash. It would also help if your Kindle, cable, and cellphone goes down. However, if your electricity goes down, this won't work, unless you own a hand-crank.

2. Go to your UFO cupboard, grit your teeth, and pull stuff out. Find things that are remotely related, and sew them together. If common sense tries to stop you, explain to it that you are making a charity quilt, or an ottoman quilt, or something that honors the kooky spirit of Young Frankenstein! When it's over, you'll be exhausted but happy!

* UFO=Unfinished Objects. A more euphemistic/positive term is "Works in Process."