Friday, October 30, 2020

Pandemic Porch Quilt Show, Days #22-24, New York, Los Angeles and Fantasy Land

Day #22. "NYC, Room 2913". Some buildings in this large quilt are based on real Manhattan buildings; some are pure fantasy. It's from my series of modern, improv cityscapes. 

The fun part of cityscape quilts is brainstorming techniques that convey the essence of a building. The purple structure below is foundation paper pieced, to represent the extraordinary Hearst Tower in NYC. (To see what it looks like in real life - it's not purple - go to Wikipedia, here.)

Day #23, I Love Los Angeles
While hanging this quilt on the porch, our new (indoor) kitty Cleo escaped her enclosure, and came darting out from under the quilt - My DH is laughing in relief that we caught her!
It has some of my favorite LA places and things. Here's a better photo, without the distracting cuties or sunspots. 

The giant teal striped building on the center-right is the Eastern Building (if you ever watch Lucifer on Netflix, you've seen lots of  scantily-clad gorgeous actors cavorting around its rooftop pool. If you were able to tear your eyes away from the beautiful bodies, over to the beautiful building, you saw why it's an art deco masterpiece). In the lower center, the green shapes are Disney Hall.
I later made a second Los Angeles quilt with many of the same structures, and some new ones. I gifted this second one to a friend, so I can't put it out on my porch, but here's a photo. 
 
My favorite building on this quilt is the arched 1960s Los Angeles airport 'Theme Building,' top center, which looks like something from the Jetsons! In this version, I made Disney Hall in shades of blue (on the lower right.)   

Day #24: Scrap City
Arguably even more fun than making a reality-based cityscape, is using the leftovers to make fantasy land! This smallish quilt is called "Scrap City." 
I hand embroidered stars (or possibly alien fighter vehicles) in the sky. 

More photos of this and other city quilts, and my methods, are in my cityscape booklet, here. in my etsy shop, CathyPStudio. 

More porch quilts are coming! 

Monday, October 26, 2020

Porch Quilt Show, Day 21: Magic Door

 Day 21: Magic Door

This may be my first scrap quilt, started in the mid 90s.  I owned very few prints at this point, so it's mostly solids. 
For years, it remained a top, and because of the lack of prints, I considered it very old-fashioned. Then, along came the Modern quilt movement. I realized - as did so many other quilters - that I was ahead of my time! So I decided to finish it, adding the log cabin borders (their edges are inexpertly satin stitched). I quilted it, with walking foot quilting. I liked the results enough to promote it to a prestigious position in my home, as a filing cabinet cover!
See more photos and details of this quilt in a 2013 blog post, here

Friday, October 23, 2020

Pandemic Porch Quilt Show, Day 20: Rolling Pansies

I made this quilt in the 90s, finishing the work of an unknown quiltmaker.

It started as a flea market find: a metal cookie tin, full of petals and leaves. Many petals were beautifully turned under with a lovely, even basting stitch in thick white thread. I couldn't bear to take the maker's stitches out, so I left them in place whenever possible.

This "pansy" is a traditional quilting motif, from the 1930s I think. The fabrics - primarily calico florals - look like they're from the 1960s. Each flower has six components, 5 petals, plus one leaf. The thoughtful quiltmaker, perhaps knowing that she couldn't finish , put one sample block in the tin, with the components basted in place on a sad square of browning white muslin.

Clearly, something more cheerful was needed. I went for broke and took quilt guru Freddie Moran's priceless advice to treat red as a neutral. I hand appliqued each flower to a red square. After quilting, I surrounded each flower with white buttons.

The quilt was lightly hand-quilted. We used this quilt often, on beds and couches. I occasionally had to re-secure dangling buttons. A few months ago, to strengthen the quilt, I machine quilted red swirls in each block's corners.
The sashing is a vintage floral plaid, also from the flea market (but not with this project).
I liked the topsy-turvy energy generated by the plaid lines shooting in all directions!
Many more quilts from my porch show are coming! 

Monday, October 19, 2020

Pandemic Porch Quilt Show, Days 14 - 19: Altered Cowboys and Beyond

My show is going strong! Here's the third batch. 

Pandemic Porch Quilt Show, Day #14: Cowboy Quilt
This quilt was made circa 1998, when my adorable little boy wanted to be a cowboy.
At the time, I was not only enchanted with my growing baby humans, but also my growing baby fabric stash, especially this brown border print:
As a new quilter, I did some reckless things. In this case, I cut the outer edges, on the sides and bottom, into hanging diamonds. What's worse, I chose a relatively thick red denim bandana print to bind them. (On the far left).
Binding and mitering up and down those sharp angles, with heavy fabric, took approximately 7000% more time than binding a straight edge. By the second diamond, I regretted it, but didn't want to rip, so I plodded onward.

The quilt has randomly strewn fussy-cut rodeo scenes, to break up some of the squares - broderie perse with a satin stitch.
I also stitched buttons, in assorted tans, browns and greys, on many squares.
Hot peppers count as cowboy fabric, right?
On the back, I placed all the bandanas I could find in my house, including this very unusual orange-and-turquoise one that my husband's had since high school, at least.
Today, my little boy no longer wants to be a cowboy. He's happy as a 26-year-old scientist in a big city - no horse, no car - but he does have a bike and a dog.

Day 15: Altered Squares
This quilt hung at Quiltcon 2018 in Pasadena, CA - the town next to mine - on my friggen' birthday! Friends overcame many obstacles to attend the show, and line up obediently in front of it when I forced them to. (I'm in the middle back). That may have been the best birthday of my life.

Day 16: She Exclaimed!
This is my exclamation-point shaped quilt, made this year. It's improv paper pieced. Instructions are in my new pattern booklet, "Modern Paper Pieced Log Cabin Triangles," here. Below, it's photographed against a grey background.
Detail:
To my happy shock, this quilt was awarded a second place prize in the Midcentury Modern category, in Mancuso's online Visuals #1 international show. (Find all the winners here.)

Day 17: Counterclockwise
This 32" x 44" quilt, made in 2015, started with an improv circles game in Diane Hires' fabulous book, "Vivacious Curvy Quilts." For the arrows in two borders, I made up my own game - my tutorial is in a couple of blog posts that begin here.

Detail:


At some intersection, I tucked dimensional folded points, to make a whirligig:


Day 18: Dresden Variation

This quilt is an oldie, maybe from the early 2000s, when I was entranced by even older, 1930s-era quilts, particularly one with this unusual color scheme - a hard teal, plus lots of soft pastels. My pastels are reproduction 1930s fabrics. The motif is called a Dresden Plate. The quilt's gently ridged outer edge wasn't nearly as challenging to bind as on my earlier, sharp-angled cowboy quilt.

I do kinda regret the salmon colored fabric between the fans. (I happened to have a lot of that fabric, which, all too often, isn't the best reason to use a color!)


Day #19: That's a Lot of Yellow
I made this quilt in 2012, by playing a game in one of Karla Alexander's "Stack the Deck" books. The basic idea: Stack squares; use a rotary cutter to cut all layers, creating multiple stacks; shuffle each stack; stitch the pieces into multi-fabric blocks. It's perfect for when you don’t want to think much, and just want to sew.

The game that produced this particular quilt is "Razzle Dazzle," from Karla's book New Cuts for New Quilts, More Ways to Stack the Deck. I took my fabric choices not from book's sample (unfortunately), but from the fireworks print in the borders. But I amplified their intensity to a degree that might have been un peu trop.
When finished, I had a fascinating mound of scraps - so I glued them to a felt circle, attached those to extra-large pipe cleaners, smacked orange buttons in the middle, and,- voila! - hyper-daisies!

Thursday, October 15, 2020

English Paper Pieced Coaster Tutorial: Finish a Block, Enjoy a Fantasy Euro-Vacation!

Are you a wannabe traveler, sitting at home, while your muscles and your miles (frequent flier) stagnate? 

This project can brighten your days and remind you of better times and more interesting places. 

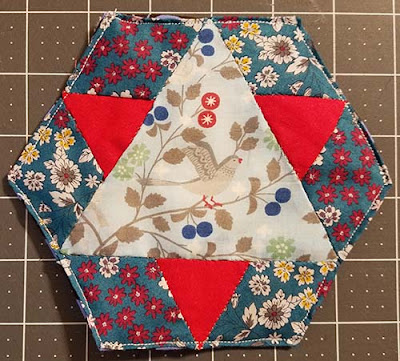
It's an English Paper Pieced Euro-coaster, upon which we can place our demitasse of home-brewed espresso, or perhaps a pot of Earl Grey. 

Put another way, this tutorial shows how I used fabric from Paris, and one of the blocks in my new English Paper Piecing book, "Hexagon Star Quilts," to make a coaster. It would also work as a hanging ornament. You can adapt this technique to finish any EPP block. 

By the way, English Paper Piecing really does come from England, and has always been very popular there. Right now, it's enjoying a huge resurgence around the world, for good reason - it's portable, easy, relaxing and addictive. 

This particular project started with a pile of fat quarters I was lucky enough to buy in France two years ago (my fabric-related adventures there are blogged here).

French Frou Frou, looks similar to Liberty of London; it's lightweight and often floral, but not as expensive. Frou Frou is easy to find in US shops, with a little help from the Internet. (William Morris fabrics have a similar look.) 

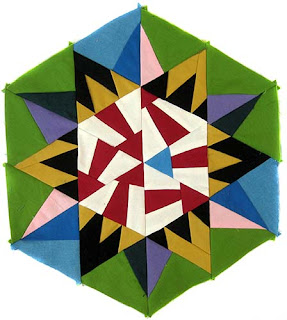
I chose Star 83 because the central piece is large enough to highlight an interesting print. If you have my book, find the star on page 115. 
If you don't have my book, you can download Star 83 for free from Dropbox, using the link HERE. (If that doesn't work, email me at cathydotperlmutteratgmaildotcom). It looks like this: 

INSTRUCTIONS

1. Choose three fabrics with varying values and hues. 

2. If you own my book, photocopy or scan Star 83 onto cardstock. In the photo, the book is on the left, and the scanned cardstock version on the right. 


If you don't own my book, use the pink Dropbox link above to download the pattern and print it onto cardstock.

3. Cut around the outline. 

4. Don't cut it apart yet! First we'll create a full-size backing with turned edges. For the back, I suggest you use a fabric that won't show cappuccino, croissant, or french fry stains. Lay the entire hexagon on the wrong side of your  backing fabric. 
5. Cut around the edges, leaving at least 3/8" seam allowance. 
6. Bring fabric and the template to the ironing board. Center the paper on top. Press all six edges firmly inward. 

Here's the reverse side with all edges pressed in. 
6. Remove the cardstock and press the edges inward one more time, to get the folds sharp. 
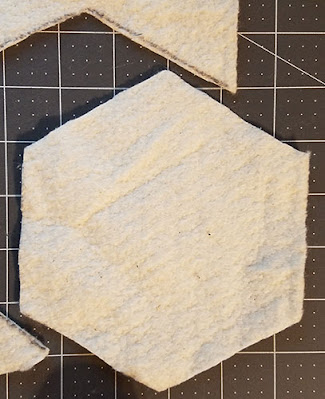
7. Don't cut up the pattern yet! We need it for one more thing - to cut the batting to size. Place it on a batting scrap.  
8. Trace around it.  
9. Cut just inside the line you drew.
Now it's all cut out, leaving the drawn line behind. 
10. Cut apart the cardstock pattern, and baste fabric to all its pieces, using your favorite English Paper Piecing techniques. If you are a beginner, my book has extensive explanation of different ways to baste, with thread or glue.  

11. Sew the pieces together, by hand or machine - again, beginners can find methods and tips in my book. Piecing order: First sew each A piece between two B pieces. Then sew each BAB unit to one side of the central triangle. 
12. Now you have three components: The assembled top, the batting, and the backing. 
13. Tuck the batting into the backing. Press the flaps over each edge. (Iron again, if you like.)
14. Remove all papers (right) from the back of the pieced block. (You may be able to reuse them to make more coasters!) 
15. Place the top over the batting and backing. 
16. Use pins or sewing clips to align the outer folds on top and bottom, and tuck seam allowances and tails inside the sandwich. 
(Some of my clips are plastic - some are metal binder clips. I find the silver binder clips easier to open than black binder clips; the plastic ones are easiest of all on the hands.)
This is also an opportunity to baste one long edge of trim - like rick-rack - between the layers, extending beyond the edge. 

17. Hand sew the edges shut - by hand, with a ladder or whipstich. By machine, you can use a straight stitch, with monofilament thread, or thread that matches the fabric (I used white here so you can see it.) An open-toe foot helps, and a sharp awl (or seam ripper) is a necessity, to tuck bits inside and do last-minute adjustments of folds. You can see my metal awl on the right below - there's a pink sewing clip on it permanently, which keeps the awl from rolling away!   
Here's the block with machine straight stitching (white). 
If you like, go around again, with a decorative stitch and contrasting thread. You could even couch a decorative cord or yarn there.

18. Just for looks, and to ensure the batting stays in place when laundered, do some quilting. I stitched all the way around the inner angle of each background diamond, which makes them pop forward (I used dark thread that's hard to see in the picture.) 
 My last step was to quilt three straight lines on each red triangle, extending inward from each outer point. 
Back: 
Now heat up the espresso machine (or locate your can of instant cappuccino powder), and you're ready for your Zoom cafe, perhaps with a virtual background of the Eiffel Tower. It's not the same as being there - but look on the bright side - you don't have to inhale other peoples' cigarette smoke!?

And hopefully, the sun will metaphorically rise again, our country will get its act together, and surely, one day, we will again be welcomed in places far beyond the front porch.