
What do these English Paper Pieced blocks from my new book, "Hexagon Star Quilts," have in common?

But quarantine is an opportunity to try new things (assuming you don't have an essential job, young children, and/or a sourdough fixation). So a couple of weeks ago, I plunged into curved EPP in a big way. It turned out to be mostly easier than I feared, but with a few trickier situations.
In fact, I have a new name for curved EPP: Extreme Paper-Assisted Applique. Because using freezer paper and/or cardstock to create and applique curved shapes is almost the same as English Paper Piecing, except the latter is harder to do accurately.
If you're pressed for time, here's my conclusion about curved EPP: It's doable, but recommended only for blocks that have relatively few curves.
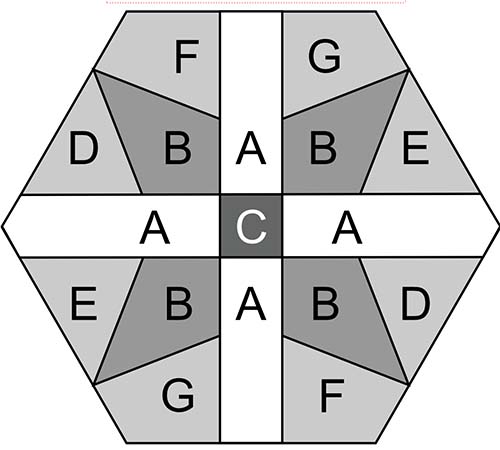
Here's how I did the research that led to this conclusion. I didn't have any curved block patterns, so I picked star patterns from my book to translate into curves, starting with this block, Star #91.

Here's my original piecing diagram:

I replaced the small central square with a large circle, and turned the outer hexagonal edge into a circle too. Result:

I grew it from 6 to 7", cut out all the pieces, basted fabric around them, and stitched them together. I used the flat-back stitch, which I found quite easy.


 Could be much better. Once again, the narrow tips of the dark blue pieces - where they curve around the light lavender petals - was challenging, and I didn't entirely succeed. The underside of the blue fabric is showing at the edges. Again, simply using freezer paper or needle-turn applique and layering the pieces on top of a blue circle would have been faster and neater.
Finally, here's a block that started as a straight-line six-pointed star. I deliberately created gentle curves that I thought would be easy to piece.

 And once again, it's okay, but not okay enough. The gaps and bumps at the edges just couldn't be filled.
Here's how I did the research that led to this conclusion. I didn't have any curved block patterns, so I picked star patterns from my book to translate into curves, starting with this block, Star #91.

Here's my original piecing diagram:
I replaced the small central square with a large circle, and turned the outer hexagonal edge into a circle too. Result:

I grew it from 6 to 7", cut out all the pieces, basted fabric around them, and stitched them together. I used the flat-back stitch, which I found quite easy.

And - ta daa - here's the front. (That wrinkle will go away, it's not an actual pleat.)

It's okay, but far from perfect - especially at the light star points, where dark blue pieces are supposed to meet. If I'd appliqued the green star and red bars on top of a blue circle, it would have been faster and more accurate, and there wouldn't be the tiny, thready gaps and unevenness at the edges.
Next, I printed my pattern for this block from my book, Star #98.

I simplified it, replaced the central hexagon with a circle, and also converted the outer edge to a circle I rounded off all the triangle tips. I sewed the basted pieces together by machine, from the top, with monofilament thread. Here's the back:
And the front.

Finally, here's a block that started as a straight-line six-pointed star. I deliberately created gentle curves that I thought would be easy to piece.


Summary of findings:
1. The basting part of curved EPP is just about as easy as straight line basting. You can pretty quickly get the hang of distributing seam allowance pleats neatly around concave curves, and and clipping seam allowances to make smooth convex curves.
2. Setting shapes around a central circle is much harder than surrounding a straight-edged shape (like a pentagon or hexagon.) Not because of the curve - it's because a circle doesn't show each piece's starting and stopping point. This creates a challenge in deciding what order to join pieces, placing them in exactly the right position, and distributing the fabric evenly with necessary precision.
3. The flat-back stitch is ideal for joining curved pieces. In fact, I can't even figure out how you could join curved edges with a traditional EPP right-sides-together whipstitch. Biggest flat-back drawback so far: I have to check the front frequently to make sure I don't accidentally stitch dog ears into the seams. (Which I did, Twice.)
3. A machine zigzag from the top works beautifully with curved piecing.
What did I wind up doing with my imperfect curved EPP blocks? I combined them with actual appliqued blocks, and set them into the side borders of this "Frankenquilt" - my oldest UFO, finally finished.

Here are a couple of closeups. For more about this quilt, go to my last post, here.

If you're interested in my book with 113 English Paper Pieced stars - all straight lines - find more information on my blog here, or on Amazon, here.
