Showing posts with label Postcards. Show all posts

Sunday, March 10, 2024

Thready Scrap Basket, or Scrappy Thread Basket, or Baskety Thread Scraps (A Tutorial)

Let's give scrap baskets a double meaning! Made from scraps, especially thread scraps, this basket is also a good place to throw them! It's about 4.5" high and 3.5" across. I used silk, so it's extra fancy, but you can use any fabric and threads you like. 


 One end overlaps the other. Three metallic buttons seal the flap, and I put more buttons below the top edge. The view shifts as you turn it...


Contents include:

-- An old freemotion quilting practice sandwich, 

--  Long scrap fabric strips, as background,

-- Ravelled threads on top. Most are threads that have peeled off my silk dupioni collection; there are also strands of a thick gold thread that will never go through my machine. Any decorative thread scraps will work. And,

-- Vintage metal buttons.

I didn't take photos while making the basket above, but here's a tutorial with a dramatic recreation (but different colors).

I started by cutting an old quilting practice sandwich to around 11" x 4.5". Below, the  blue square on the right was a tension test with flannel. Since that patch is not thick (and it's covered with stitches), I just left it there. On this side, the white fabric doesn't reach all the way down to the bottom edge of shape, but that's okay; this entire side, including the batting along the bottom, is about to be completely covered.

The reverse side does have fabric reaching to all edges. That means I can decide later if I want to leave this interesting side showing on my final piece, or cover it with another piece of fabric so neither the old nor new stitching can be seen on back.

I covered the front with long, rough-cut silk scraps, each a couple of inches high, overlapping their long edges by at least a half-inch.

I drizzled that with  clots of unravelled dupioni, and other decorative threads, plus small scraps and strips. 
Keep adding. Pretend you are Jackson Pollack.
Too much is never enough (imho.)
Once you're happy with it, cover it with a layer of tulle.  If you're lucky enough to own tulle in several different colors, audition them all -- they have unexpected and subtly different effects! Here, I decided I liked the black tulle best.
Carefully pin the tulle in place, all the way around the edges of the practice sandwich underneath (it's hard to see the pins, but there's the yellow head of a flower on the lower right).  

Do a rough trim of the excess tulle. (I used my rotary cutter, above). Bring it to your machine and quilt as desired! I used my walking foot, and a shiny rayon variegated thread, to quilt wavy echoing lines. 

Alternatively, you could use a freemotion quilting foot and do more elaborate designs! 
At each end, I turned the corner, turned again, and used the walking foot's edge to echo the previous line.
When it was done it still looked pretty messy.
Time to trim all the edges even with the backing practice sandwich. 

My ruler helped me cut an even rectangle.

To finish the edges, I did a corded edging all the way around. This involves zigzagging a thick dark blue embroidery thread (6 strands) all the way around. I used a medium-loose, very wide zigzag, with dark blue thread in top and bottom. 

Here's a short video of the process....


At corners, stop with your needle outside of the corner, and turn. 
 

All done! 
A better view of the edging (left)

Next I cut a circle of Peltex Ultrafirm interfacing, with one fusible sided. I fused silk to one side, and sewed another fabric circle to the reverse side. This gave me the base. 

(The flowery outside is former pants). I hand-stitched the lower edge of the embellished panel around the round base. 

Here's the view looking straight in. 
There's so much more that you can do with this idea! You could fold it into a little case for your earbuds.
In 2018, I used it to make a whole lot of  heart brooches. Find a tutorial at the end of this post.


And I made schools of fish and other ocean creatures (my tutorial is here.
My fish pattern book is on etsy, here.)


As you can see, this technique is adaptable and  addictive! Find the Create Whimsy article that triggered this round of objets, here

I have some big news coming up soon! Please join my main mailing list, 
here.


Sunday, February 18, 2024

Confetti Cat Portrait

BEFORE: In my last blog post, I showed this potential valentine, which my friend Jane pointed out, looks more like the Valentine's Day Massacre. 

I certainly couldn't give this to anyone I don't wish to maim. But then it occurred to me that my daughter's cat, Cleocatra, routinely combines love with blood. She doesn't allow claw-clipping, so when she plays with us, scratches can ensue. She's also an unrepentant lizard-tormentor and sewing-machine occupier.

AFTER: So I turned my violent background into this! The perfect Valentine for my daughter!

This technique has been around a long time, with many variations. If you were quilting 20 years ago, you might, like me, treasure your copies of the fabulous "Snippets Sensation" books by Cindy Walter. 

The basic idea: Lay down a piece of batting or or fusible interfacing (fusible side up). Cover it with fabric scraps. Cover those with one piece of tulle. Last, "quilt" on top.  

For the cat portrait, I had already put 1 layer of white tulle over the piece you saw at the top of the page. To add the cat and the caption, I laid more on top.

I backed a couple of inches of black and white fabric with fusible web. Then I used the "think" method: I stared at the photo of Cleo above, and freehand cut the components: black head and body, white snout and forehead, black and pink nose/mouth, yellow eyes, and black pupils. I fused and/or glue-sticked all those elements in place.

I used alphabet rubber stamps on white woven bias tape to create the words, "Sometimes Love Hurts." I glue-sticked those in place

I covered all the components with one more piece of tulle, this time dark purple. Next, I added a little more freemotion quilting in red over the background area, plus I used white thread to sketch in Cleo's whiskers and ear hairs. 

I stitched the square to a former Christmas necklace, full of bells. (They signify the bell that Cleo wears to warn victims away.)


My daughter loved it! Cleo was not impressed. But seriously, I adore this cat. Tips for tricking cats into allowing their claws to be clipped would be appreciated.

Find the Create Whimsy article that triggered this round of fun, here. More details are in my last post. Find my tutorial for playing around with this idea with silk scraps, to make fish and valentine jewelry, here

Want more ideas? I have some big news coming up soon! Please join my main mailing list, here.


Saturday, February 10, 2024

Stress Relief with Confetti Valentines and Non-Valentines

 I was minding my own business, making a whole lot of improv triangle kaleidoscopes, like this.

I'm only using solids for this quilt. The smallest scraps were filling my "toss" bin.

But then the Create Whimsy newsletter arrived in my email. Lynn Woll, its curator extraordinare, had an article titled "Scrap Happy Confetti Quilts," with  Valentine's Day projects. Oooooo! It looked like so much fun...and I knew I had loads of fresh scraps. 

I plucked the solids from my "discard" bin and sent them into plastic bags, organized by color. 

Then I cut out a 4" square of fusible mid-weight interfacing (Pellon 809/Decor Bond), and started placing bits on them. Lynn suggests laying out squares of interfacing, fusible-side up, then adding a layer of mini-squares, working inward from the borders. That was too slow for me. I used lots of bigger shapes. A top of layer of tulle, to hold everything in place, is an option. I liked the way it looked with a square of purple tulle from my stash. The last step was machine stitching a grid.

That was good practice for the next one, more of an attempted Valentine. 
The blue is a batik, the orange piece on the far left is a tiny print; the rest are solids. I placed white tulle on top, which cut the intensity. I think this piece sends the message, "Although I love you, while wearing pink I was in a bloody duel with golden swords, and now my heart is sore and broken."  In other words, I can't think of anyone I actually want to send this particular (inaccurate) emotion to. (My clever friend Jane suggested it might work as a remembrance of the romantic Valentine's Day massacre.)

For my third try, I went for a design that's tough to ruin: Tree. I accidentally laid the 4" interfacing square down upside-down, so NONE of these pieces were secure! 
I didn't want to move them all to a different piece of interfacing, with fusible facing correctly up; so I just left it like that. I fused one more layer of Decor Bond to back. The extra layer turned out to be helpful for stabilizing the piece during stitching. 

Still, nothing was glued in place, so I had  to cover this one with tulle, too. First I tested white tulle. 
Too pale. So I switched it out to the leftover purple tulle. Much better, richer color.
(The moral of the story: Test different tulle colors.)
Instead of a grid, I did some contour quilting, switching thread colors for different areas.
(Note: the bottom red stripe is a piece of an antique kimono that happened to be on my work surface left over from a different project!)
I trimmed it to a slightly smaller square. But there were still blank spots (where I accidentally left white/interfacing showing) around the edges. So I trimmed even more, cutting curves. 
Finally, I edged it with variegated threads.  
Here's the back. In hindsight, I should have put a layer of fabric on the back before the stitching.
Then I realized that it was shaped exactly like toast. And what could be more romantic for Valentine's day than a scrappy toast-shaped tree scene? (That's a rhetorical question.)
More fun with tulle, trees, and love are in this blog post. Click on the words "Valentine's Day," and/or "tulle" in the word cloud on the lower right for even more.
Find the Create Whimsy article here. Please sign up for my newsletter, too, here. Lots of big news is coming soon! 


Sunday, October 21, 2018

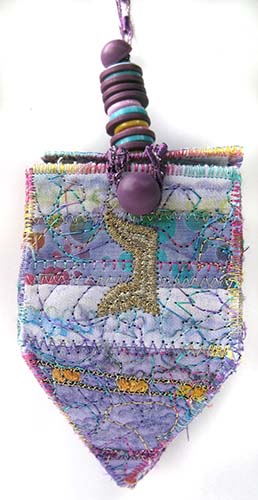
I made some little dreidels. I made them out of scraps. They spin like...

(Sung to the tune of "I had a little dreidel")

I made some quilted dreidels...
...I made them out of scraps (batik scraps, stiff interfacing scraps, gold lamé, etc.)...
...And when I tried to spin them....they spun like cr#p. [End song.] My husband, a physicist, explained that because the buttons and beads are not glued together, they dissipate the energy from the spin, not to mention angular momentum, a phrase I always wanted to type. Oh well. On the brighter side of physics, the lids open and shut...

...one of them has a bobbin at its base....
 ...and inside, you can store small toys...

...chocolate coins and/or wrappers from chocolate coins of yore...
...even (bellydancer) coins... 

....or stuff another dreidel inside!

My little dreidels really fit inside the big ones (because the stems are flexible and dissipate energy) - they're matroyshka dreidels!

I had so much fun making them, that I sat down and wrote up a tutorial, much of which is free below. (Commercial interlude: For people who prefer a clear printout, an inexpensive 13-page e-pattern is now in my etsy shop.)

The Hebrew letters on a dreidel are a nun,

..gimel
hei

...and shin

...Representing the sentence "nes gadol heya sham," "a great miracle happened there." Wikipedia's dreidel basics are here.

Making these didn't take long - I made two in maybe three hours, no shopping required. Below is the plan (developed in hindsight. When I set out, I had no plan).


These are the measurements for the larger dreidel. You can go bigger or smaller. (I made a 1" version, and it was very tricky to sew, but doable. Watch your fingers!)

You'll need small amounts of stiff fusible interfacing (product names include Pellon F2F, Peltex, Peltex2, or Fast2Fuse).

1. Decorate a piece of interfacing that's big enough to later subcut the pieces shown in the diagram above. A minimum to decorate would be about 8" x 10". Or, scrounge up smaller pieces from which you can cut the individual pieces above.

I started out with a bunch of leftover 4" x 6" fiber art postcards backed with fusible interfacing. I fused a streaky batik on as background, then zig-zag stitched fabric strips and ladder yarn on top. 


Then I scribbled over them variegated thread....
and/or gold thread....
[What I should have done, but didn't in my first dreidel: Line the other side. If you want the boxes lined, this is the time to fuse or glue-stick a nice piece of fabric on the reverse side, and cut it even with the edges of the top.]

2.  Cut the individual shapes from the embellished interfacing:  
  • 5 squares that are 2.25" on each side; 
  • 1 small rectangle for the tab that's 2.25" long by about 3/4" high; and
  • Four equilateral triangles (or near-equilateral triangles) that are 2.25" across (= same width as the squares), x about 2" high (height needn't be precise - isosceles triangles work too.)

3. Sew the squares to the triangles. I recommend a satin stitch, though in this case I did a loose zigzag. The satin stitch is stronger. 
4. Do the lettering. Draw out the Hebrew letters - if you have a dreidel around the house,  you can copy those letters, or mine, or those on Wikipedia here. (My pattern has some nice letters) If you choose lamé for the letters, fuse light interfacing to its back, setting iron at the lowest possible temperature for fusing, or you will melt it.  Or use a less fragile fabric, and add fusible web to the back. Cut out the Hebrew letters  Fuse or gluestick one to each square. (You could also paint them in!)

5. Stitch around the letter. I used gold metallic thread:
6. Join the four panels, including the seams that will bring the shape into the third dimension. If you've machine-sewn bowls before, you know this is tricky - go slowly. (You can also hand-sew.)

Line up the panels, tips pointing away from you, next to your machine, in the correct order (follow the diagram above, but in reverse, since they're upside down). Set a wide satin stitch and starting from the bottom tip, stitch forward. This is simple...until you get to the point where the two squares diverge.
7. Gently bring the two corners closest to you a bit towards each other, and take ONE more zigzag stitch, just catching the edges with your needle. Bring the corners closer, and take another stitch, catching both sides. By the second or third stitch, the corners will demand to snap together! Encourage this, pressing the two square sides tightly together. Stitch forward, slowly and carefully (Do a couple tiny straight stitches at the end). You'll have this: 
8. Next, sew the two pairs together thusly: 

9. Cut out the D-shaped tab from extra interfacing - as shown in the diagram. it has the two bottom corners rounded off. Satin stitch it one side of your last square, the lid. The tab really helps hold the lid in place, and the dreidel in shape.

10. Then satin stitch the opposite side of the lid, to the top of one of the panels. Before you attach it, you might want to quilt a spiral into it, like I did! (Pretend the handle isn't there yet.)

11. Satin stitch all the way around all the remaining unattached raw edges, including the lid and tab. (Pretend the tab is on top of the lid in the photo below. Do what I say, not what I did!)
12. The last crucial seam is shown below, running from the dreidel's lowest point, up to the beginning of the lid. You must sew this seam by hand.

For my large dreidel, I did a hand whipstich from the outside with thick variegated thread - you can see some of it on the right edge, below, where the thread is white. On such a scribbly messy dreidel it's not a big deal.

For the smaller dreidel, I hand stitched the last seam with a pink Bottom Line thread, which is strong and thin, so the stitches hardly stand out (on the right, below).
13. A stack of buttons makes the handle. I used 6-strand embroidery thread and a needle longer than the button stack. I sewed up and down through the button holes, a couple of times to get it firm and (relatively) straight.
I also added a button in the front, to use with an optional loop that goes under the handle. 

They work not only as gift boxes, but as hanging decor. I do feel bad that they don't spin well. I couldn't think of a secure way to install a stiff rod in the lid - if you have ideas, please do share!
If you attach a bangle bracelet, they can double as a wristlet. The one below is not large enough to hold a cell phone, but certainly lots of chocolate coins! (It's posing on my backyard rhododendron;  but you could also hang it on a Christmas tree!)
If you can make them from the tutorial above, have at it! I'd love to see pictures. If you'd like more guidance, the e-pattern includes illustrated step-by-step directions, the pattern in three sizes, a one-piece version that's simpler than the one above, a nice Hebrew font for medium and large size dreidels, and embroidery letters for the small dreidel. Find it here. Email me with any questions!