Let's give scrap baskets a double meaning! Made from scraps, especially thread scraps, this basket is also a good place to throw them! It's about 4.5" high and 3.5" across. I used silk, so it's extra fancy, but you can use any fabric and threads you like.
One end overlaps the other. Three metallic buttons seal the flap, and I put more buttons below the top edge. The view shifts as you turn it...Contents include:
-- An old freemotion quilting practice sandwich,
-- Long scrap fabric strips, as background,
-- Ravelled threads on top. Most are threads that have peeled off my silk dupioni collection; there are also strands of a thick gold thread that will never go through my machine. Any decorative thread scraps will work. And,
-- Vintage metal buttons.
I didn't take photos while making the basket above, but here's a tutorial with a dramatic recreation (but different colors).
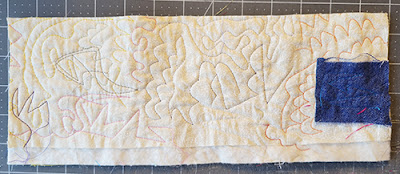
I started by cutting an old quilting practice sandwich to around 11" x 4.5". Below, the blue square on the right was a tension test with flannel. Since that patch is not thick (and it's covered with stitches), I just left it there. On this side, the white fabric doesn't reach all the way down to the bottom edge of shape, but that's okay; this entire side, including the batting along the bottom, is about to be completely covered.
The reverse side does have fabric reaching to all edges. That means I can decide later if I want to leave this interesting side showing on my final piece, or cover it with another piece of fabric so neither the old nor new stitching can be seen on back.
I covered the front with long, rough-cut silk scraps, each a couple of inches high, overlapping their long edges by at least a half-inch.
I drizzled that with clots of unravelled dupioni, and other decorative threads, plus small scraps and strips.
Do a rough trim of the excess tulle. (I used my rotary cutter, above). Bring it to your machine and quilt as desired! I used my walking foot, and a shiny rayon variegated thread, to quilt wavy echoing lines.
Alternatively, you could use a freemotion quilting foot and do more elaborate designs!At each end, I turned the corner, turned again, and used the walking foot's edge to echo the previous line.
When it was done it still looked pretty messy.
Time to trim all the edges even with the backing practice sandwich.
My ruler helped me cut an even rectangle.
To finish the edges, I did a corded edging all the way around. This involves zigzagging a thick dark blue embroidery thread (6 strands) all the way around. I used a medium-loose, very wide zigzag, with dark blue thread in top and bottom.
All done!
And I made schools of fish and other ocean creatures (my tutorial is here. My fish pattern book is on etsy, here.)
I have some big news coming up soon! Please join my main mailing list, here.


I love this basket! Your idea of incorporating silk and threads (orts!) is wonderful. Thank you!
ReplyDeleteThanks so much for your nice note, I hope you have fun with it!
Delete