4/19/20: This roomy mask pattern has been significantly improved and streamlined. If you downloaded a version before this date, please download the latest version, V. 5a, here. Special thanks to all who've tried it and made suggestions, especially Susan Brooks of Ambler, PA, whose knowledge knocked an entire page out of the directions!
This tutorial is for a very comfortable, roomy, two or three-layer mask that has quickly became my family's favorite.
Quilters' cottons are ideal. The new small/medium size fits my petite adult daughter, above, and my husband, below, who has a large brain but a smallish head. He says this is the first mask style that he can comfortably jog in.
I have a big head (for a woman), and both sizes work for me. If in doubt, make a medium first. (Below, I'm wearing a large one sewed from a polypropylene tote, scientist-endorsed for masks here.)
My new version adds a narrow sleeve above the nose (lavender, below). The sleeve has open ends, so the wire slips in easily - but can be worked out if it breaks or rusts.
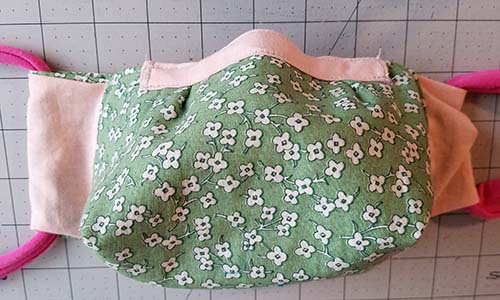
In the next mask, the pale pink fabric strip on top holds the wire. This design has one main body - the green floral in this photo - and two side panels, in pale pink.
This pattern assumes basic machine sewing skills. If you've ever made a simple lined tote bag, this will be familiar. Your first might take an hour, but after that, it will go much faster, especially if you make several at once. I can finish the main body in 20 minutes. (Deciding on the ties and adding them adds a few more minutes.)
The entire tutorial is below. A printable version is in a free 6-page document on Dropbox, here (Version 5a, 4/19/20). If you can't download it, I'll send it to you - email me at cathy.perlmutter.gmail.com.
Note: This design is not doctor-approved. Some of my favorite approved mask patterns are on my resource page, here. For a faster mask, you can also consider my simple pleated mask here.
MATERIALS
Launder cotton fabrics on warm or hot. Iron cottons on "high"; if using polypropylene, set iron to "acrylic."
8 " x 10" featured
fabric for Large; (7.25" x 9" for S/M). Plus, enough to cut side panels from one 4" x 8" rectangle for L (3.5" x 7" S/M). The featured layer
shows on the outside. It's a green floral in these photos. Use quality
quilters' cottons, especially batiks.
8" x 10" lining fabric for L (7.25" x
9" for S/M); plus enough to cut one 4" x 8" rectangle (3.5" x 7" S/M). The lining layer will go against your face. It's
light pink in the photos.
Option: 8" x 10" hidden layer fabric for L
(7.25" x 9" for S/M) Cottons or polypropylene from a cut-up tote bag, or Oly-fun, a brand of polyproylene. In this
tutorial, the magenta layer is OLY-fun polypropylene.
Elastic, 20"
of quarter inch-wide. Or, tee shirt "yarn" Cut a 3/4" or 1" strip across the width of a tee shirt. Pull on both ends, to make a
soft stretchy cord that's a comfortable substitute for elastic. Photos
toward the end of my last post, HERE.
Wire, about 5"- 6" for large. (4" - 5" for S/M). Grocery ties are barely adequate - use two. Stronger, longer ties, like those for produce, gardening, or trash bags, are better. Pipe cleaners work, but may not last long. Right now, I like 22 gauge floral wire (center of the photo) best. Use small pliers to put loops at wire ends, so it doesn't poke anyone.
Option: Sewing clips. If you have them, use them. We want to minimize poked holes, especially with polypropylene.
1. Download the pattern from the Dropbox link above. The LARGE pattern is on page 5, and the SMALL/MEDIUM pattern is on page 6. After you print the large pattern, check that the red box surrounding it measures 8" x 10."
If you only print out the small/medium size pattern from page 6, its bounding red box should measure 7.2" x 9".
2. Cut out the paper pattern. Cut away the darts from its nose area. (You will NOT cut these away from the fabric.) Because I'm making lots of them, I made a master pattern from an old file folder.
3. Gather two or three layers of fabric. You could pin or clip the paper pattern to each layer, then cut the layer separately (but don't cut out the darts). Or, save time by stacking the layers, lining up along one edge (the top here), and clipping in place. Use scissors, or a small rotary cutter to cut through all the layers, or...
4. Or, trace all the way around the pattern, including the dart lines on top.
5. Then cut out three layers at once. I use pins outside the mask area, and clips inside, because holes in polypropylene do not heal. If you're working with cotton only, pins aren't such a big an issue. DO NOT cut away the inside of the darts.
6. As I cut away each edge, I clip the three layers together there. Next photo, everything is cut out from three layers.
7. Unclip the pieces.
8. For the layers that were not on top, use the pattern to draw in the darts.
Now the pieces look like this.
9. From the wrong side, fold each dart in half (backwards, up through its center), pin, and stitch on the lines from outer edge, down and off of the point.
10. Do four darts (for 2 layers), or six darts (for 3 layers). You can chain-sew them through your machine without cutting thread. The wrong sides will look like this.
11. Continue to chain sew: From the wrong side of the lining, fold the fabric in half up along its horizontal mid-line. Match the two raw edges on the right.
12. Using a 1/4" seam allowance, stitch from the top of the corner, down and off the bottom corner.
13. Chain sew to finish the same seam on the wrong side of the featured fabric. If there's an inner layer, send those edges through too. Repeat to stitch the other sides of all layers. After stitching, a top half looks like this:
PREPARE THE SIDE PANELS
14. Cut two 4” x 8” rectangles (large), or two 3.5” x 7” (small/medium), one from featured , and one from lining fabric (I don’t add a third layer because these will be doubled into 4 layers in the finished mask.)
15. Place featured and lining fabric right sides together, and stitch two opposite long sides with a 1/4" seam allowance. Press.
16. Turn right sides out, push out seams, and press. Then cut the strip exactly in half (cut 4” long for large, 3.5” for S/M), to create the two side panels.
17. Insert the third layer (if you have one) right side out, into lining layer, right side out. (If you're not using a third layer, skip to step 18.)
The right side of the hidden layer meets the wrong side of lining. Tuck them together neatly, finger pressing darts in opposite directions. Below, focus on lining up the two layers and the two pointy corners on the right and left top edges.
18. Fold a side panel in half, so its four raw edges meet at the top. Decide if you want the featured or lining fabric to show on the panels. Here, the pink is folded to the outside. Match the four raw edges of panel to the raw edge on one side of the mask. Center the flap between the two pointy corners. Repeat on the other side.
19. At the machine, baste both flaps in place with a scant 1/4”seam allowance (using a thread color that matches the lining!)
20. When these two layers are neatly clipped or pinned together, and the flaps basted, tuck the hidden layer (if there is one) and the lining with its flaps, good side out, all into the featured side, wrong side out. Make sure darts are all on the same side.
Keep going, it's almost all the way in!
Massage til all the top edges are more or less even! The lining and the featured side should meet, good sides together. From the top, shown in the photo below, you should see the wrong side of the hidden layer. (If there’s no hidden layer, you’ll see the wrong side of the lining). Finger press the featured darts in the opposite direction from the lining darts.
21. Once all the edges are more or less even, it's time to sew. The next photo has letters marking the mask’s four corners, 1/4" down.
With a 1/4" seam allowance, stitch from a to b, stop and swivel, down to c, swivel, and stop at d and do a few backstitches. Try to start and stop before hitting a side panel.
In the next photo, the new seam is in red thread, and the left panel edge is open, from corner to corner.
22. Turn right sides out through the remaining side hole.
23. Push out and press edges where featured fabric meets lining. (Use the “acrylic” iron setting if there’s polypropylene inside.)
24. You’ll have to do some fussing at the hole, to tuck the flap’s base neatly inward, and turn the top of the featured fabric edge inward.
Pin or clip in place.
25. Topstitch! Start at the lower left of that flap, Do a few back-and-forth stitches, then stitch all the way around the main body of the mask, from the outside, 1/8" in from the edges.
I stop and swivel at each corner. End where you started with a few backstitches. Here's the outside of the first flap, topstitched.
.
.and hopefully the inside will look neat enough, too!
ADD A NOSE WIRE CASING
Start with a 2" x 6" strip of fabric for large ( 2" x 5" for S/M ), or a 2" x 5" strip of polypropylene (2"x 4" for S/M). A bias strip will curve a little better to fit the top of the mask, but straight-of-grain works too.
N-2. Fold the short ends inward 1/4"
N-3. Fold in half the long way, to create a crease in the middle. Unfold.
N-4. Fold both long edges inward.
N-5. Fold in half one more time so the outer folds meet.
 N-6. Sew up the short sides only to seal them (so someone doesn't accidentally slip the wire inside and get stuck on the seam allowances). In the next photo, I used white thread to seal the ends, so you can see it more clearly.
N-7. If you use polypropylene, all you have to do is press the long sides inward to the center, then fold in half again. There's no need to turn the short raw ends inward - they won't ravel. You might want to stitch down the short edges, to prevent someone from inserting the wire through the wrong channel.
N-8 Find the center of the mask, and the strip, by folding in half. Place the center of the strip to the center of the mask, above the nose darts, and clip or pin in place. I don't think it matters if the strip's open end is along the upper or lower edge.
N-9. Stitch two horizontal rows, along the top edge of the strip, and then its bottom edge. Do some back and forth stitching at the beginning and end of each row. Don't seal up the strip's short sides.
N-10. Hold your wire up to the casing, and cut it the same length or a bit longer if possible. If it's raw wire (not a twist-tie), turn the ends into little loops to prevent anyone from getting hurt. Slide it into the casing.
Finish with elastic, tee cord, or ties
36. Elastic: Cut elastic to 12" or whatever size you think you need. (After you try it on the first time, you can adjust to the right size.) Slide your piece through the side panels.
Hand stitch the elastic ends together, ideally with a little overlap I use heavy thread, and stitch from the center outward, in both directions. I also drip some Fray-Check on the ends to prevent fraying. Then pull the loop so the stitching is hidden inside the panels. If you send this mask to someone, you can tell them that they can adjust the size (if they have basic sewing skills.)
Tee cord: It's more comfortable, and doesn't trigger latex allergies. Cut two 1" strips crosswise from a tee shirt. Pull on the ends so it curls in on yourself. If you know you want behind-the-ears ties, cut the cord into two 15" pieces. Slide them through each panel and tie a loose knot. Try it on, and adjust as needed. When worn, the knots can go inside the flaps, or where they're shown in this picture, just below the flaps. (If knots go behind the ears, the mask won't stay on.)
If you want to leave open the possibility of behind-the-head tying, cut one long piece - whether a tie, twill tape, or tee shirt cord, whatever you're using - to 40" - 60". Thread one end down through the flap on the right, then up through the flap on the left. When worn, the bottom loop will go around the back of the neck, and the ends will be tied up above and behind the ears. (I accidentally drew Homer Simpson in Marge blue.)
If you need a tighter fit under the chin, you can stitch a dart there.
A mask won't be helpful unless the wearer uses it correctly. Everything you need to know about mask-handling is in a short video from the World Health Organization, HERE.
Tell me how it went - your comments and suggestions are so appreciated.
When this pandemic is over, I'm looking forward to converting the masks into tiny purses, perfect for holding a lipstick, when the time comes that our mouths can breath free again.
Looking for more patterns, more science, or where to donate home-sewn masks? My resource page is here. And my easier and faster mask is on my blog, here.


