Thursday, December 8, 2022

Clean Your House by Reincarnating Your Freemotion Practice into Psychedelic Gifts!

I've been on mental vacation for the past couple of days, because I just wrapped up a couple of big projects.  So I started procrastinating the next big thing on my list by cleaning up my studio and selected portions of my home. 

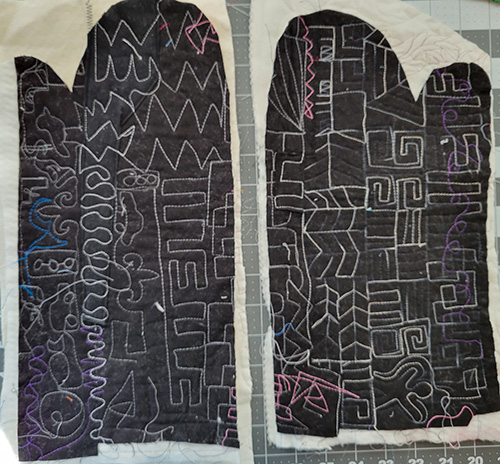
But then I wound up procrastinating my procastination with this gift project idea, just in time for the holidays: Wall art/kitchen art/potholders from old freemotion quilting practice pieces! Here's some of what I've made so far, in the guise of cleaning up my house:

1. An oven mitt made from light-threads-on black practice pieces. 
2. A square potholder made from two different practice pieces: 

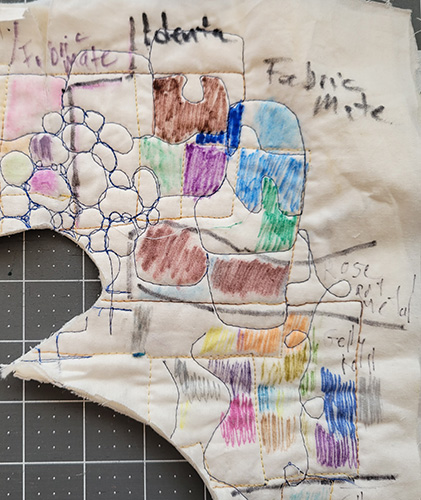
And a dark-thread-on-white fabric potholder, colored with  fabric markers:

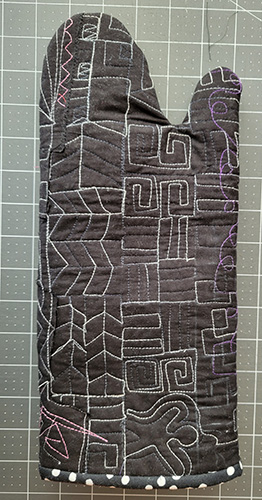
And you can do this, too! It started with the oven mitt. While cleaning out a cupboard in my sewing room, I found a forgotton stack  of freemotion practice pieces, including this: 

(Here's the quilt it was practice for, made for my next book "Quilted New York".)

You can't see quilting in the black sky above because I used black thread, so that my imperfect freemotion quilting wouldn't detract from the piecing. 

But on the way to that nervous and maybe temporary solution, I did a whole lot of quilting practice on black fabric with conspicuous threads. One of the most striking was a variegated grey which fades in and out as it shifts from light to dark and light again.
Also in my cleanup efforts, I've been throwing out old potholders. This is poignant; I made most of them in the last millenium; but especially because of the one below, a factory-made oven mitt that my daughter decorated for Mother's Day circa 2010. I have loved it dearly, but after a dozen years it's disgusting, greasy, and has a dangerous bald spot. It had to go. But I don't own another decent oven mitt, and, well, this one's got my precious little girl's art on it! 
Fortunately, the spirits sent a solution: Reincarnate it. I turned it inside out and traced around it to make a paper pattern. 

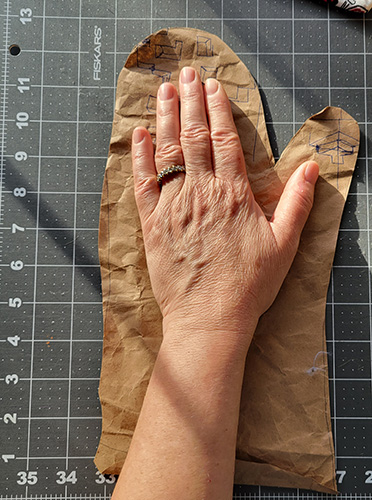
If you don't own an oven mitt, you can just as easily trace around your hand. I suggest you make the pattern substantially bigger. My first paper pattern, below, is about 8" x 12", but that was a little tight - my next one will be closer to 9 or 10" at the widest. (The 12" length was good, and you'll see I made another one a little shorter, which was fine too.)

I used that to cut out two opposite oversized mitts from my black freemotion practice pieces. (The one on the left still had gaps where batting showed - the white areas - but I easily covered those with more black fabric and a bit more uninhibited freemotion quilting.)

Now the two oversized halves looked like this. I added one more layer of white freemotion practice pieces under them.
The reverse sides:

I placed black sides together, outlined the mitt pattern closely on the back of one side, pinned everything in place, and sewed on the line. 
Trimmed the seam allowance far back.  Also clipped deep into the angle between the thumb and the rest, cutting up to but not through the seam. 
Then came the hardest part: turning it right side out.  It was a long, unladylike battle involving chopsticks, a metal ruler, bicep-flexing and grunting. 
Eventually I got there, and beat my chest with joy while giving a Tarzan yell. (Never say I'm not ladylike.) 
The other side. (The wiggly wave is the new patch, a slightly greyer black fabric.)
Binding the bottom edge was the last step.
I found leftover quilt binding, and ran it around the bottom to determine length. Then I pulled it off, trimmed back the extra with a half-inch seam allowance, sewed the ends together, and clipped it back in position. 
Sew 1/4" from the edge. Convert your arm to a freearm if you can, to make this step easier. 
Then turn the loose edge inward and hand sew in position. 

Awkward, but doable. And voila, here's the finished mitt, side 1.
And side 2 
That was so satisfying that I made a shorter oven mitt from the same pattern, and a shorter quilting practice piece, with dark thread on white fabric. For this one, I only used one freemotion practice piece on each side (instead of the double layer I used in the black one). That made it a lot easier to turn and I think the protection is still pretty good.  

I followed that with the two square potholders you saw above. This one was made from practice pieces from two different quilts, one grey and one black. I cut their mutual edges straight across, and did a multi-step zigzag to unite them. Can you find the guy shooting out of a cannon? 
The other side features guitars, suns, and a large upside-down cat. The seams criss-cross each other in opposite directions. I added a fried-egg binding.
That led me to dig up more freemotion samples, in this case white ones, to make another square potholder. 
The reverse side had two different white practice pieces zig-zagged together, with the join covered by a strip of popcorn fabric. 
Compared to the others, this one seemed boring. Wouldn't it be great if that white fabric were rainbow-colored? Wait - I can do the coloring myself! (My little girl is now in grad school  and doesn't have time to color these new potholders just because her mother is having a nostalgia fit.)

I dragged out my extensive (and old) collection of markers, pencils and crayons, and tried coloring with all of them. My unscientific findings: 
  • Fabric-tipped markers are much easier to color with than crayons or colored pencils. It's especially helpful if the marker has one narrow and one wider end. 
  • Crayola washable markers were my favorite for lots of courage and minimum dexterity required, but unfortunately they're "WASHABLE," which means the color will vanish with washing! This can be a good thing if you're doing this project with a very young child who also wants to color themselves and the walls.
  • I enjoyed using my old permanent Identi-pen fabric markers, Zig markers, and FabricMate markers. But all those sets were pricey when I bought them new, and they still are.


Marker and pen brands come and go, so I did a little online research and found many more choices these days! I was especially overjoyed to discover that Crayola now sells sets of  permanent fabric markers, and they are less expensive than most other brands. I headed for my local Michaels, expecting to find them easily. 

Michaels had at least three different sections with many brands of colorful permanent markers (fine art supplies, fabric supplies, and scrapbooking) - but nowhere did I find the Crayola permanent fabric markers. Here's what was in the fabric marker section:
Most are "Tulip" brand (the ones on the bottom are "Artminds". I decided to invest in a small set of the former, $8.99 for six pens. 
I tried them on my white potholder.
That led to another interesting discovery - the bottom section of the potholder above was quilted on a white-on-white muslin print. The subtle white design on the print was nearly invisible, until I colored it  - then the fabric's subtle leafy print appeared as a watermark-like texture! Kinda cool! 
Meanwhile, the area above it was on a smooth solid white fabric....so no watermark texture appeared, you could just see the strokes. 
I had trouble coloring in the lines and the result was a bit blotchy. But once I colored more of it, it became psychedelic, like Yellow Submarine! I even colored over some of the popcorn, which you can see on the right. 

This would be a fun collaborative gift. Present a potholder, (or a pillow, or a throw) made from freemotion practice pieces, to an artsy-craftsy youngster or adult; along with a set of fabric markers (or washable markers if they're very young and the piece will never be washed). You could even sew a bunch of practice pieces into an artistic coloring book! 

I really want to know: What do YOU do with your old freemotion quilting pieces? 

Commercial postscript: My big projects that I just finished include my new website, and my next book "Quilted New York," which is about to be published!

Monday, December 5, 2022

From Class Experiment UFO to Bed Quilt for Someone Who Really Needs It

A new UFO finish! Twelve years in the making! It flew to Kentucky last week to someone who lost their possessions in last summer's devastating floods. 

A couple of weeks ago, I read on Facebook that the Breathitt Museum in Jackson, Kentucky is distributing handmade bed quilts to flood victims. 

They've given many quilts to children, but now they need twin- or full-size quilts for teens and seniors. Their Facebook page has moving pictures of people beaming with their new quilts.

A search of my UFO cabinet didn't turn up anything large that was close to finished - but I did find this 25" x 40" rectangle.

It's been awaiting its destiny since 2010. That's when I took an online class taught by Kenyan quilter Dena Dale Crain, called "Structured Fabrics." (Dena's webpage is https://www.denadalecrain.com).  

I started with a large-scale print featuring vintage fashionable women. I bought it in the 90s because it reminded me of my Mom, plus it was a so campy; but I never did anything with it. It seemed perfect to experiment with.  

It's a border stripe, so there were also lines of automobiles, poodles and fashion accessories. 

Crain had us cut our main print into strips, then weave the pieces back together atop a layer of fusible interfacing. From there, we did more slicing, rearranging, and inserting, plus zigzagging things on top, including lines of bias, cord, and/or ribbon. Here's a closer look at one of the "structured" areas. 

I added at least four more fabrics - a brown Indonesian print, in an attempt to cut the sweetness; an abstract hot pink fabric with multicolored lightening bolts (to amp the sweetness again); a flamingo fabric; and a solid teal. 

I had no idea what to do with the results. So this unusual rectangle, a couple more structured areas, and the remaining uncut fabric, went into my UFO cabinet for a lengthy stay.

When I pulled it out a couple of weeks ago, and considered using it in a bed quilt, my concern was that there were raw edges would not stand up to heavy use and laundering.

So I laid purple tulle on top of each constructed panel, and stitched it in place closely - every 3/4" or so, vertically and horizontally, with invisible monofilament thread and a multistep zigzag, to trap and freeze as much as possible. I added even more lines of stitching when it came time to quilt it. 

Below is another constructed section completely covered with tulle and close stitching and quilting Even looking at it closeup, the tulle is hard to see - you have to know it's there.  

I surrounded the structured areas with gorgeous (and sturdy) new Asian-themed floral fabrics that my friend/fabric scout Marian recently shared with me. None of the surrounding area required tulle. 


Along the top and bottom, I added patchwork panels of squares leftover from a different quilt. 

 On the back, to make the quilt extra cozy, I used colorful flannels....
Including one of the funniest statement fabrics I've ever met: 
(The text reads "Dream Date," or "Nick and Nora," the brand name, but to me the statement is: Love whoever!)
 
I finished it in record time, machine washed and dried it, and shipped it off to Kentucky. And then the museum posted a picture of a happy looking teen showing off the back! It made me so happy! (I hope she likes the front, too. I didn't make the wonderful quilt on the right, held by a senior.) 
If you'd like to donate a quilt to this very good cause, find the information here. They are still in need of quilts for teens and seniors.