Showing posts with label Solid Fabric. Show all posts

Wednesday, March 15, 2023

Quilty House Portrait: A Labor of Love

I've made a lot of cityscape quilts, and I always have a blast doing them. Here's one, "Nonsense Town." 

And here's a closeup of some of the buildings. Let's look at that orange one. 

With a single plaid, I suggested zillions of windows. The other buildings, similarly, have relatively few pieces representing hundreds of windows.

Below is an even simpler example, a potential skyscraper made from two print fabrics. It would take 4 minutes to cut out and sew together. The darker perspective side gives it a nice dimensionality. Modern skyscrapers require so little time to represent so much living/office space.

And here's a 14" pillow I just finished for a dear friend, who I've known since 2nd grade, portraying her charming childhood  home. This took freaking months.

We started with some old photos, including this one: 
Online, we found more photos, though none with a good head-on view....
She also sent me a lovely sketch that a friend had made 40 years ago. Unfortunately for me, the artist  opted for geographically-accurate foliage in some of the trickier areas, perspective-wise, so it didn't give me a lot of guidance.
I came up with my first draft of a pattern by tracing the dark, ancient photo, with her standing in front. (The disruptive lines are the tree.)

I wanted to include her, but she nixed that. So, after several drafts from several angles, here's the simplified drawing : 
(I moved the tree. It ended up disappearing completely.)

The tracing and drawing was done in my graphic design program, CorelDraw (but you could do this all on paper). Then I upsized it to about 14", which required four sheets of letter-size paper. I taped them together, taped the whole thing to a window, and started tracing pattern pieces. 
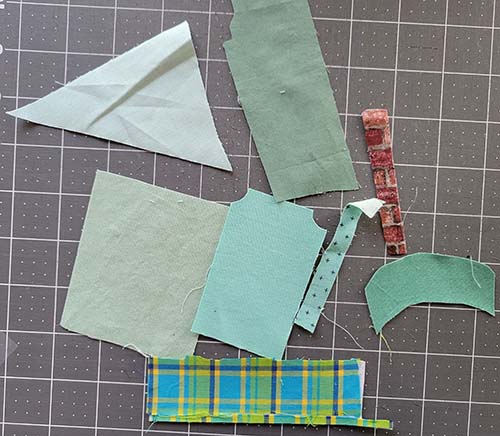
I traced every element of the house onto a new piece of paper. I cut them out, flipped them to the back, and traced them onto the back of paper-backed fusible web.  Here are just a few.
We also had to work out the colors. Since computer color is unreliable, I sent her to the hardware store to look at paint swatch cards. She sent me 8 of them, with notes. 
From those I picked a palette. Most are solids, but there's a faux red brick novelty fabric, and the plaid on the bottom represented the grid under the porch. I chose pieces a little darker because I knew the house would need contrast for its many different sections to show. 

My friend had some more specific requests. She wanted a Dutchman's Pipe on the porch, and since I had no idea what that was, she sent me photos.

Layer by layer, I traced each piece, cut it out, and pressed it in place, on top of an applique press sheet. When everything was just barely fused in place, it was time to choose a background. I set the house on a couple of different candidate skies and took photos to send her. This one's dramatic...
 
But perhaps a little bleak; good for a Wuthering Heights pillow. 

I liked this one, but the batik didn't really go with the flat house colors: 
 
I liked this rainbow/unicorn sky, and my friend is a very colorful person. 
And more. The one she selected was also my favorite, with puffy white clouds. I think it gives the house a dreamlike quality, appropriate for a nostalgic memory project. 
After fusing the house onto the large sky square, I stitched everything in place, using a machine satin stitch, or, for the tiniest pieces, straight stitch (like the dark strips of the porch railing). 

The windows needed panes - I hand-embroidered those with white pearl cotton, using a backstitch.  I also hand embroidered the heart motif in the top red triangle, and the other red trim areas.  
 
I called my friend to find out what color her doorknob was and what side of the door it was on. For that, I used a vintage metal shank button.  She also mentioned the mailslot on the door, which I hadn't seen in any photos, so that was a last minute addition.
And she requested a lilac bush on the left. 
The lilac blooms and bush were cut with pinking shears, fused in place, and then freemotion stitched. I chose a fantasy aqua color because a more botanically-accurate dark green was in the house on that side.

So speaking of fabrics, how many separate cut, fused and stitched pieces would you guess went into this house? I'm counting around 70, not including the background sky. 

(There's one more fabric on the pillow's back, a different sky, because I ran out of the puffy cloud fabric on front. The  pieces are overlapped, with hook-and-loop tape holding them in place.)
This project was a labor of love. It made my dear friend very happy, which was the point. I learned a lot that will be very useful. But it does leave me with a burning question for you and me: If a client (who was not a lifelong friend) wanted a 14" pillow with a portrait of their gorgeous, detailed, gingerbread-style home, how much would you charge? 


Interested in portraying much more real estate, much faster?  Check out my new book, "Quilted New York; Celebrate the City in Color and Fabric," at https://cathyperlmutter.com/books-and-patterns/


Sunday, January 15, 2023

Tallit Commission: A Time for Machine Embroidery

Here's my latest commission, and although I live in California, and the client lives in the southeast USA, it was made with help from one of the best Judaica machine embroiderers on the planet, Marilyn Levy of Ontario, Canada. It's a tallit (prayer shawl) for a young man's bar mitzvah. 

Like all my commissions, this one started out with a  discussion with the young man's family. They wanted cotton, with a leafy design, in blue and grey, so I drew up choices.


They liked #1 best, the simple vines. What was most unusual - and why they needed a custom tallit instead of one off the rack - was that they wanted Ecclesiastes 3:1-8 on the atarah, the long rectangular band that marks the collar.

You know this verse: it begins, "To everything there is a season, a time for every purpose under heaven." 

An atarah is optional - store-bought shawls sometimes carry the embroidered prayer for donning it. But I've never seen one with this particular verse. 

Initially, the family hoped we could fit in the entire verse, which is a long paragraph. They wanted the letters big enough to read from a distance. I make a sketch to show them what this might look like. 

That convinced them that just the first line might be better. They wanted it in Hebrew and English. I told them I could only do this job if I brought in a subcontractor. I contacted my friend Marilyn Levy, a.k.a. "the TALLITmaaven," who graciously agreed to help. So now we had a three-way, international collaboration, with the family telling us what they wanted, Marilyn showing us what's possible in embroidery, and me getting everyone on the same page and doing the construction.

After much back and forth, here's a printout of Marilyn's design; the family was happy with the size and fonts she chose. (The straight lines help with placement; it's not part of the design.) Full size it was about 22" long.

I printed it out onto paper, cut out the lettering area and taped the two pieces together. I used that long paper strip to block out the area of the tallit where it would lie, and started sewing the other elements in place around it, while waiting for Marilyn to finish the fabric version. 

Marilyn did a gorgeous, flawless job with the atarah, as I knew she would. 


A little closer: 

She also embroidered the boy's name a few times, so I was able to cut those out and place them inside the tallit, inside a kippah (hat), and inside the quilted tallit case I made to hold everything. Here's the front of the case. The secret to quilting those lines so straight....
....was that I used my walking foot to quilt it from the reverse side, a star print, following the lines of the stars in three directions. Below you can see the print under the top flap. Lower down, the silver thread that shows against the blue was in the bobbin. One of the name tags is on the lower left (I blurred the name for this post.) 
I also made a pair of kippot with the same blue fabric, with grey binding.
The one on the left is reversible, but the other one, not so much, because of where the name tag went, as you can see below. (I didn't want to set the name lower, fearing it would interfere with the fit.) The hat pattern is from my book, The Uncommon Yarmulke (sold in my etsy shop at https://www.etsy.com/shop/CathyPStudio.) I used the "large, 4-panel" pattern on p. 19, which fits most teens and adults.
On the tallit, I freehand machine stitched veins on the leaves, and 6-pointed stars on the "pinot" (corner squares), with silver metallic thread. The leaves contain Decor Bond, a midweight fusible interfacing, which  gave them a bit of depth and stabilized them for embroidery. There's also Decor Bond backing the corner squares, which makes them strong for their duties holding a satin stitched buttonhole to surround the tzitzit, the ritual macrame strands, in place.

Like so many commissions, this one was not without its moment of terror. Marilyn put the package with the atarah and name labels into the mail, and headed off on vacation. After a week, the package vanished from the tracking system. I couldn't find it in the Canadian or the US mail. It didn't turn up on its due date, a Friday. My incoming US mail alerts showed no sign of it.

I lay awake that night, imagining the worst. What if it never showed? What if I had to do the embroidery myself, by hand? I decided to give hand embroidery a shot, just for my peace of mind. I spent the weekend doing the best hand embroidery I could possibly do, using Marilyn's paper printout as my model. Here's the result.


The closer you get, the messier it looks. This: 

Versus this: 
The handmade version is charming and might work for a compassionate blood relative; but it's not a job for a client. 

Thankfully, on Monday, Marilyn's atarah appeared, seemingly out of nowhere (according to two country's tracking systems).  I was thrilled with it.
The tallit and its accessories reached the family with plenty of time to spare. But you know how you sometimes find yourself buying fabric for the last quilt you finished? That's what sort of happened to me after this project. 

In this case, I started looking at embroidery machines, thinking, "Wouldn't it be nice if I could do this?" 

And then I answered myself. Machine embroidery is a complicated hobby and/or business. The cost and complexity of an embroidery machine is just the beginning. 

Then there's the knowledge, skill, time, and money required for acquiring and understanding lots of software; designing, sizing, adjusting, stabilizing, hooping and rehooping required for large, complicated designs including bilingual Bible verses on atarahs; not to mention mountains of threads you have to buy, and thread changes you must perform. Most of these things are so clearly not my strengths. But partnering with Marilyn who loves all this and does it so well - that was my idea of fun! 

I also vowed to learn a little more about hand-embroidery. I enjoyed doing it, even if the results were not suitable for formal occasions. I do wonder if flawless hand-embroidered  lettering - especially Hebrew lettering - in a reasonable amount of time is possible. If you've done it, I'd love to see and hear about your approach! 

To learn more about Marilyn's gorgeous Judaica, go to her website, http://www.tallitmaaven.com/. More examples of my (mostly not machine embroidered) tallitot and their backstories are on my Judaiquilt.com website, at http://judaiquilt.com/Tallit_Gallery.html


Friday, April 30, 2021

A Funny Thing Happened on my Way to a Vaccination Quilt

Here's what I just made, instead of a quilt

There are two immutable quilting laws that correspond to Murphy's law: (1) Your bobbin is low; and, (2) Anything that can look like a phallic symbol, will.

The latter law kicked in when I decided I needed to make a quilt that would encourage people to get vaccinated.  I'd been thinking a lot about about friends who struggle with needle phobia, but desperately want a vaccine. I admire their courage, and want to thank and encourage them and others.

Would it be possible to make a quilt with friendly-looking hypodermics? I started by reviewing photos online.  I did some drawings, like this one.

The vertical lines on the lower image show that I was testing whether I could turn this into a Foundation Paper Piecing (FPP) pattern. But it was way too complex. Also, ideally, I wanted a pattern that could be improvisational (I have a measuring phobia). 

I also thought it might be fun to arrange needles in a circle - which meant wedge-shaped needles.

All those thoughts led to this: 
About 30 of them could turn into something like this: 

It looked good in my graphic design program! But when I made a couple,  I wound up with...
Swords. Carrot Swords. You know, carrots with sword-shaped handles, like vegetarian Vikings used. (None were found at archeological sites, because they composted).

Back to the drawing board. Clearly, hypodermic chambers are unrecognizable when wedge-shaped. I changed the pattern to make the body a rectangle, but with long narrow background (white) wedges on both horizontal sides). I FPP'd one.
First run:
I screwed up the long white edges there - they should have been longer. Worse, with the tiny pieces, this was no fun, and I wouldn't want to make 5, let alone 30.

So forget the wedges - I was back to rectangles, simplified further.
Instead of FPP these, I measured and cut fabric strips for each piece, and chain pieced them to make these: 
I did mess up the grey placement on the handles (the dark greys should form an intact H, not a broken one.) But that was okay, I told myself - the weird handles looked kind of artsy  To solve the bigger problem of needles being too thin to piece, I planned to embroider a line of thick floss, emerging from each tip, shooting across the white rectangle.

Are you sensing where this is going? When I put this collection up on my design wall....
I'm sorry. I cannot NOT see phallic symbols here, inexplicably linked to broken letter "H"s (or "I's"), for some kind of profound statement on ego and sexuality.

Argh! I thought long and hard (no pun intended) about what I wanted to say, and then I went back to my graphics program and made the meme at the top of the page. I don't think any of the needles it depicts could be construed as X-rated unless your mind has been hopelessly sullied by reading this blog post. 

I don't know if I'll ever turn these scraps into a vaccination quilt. Maybe a Viking quilt?