Wednesday, December 26, 2012

Prisoners of Quilting

Three days ago, on December 23, a woman walked into a Virginia quilt store and stole a large pile of fabrics. The security cameras took a picture of her with a sizable bundle, here. She hasn't been caught, yet.

The article floored me. Who would rob their LQS? [local quilt shop?] Rather than taking things from them, we should all be lining up to give them money, because they are at the heart of quilting, and they struggle for survival with so many online fabric vendors.

Madame Burglar, if you happen to be reading this:

Return that fabric! Don’t try it again! Think of the consequences! If you're caught, there will be a tedious trial, and no matter how addicted to English paper pieced hexagons you might be, the courtroom judge probably won’t let you do it during the trial!  Not even with luscious modern fabrics

What’s more, the prison warden will almost certainly prohibit you from keeping your Featherweight in your cell!
[Dramatic enactment of the heartbreaking view from inside your prison cell.]

On the other hand, there have been many prison quilters.

For example, North Idaho Correctional Institution prisoner John Gout, a prolific and altruistic quilter. His quilts were made from prison jeans (blue) and jumpsuits (orange), for a serendipitous complementary color scheme.

Not only do colors on opposite sides of the color wheel make each other sizzle, but blue and orange also happen to be colors of nearby Boise State University. Below is a spectacular BSU quilt that Gout made.  It was autographed by the school's football players and auctioned to raise money for a Ronald McDonald house.

All Gout's prison quilts were made on a 1938 industrial Brother machine. The prison provided batting, and for backing, he used old twin sheets.

Here's the really good part: While serving time, he was permitted to quilt for two or three hours a day! (I'm jealous.)

By now, Gout's out of jail, having served a decade until 2011 for burglary (Unfortunately, the articles don't say what he initially stole). But he's apparently passed the craft to fellow Northern Idaho inmates, who now are also enthusiastically churning out charity quilts. It's win-win, for prisoners and charities. (Incidentally, you can donate fabric to help them out of the blue-and-orange rut. Find the phone number for donations at the bottom of this article.)

 Here are some more ways to obtain fabric that are more sensible than crime and punishment:
  • Scour Craig's lists for ads like these**. [**People selling massive fabric stashes.]
  • Sign up for your local Freecycle email list. Ask for fabric. People are constantly giving away and;/or searching for fabric on my area Freecycle. 
  • Stalk yard sales and thrift shops. Genius quilter Jimmy McBride, a non-prisoner who probably can afford new fabrics, makes a policy of using thrift shop fabrics anyway for his fantastic cosmic quilts.
One of Jimmy McBride's astronomical thrift shop garment quilts. See all his artwork  at http://jimmymcbride.com
If at all possible, resolve to visit your LQS early in the New Year, and then, often. Pay happily. Thank them for existing. On the drive home, wave at the local jail as you fly by, go into your home,  lock yourself in your sewing room, turn on the Les Miz soundtrack, and stitch.

Finding the time to sew is a little more challenging. Contrary to the implications of this article, you don't have to be a prisoner to find time to quilt. You simply have to create prison conditions in your home. Inform your spouse and offspring that they may deliver hot meals thrice a day to your door, which you'll open only wide enough to import the tray. Plus an occasional chocolate snack.  Every four hours, you and the whole family should break for calisthenics in the yard. The longer your sentence, the happier you'll be.

Wishing you a happy, healthy, creative, quilty and above all, perfectly legal New Year.
[Update, 1/9/13: A sequel to this post can be found here.]


Friday, December 21, 2012

50 Shades of Purple

I have a confession to make. Sometimes I'm unfaithful to quilting. I sneak behind its back, and fool around with crochet.
Especially when stressed; when taking octogenarian parents to neurologists and urologists, or teenage offspring to orthodontists and dermatologists.

The way I crochet is this: I collect small amounts of colorful interesting yarns. No more than one skein of anything. I'm a sucker for purple, blue, green or variegated. Gold and silver, too. I combine them, using mostly single crochet stitches, to create unintentionally off-kilter bracelets. Color and texture decisions are profoundly pleasurable. I am sure, medically speaking, that they release powerful color and texture endorphins in the brain. Counting is not pleasurable. It inhibits endorphin release. So I rarely count, and things do tend to wander sideways.

Once crocheted,I embellish these with vintage buttons, or vintage earrings, or vintage anything else, which  releases even more of my own vintage endorphins.
Don't worry, I pay for all this pleasurable infidelity. Crochet is a cruel mistress (master?), much crueler than quilting, my rock-steady life partner. When I quilt too much, I wind up with too many quilts. When I crochet too much - like more than 20 minutes at a time - my arms ache, and the next morning I  wake up with numb arms,  93% sure it's carpal tunnel but 7% worried it might be a stroke.

Continuing this masochistic affair will one day bring me back to my internist,  meaning yet another medical waiting room, meaning more crochet.

Let's face it, I'm hooked.
(Sorry.)

(More crocheted cuffs, with descriptions, here.)

UPDATE:  The hook above is a trigger grip crochet hook, very comfy, and I love it, though it doesn't prevent carpal tunnel. Abstaining from crochet prevents carpal tunnel.
UPDATE: My friend Robin recommends Handeze gloves. Haven't tried them yet, but I will.

Monday, December 17, 2012

Enduring the unendurable

(NOTE: This article was updated on 12-28-12, 8:10 am Pacific time]

I've been tracking ways to help the people of Newtown, Connecticut, scene of the school shooting. Here's what I've learned:
  • Funds are needed more than anything else. A long list of Newtown-area charities that need money: http://newlondon.patch.com/articles/how-to-help-families-affected-by-newtown-school-shooting-26246878 . 
  • Another list is on this CNN page
  • Plus, the Western Connecticut United Way.
  • Scholarships in the names of several victims are listed here. On the same page are family assistance funds.
  • The Connecticut PTA (parent teacher group) is collecting monetary donations for Sandy Hook. 
  • The Connecticut PTA is also collecting snowflakes, made from any material (paper is fine) to decorate the new building that the Sandy Hook Elementary children will be moving into after winter break. Info here. Free snowflake patterns in honor of Sandy Hook are offered by Embroidery Library Inc, here,  and by Sarah Vedeler designs, here. UPDATE 12/28: There are rumors that there are more than enough snowflakes, but the local PTA hasn't removed its call for them yet. 
  • Project Linus, the international charity quilt project, is sending 700 completed quilts to Sandy Hook. They don't need you to make another quilt, but are accepting donations to cover shipping.
  • A Connecticut quilter named Paula DeSilva is organizing a quiltmaking campaign at https://www.facebook.com/quilt2heal. Fabric as well as monetary donations are welcomed. 
  • Quilts for Sandy Hook Elementary children are being collected by craft publisher Taunton Press, which is located in Newtown. Info: http://scrap-therapy-quilts.blogspot.com/2012/12/a-request-for-hugs.html . 
  • The mother of Noah Pozner, 6, who died in the massacre has asked that trees be planted in Israel in his name, and in memory of all the deceased. Hadassah, the Jewish women's organization, has set up a page where people can purchase trees for $18 each. 
  • The project I know the most about is a pillowcase project, launched by Becky Frazer, the owner of the Quilter's Corner shop in New Milford, Connecticut, about 15 minutes from Newtown.  Becky is hoping to collect 600 kid-friendly-fabric pillowcases to give to the children of Sandy Hook Elementary School. Since announcing the effort Saturday, she's had calls from all over the country, and even from Spain, pledging pillowcases. Find updates at https://www.facebook.com/pages/QUILTERS-CORNER/182422601980 . Or contact Becky at quilterscorner@charter.net, phone 860-355-4516.  
Someone wrote to ask me a very good question - what's so great about pillowcases?

Answer:

(This is a child model, from the Million Pillowcase Challenge - see below).

Basically, it's a hug. From a distance.

Quilters' pillowcases aren't like the plain shmatas that you find in, say, my bedroom. Quilters make them from top-quality fun fabrics - two or more - plus, often, a decorative trim - piping, rickrack, etc. There's the main part of the pillowcase; a wide cuff; and then, optionally, a trim between them. They're quick to make, and, along with grieving for lost children, you're also thinking about color and pattern and combinations that might delight a traumatized child who could use something to smile about.

Becky suggested I make a "tube" pillowcase. Have you heard of that? Me neither. She promised me that it's easy, I'd enjoy it, and that there are lots of directions on the web.

Google found an excellent how-to video at  http://www.youtube.com/watch?v=MrYWCma9wgM. It's from the Missouri Star Quilt Company, who posted it to encourage stitchers to participate in a different charity, the monumental American Patchwork and Quilting 1 Million Pillowcase Challenge.

The directions are crystal clear, and, and as Barbara suggested, unexpected - there's a counter-intuitive roll-into-a-tube-and-stitch inside-out-maneuver that magically hides all the cuff seams. (The pillowcase doesn't come out like a tube - it's the rolling action that's tubular).

The video project requires three fabrics:
  • Main fabric - 27" (= 3/4 yard) x fabric width, selvage to selvage (around 44")
  • Cuff fabric - 9" x  fabric width (= 1/4 yard - NOT a fat quarter)
  • Trim  - 2" x  fabric width.  
The video was made before the Newtown tragedy, but the instructor points out, "When you have people who are suffering, to have something that somebody made for you, it's really a sweet gesture."

If you prefer written directions, try these: http://blog.contemporarycloth.com/pillowcase-tutorial-by-jane-skoch-of-maiden-jane-for-remember-september/ . These directions are almost exactly the same as the method on the video, with the same fabric requirements (except the trim is cut to 3" instead of 2").

Becky said that she will personally bring all the donated pillowcases directly to the school. "If you want to send a quilt, I'll bring that, too," she added.

POSTSCRIPT I (12/19): It's been pointed out that there are now so many quilt-type projects that the people of Newtown won't know what to do with them. So contact and/or check the Facebook page of the Newtown sewing charity you want to give to and make sure they still need your handcrafted item. If they don't, donate the item to a charity in your area, and/or to the Hurricane Sandy quilt projects. There are still many people suffering in the cold from Sandy's damage.
POSTSCRIPT II (12/20): From a Connecticut reader who today attended a meeting of Newtown-area clergy: "The community of Newtown is COMPLETELY OVERWHELMED by the overabundance of attention...If you can continue to pray for the community and encourage the media to let them go on with their lives that would be great." 
POSTSCRIPT III (12/23): (From an AP story about how much the people of Newtown appreciate the gifts pouring in): "There were nine minutes of evil, and an infinity of goodness after that," Stratford said, sitting on a forklift loaded with gifts. "This is therapy for me."

Friday, December 14, 2012

Quiltlet #6: Burlap & Old Lace

What do a burlap bag, old lace, beige silk dupioni, blue denim, an unevenly stained old metal shank button, old loopy navy trim, and new off-white embroidery floss have in common?

Not much, but they all made it into this quiltlet.
The denim is the background, the navy trim is around the edges, the upcycled burlap bag is stitched to the front, and the lace is appliqued on top by machine, with invisible nylon thread in a zig zag along the edges. A dupioni silk button  loop is on the upper left, and the metal shank button is on the upper right.

 It has a cousin:
The vintage blue-and-white lace along the bottom edge, and the crocheted white trim on top, are from someone else's scrap bag. There's a dupioni covered button, plus a dupioni loop. The burlap is cut to incorporate its fringed selvage. The base, again, is denim

What strange bedfellows have you brought together lately?

Sunday, December 9, 2012

Dreidel, Dreidel, Dreidel, Japan


If you happen to be a Jewish quilter, or are a quilter with Jewish friends, you may already know that there are lots of Chanukah fabrics out there.  It's harder to find Passover fabric, and forget about Rosh Hashanah, or - what a concept! - Yom Kippur. (Atonement fabric?) 

Many Chanukah fabrics involve dreidels. As a result, Jewishly-interested quilters have waaaayyy too many dreidels. We're always looking for ways to use them up. 

Super-quilter Cheryl Lynch did a brilliant job reducing her stash by making fabric-intensive table runners, here. The blues look so wonderful together. 

Above and below are some fabric postcards I made for an online exchange a few years ago. It was not only a lot of fun, but also a tremendous dreidel-reduction opportunity. 

I started by making a large background of crazy-pieced Chanukah fabrics. Once all the pieces were joined, I painted them with a translucent Setacolor blue paint, so they all became a similar dark blue tone.

Then I cut the backgrounds into postcard sized pieces - just a little larger than 4" x 6"

Fused the background pieces onto a strong, thick, craft stabilizer, like Peltex, again cut slightly larger than 4" x 6". 

From unpainted Chanukah fabric, I cut out the dreidels, backed them with paper-backed fusible web, then fused and stitched them to the painted fabric rectangles.  Cut the cards to exact 4" x 6" size. Added embellishments. In the card above, on top of this article, I stenciled spirals, and stitched on small metal coins. 

The card below also features stenciled spirals and a crazy-pieced painted background. 

For the next card, I criss-crossed a translucent ribbon on the card, and stitched that dreidel smack-dab on the intersection.

Here, I appliqued three large stars, and stenciled small stars around them. 
After a bunch of cards like that, I needed something different. 

So I played around with foiling. In this card, the dreidel is created with a variegated silver foil. The message ('Hanukah sameach' = Happy Chanukah) is stenciled, as are the hands; there's a coin embellishment on the lower right.  
Foiling involves stenciling or painting a special glue onto the fabric, then ironing or rubbing a sheet of shiny colored foil to the sticky glue area. It's easy and a lot of fun, though, with a non-variegated foil, I can't say the effect is wildly different from using metallic paints. (Learn more about foiling here. No financial affiliation. I use Jones Tones foil paper and glue.)

Finally, I made a one-off. I had printed the lyrics to 'Rock of Ages' on fabric, for a different project, and didn't end up using it. I combined the lyrics with a sincere little guy from fabric I'd bought in Japan many years ago: 
I strongly suspect he's a marcher in a traditional Japanese festival. But he looks like he's as impressed by these lyrics as I am. Alternatively, he's eager to mop dreidel scuffs and chocolate gelt crumbs from the floor. 

Making fabric postcards is fun and addictive.  And they can serve as holiday decor/ornaments.  Tutorials abound, and I liked these two, at: 
  • http://www.patchworkposse.com/blog/2009/08/lets-talkfabric-postcard-tutorial/
  • http://needledmom.blogspot.com/2008/04/fabric-postcard-tutorial.html
If you're longing for your own dreidel fabrics, or other Jewish fabrics, my Judaiquilt.com website has a list of shops that carry them. Start searching at http://judaiquilt.com/Shopping.html.

And, whatever you celebrate, may most of your dreidels (fabric, spiritual, or real), come up gimel (winner takes all!).


Friday, December 7, 2012

How You Look vs. How You See

Chanukah is coming up fast, Christmas isn't far behind, but maybe you still don't know what you want for a present (or what your favorite quilter wants.)

Assuming you don't have thousands of dollars to spend (if you do, a longarm quilting machine 

with a house big enough to hold it,

are always appreciated).

But if you can't afford those, here's something almost as good: 'MagEyes, the Hands-Free Magnifier,'  for around $35-$40. (No financial affiliation).

Is this an exciting look or what?
That's not me in the picture, but it hardly matters, because when you walk around with this thing parked on your head, you are making an important statement. It's not really a hot, sexy statement. It's a geeky, nerdy statement. It says:

I care a lot more about how my quilts look than how I look.

To backtrack a bit: I discovered quilting in my late thirties, just around the time I was prescribed my first pair of glasses. Year after year, my vision got incrementally worse. Every year or two, I needed a stronger prescription.

But even with new glasses, after a couple of months, I still couldn't thread a needle in less than 5 progressively more frenzied minutes.

At a quilt show, a vendor was selling MagEyes, and I decided to invest.

My gosh. What a difference. I could not be a credible quilter without this thing. It allows me to thread needles in seconds, and, most important, see where I'm going when stitching, especially during machine applique and stitch-in-the-ditch, when precision placement counts.

The downsides: When I'm not using them to see closeup, I push the lens part up high, above my forehead. Eventually, I forget whether I'm wearing them. Then, when I want to see something closeup again, I start clawing at my forehead to bring down the magnifying glass section, which may or may not be there. People think I have head lice, or am genuflecting (odd for a Jewish person)[Update: I messed up on the genuflection analogy - see reader comments below], when I'm basically feeling around my forehead in order to see better. It's difficult to explain, and confuses even me.

When the doorbell rings, I  may have still forgotten that they're there, or I'm too lazy to take them off, and so I terrify Boy Scouts collecting canned foods. If I see that my husband is at the door, and I open it for him wearing this contraption - well, let's just say it doesn't rise to the standards of romantic authorities' marital door-greeting recommendations.

So release your inner watchmaker or your inner railroad model builder, or, above all, your inner Geordi La Forge....
You will thank me!

 (More info about MagEyes is on their official site, here. I notice they have come out with an even stronger one. Hmmm, I may need that one too.)

Also, let me know if you use and like a different magnifying system! There are several out there.

UPDATE: Here's a variation that will give you a forest view, no matter where you look. 

Monday, December 3, 2012

Quiltlet #4: Pledge Allegiance to Steampunk Nation

Presenting Quiltlet #4!  [What's a quiltlet? Explanation here.]
Before I show you the whole thing, here's a detail:
Are you up on Steampunk? It's a Jules Verne dark-visionary-retro-futuristic look, involving gadgets, gears, and rust. At first Steampunk didn't do much for me, but then - as with millennium quilts and even  Sunbonnet Sue  - it started to intrigue, and finally, obsess me.

Unfortunately, the fever coincided with a visit to a bead show, where I passed by innumerable shiny brand-new beads, to hand over ten bucks (!) for the rusty watch innard above.

I combined it with a bunch of other elements, old and faux old, to make this cuff:
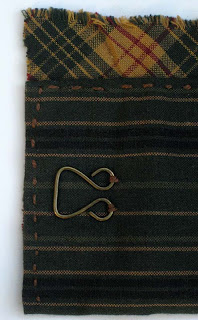
See how it vaguely resembles an American flag?

Can you guess what's new and what's not? In the closeup below: the round buttons in the upper right, lower right, and lower left corner are vintage. The "gear" in the upper left corner of the brown square is a new scrapbooking tchotchke. The bronze arrowheads are new, iron-on embellishments, from my LQS (local quilt shop).  The brass chain and the jump rings are new, and the hanging metal key is old.

They're stitched and glued to a  2 1/2" brown leather square, cut from an old men's jacket (acquired from the thrift shop).

Also on the front of this quiltlet, there's a large oversized brass eye,  new from the sewing store notions department. It's about 3/4" square.

Corresponding to an oversized hook on the back of the bracelet, sewn on thusly with brown embroidery thread: 
The two pieces of homespun fabric, in coordinated colors, came in a fat quarter pack from a quilt shop, quite a while ago. The colors are way more rustic than I'm used to working with, but perfect for the gloomy Steampunk atmosphere.

Homespun also frequently has stable fringed selvages, and I placed those edges for maximum effect, to create a fringe along the bottom and one short end. Here's the back:
This thing is a bit heavy, so I think I like it better as a horizontal wallhanging than a cuff. In a pinch, if there's no American flag in sight, I can pledge allegiance to it.

It's constructed in such a quirky way that I don't even think I can or should repeat the directions. If anyone wants directions badly, please email me, and I'll make up a more efficient route.

The cuff isn't my only Steampunk creation. Several months ago, as part of a Fiber Arts Trader swap, with a 'Steampunk Ice Queen' theme, I made these three things: (Brooches/Pendants/Wallhangings!):

Here's the third one closeup:
Clockwise from the top: Broken bobbin, perforated rusty street find (maybe the top of an old salt shaker?), metal snap half, tree-branch shaped silver plate bead, gear from the same source as above, vintage metal button, dead sewing machine bulb. The 'Grow' message, admittedly, is excessively cheerful for the dark and broken Steampunk mood.

Steampunk brooches or quiltlets make unique holiday gifts. But beware: you  and/or your giftee may become addicted, and find yourselves pledging allegiance to Steampunk Nation.

Have you made a Steampunk quilt/wallhanging/anything else?

P.S. I was delighted to be able to share this project on Nina-Marie Sayre's weekly creativity compendium, Off the Wall Fridays. Check it out! 

Thursday, November 29, 2012

The Lincoln Movie & the Keckley Quilt

If you've seen the Lincoln movie, you know that one of the most intriguing characters is Elizabeth Keckley, who, in the movie as in life, was a close confidante to Mary Todd Lincoln.

Keckley was an extraordinary person who suffered greatly as a slave, but was eventually able to purchase freedom and send her son to college, in part due to her needlework skills.


Incredible as it may seem, Keckley left behind a quilt which is said to have been made from scraps from creating Mrs. Lincoln's dresses.

A better view of the quilt is on page 2 of this article. The quilt resides at the Kent State University Museum, in Ohio. The museum produced a brief video, highlighting its dress fabrics and poignant liberty-themed embroideries, here.

The story of  Elizabeth and Mary has a sad ending.  Mary Lincoln, and the public, never forgave Elizabeth for sharing confidential information in her memoirs, Behind the Scenes, or, Thirty Years a Slave, and Four Years in the White House. She died in poverty. Learn more about Keckley here.  


Postscript: Another fascinating thing about the movie is how similar the actors look and/or were made up to resemble the historical figures. Slate Magazine did a terrific side-by-side comparison, including Keckley and the actress who played her, Gloria Reuben. 


Saturday, November 24, 2012

Quiltlet #5: Upcycled Coffee Cuff, in Smell-Surround

As long as we're paying tribute to comestibles....

.....Presenting Quiltlet #4! It's an upcycled coffee bag cuff, potentially in smell-surround! 

In an earlier post, I expressed my passion for coffee and coffee-themed quilts. Coffee makes me omnipotent and omniscient, for about 47 minutes every morning - better brief than than never! (How deep is my love? This deep!)

The quiltlet above brings caffeine-fueled creativity to a new level. Genuine coffee accoutrements, including a disassembled coffee bag, and, potentially, coffee molecules, can be included. 
But before the directions, excuse a short digression, to share what I learned during several minutes of research into coffee bags.  

The technical name is "retort pouches". Fused layers of plastic and metal, they were co-invented by the military and private industry in 1978. The technology spread slowly to the commercial market. Kids' juice drinks were among the early adopters, most notably Capri Suns. 

Coffee companies eventually caught on - pouched coffee is lighter than metal cans, reducing shipping costs. Tuna and other seafoods are among the newest converts - but who the heck wants a tuna-scented cuff?(Update: A reader answered this question: Cats and their owners.)

The bad news about retort pouches is that they're not usually recyclable.  They go into landfill, or are  incinerated. This is hopefully changing; I found several companies online that have developed recyclable versions.

The good news: retort pouches are sturdy, colorful, washable, and...stitchable! So it was inevitable that green-minded sewists and crafters would start eying them flirtatiously; the relationship was consummated, and their spawn was a new subset of crafts. Google "juice pouch crafts" or "juice pouch bags," or "capri sun pouch crafts" - you'll find a ton of of ideas and patterns, especially for tote bags, wallets, coin purses, and, of course, the occasional prom dress.

It wouldn't be healthy to drink your way to a juice pouch tote bag (let alone a prom dress), not in a short amount of time, anyway. In recent years, health experts have warned children and adults to cut back on juice consumption. Even 100% fruit juice contains plenty of unnecessary sugars and calories.

Coffee bags, on the other hand, come full of very tasty 100% coffee, beans or ground, which might be very good for you, even if you drink many cups a day. Coffee consumption is associated with a lower risk of cancer, dementia, heart disease, diabetes, depression, humility, etc., according to scientific studies like these and these. The day may be coming when we view coffee as a nutrient.

So the first step is to drink a lot of coffee, until the bag is more or less empty. Then,  wash it. Or better yet, just wipe it down a bit; but leave in some coffee dust. Yum, it will smell good for a long time and probably not attract vermin?! Isn't it much better to have a roasty fragrance on your wrist than some sappy perfume? (Or tuna?)

However: If you've got a Starbucks coffee pouch, examine it carefully before cutting - some offer a trade-in: 


You are supposed to hand over the whole bag to get a free smallest-size cuppa.  (I keep intact, rolled up empty Starbucks bags in my purse, ready for barter. My purse smells delicious.)

I chose a Peets' coffee bag for this project, not only because it DIDN'T offer a trade-in, but also because it's a rich chocolate brown, with gold lettering (nice font, too). 


You can see the gold lettering better in this back shot of the  finished cuff: 


Here's an annotated version of the whole cuff: 


Cuff ingredients: 
  • An empty coffee bag (Peet's 'Major Dickason's Blend', in this case. (Delicious, by the way.)  
  • Brown glass beads shaped like coffee beans (along the top edge. From bead shops or the web);
  • 'Burnt' wooden buttons (along the top. Evocative of  roasting.); 
  • Vintage gold faceted glass bead (on the 'wave.');
  • Small brown/black/white glass trade beads (along the bottom.);
  • Two brown abstract print fabrics (fabrics A and B);
  • Two coffee-themed novelty fabrics: the small black-and-white tumbling coffee cups (fabric C), and the large yellow cup (fabric D). 
  • Backing fabric (Brown heart print, shown at the bottom of this post.) This is fabric E. 
  • Two small black sew-in snaps;
  • Thread: gold metallic (from Superior) for zig-zag wave; 'invisible' nylon thread to applique the cup; and brown thread to applique the coffee bag and the 'wave'. 
  • Strip of batting, same height and width as unfinished bracelet.

My finished size: 9 1/4" x 4 1/4".  This size is good for a wallhanging, paper weight, pencil holder, coffee-scented votive-candle-surround, etc.

But this is important: If you want your cuff to actually function as an actual cup cuff (to keep hands cool when handling a hot paper cup ), you need to make it FINISH at  9 3/4" - 10" long  x 2 1/2" high or shorter (under 2 1/2"). So adapt these measurements as needed.

I always use 1/4" seam allowances.

During this project, I found that coffee bags are very easy to stitch. No need to turn under edges. They glide easily under the presser foot. The only danger is sewing stitches too closely together - that can cause the holes to rip through. Use a long stitch length, and a thin needle, like a microtex. 

For information about how to search out coffee-themed novelty fabrics online (like fabrics C and D), scroll down to the very bottom of my earlier coffee post

1. Cut a rectangle of fabric A (dark brown fabric) 3 1/2" x 9 3/4".

2. Cut two strips of fabric B (light brown fabric), each 1" x 9 3/4". 

3. Stitch the two B strips to the top and bottom edges of the A strip.

4. Cut a rectangle from the coffee bag to approximately 2" x 9 3/4". Center it horizontally on the AB unit and stitch it down with brown thread, using a long zig zag. (A tight zig zag would be bad because the needleholes would be close together and might rip through the bag.)  

5. If you have a fabric C for the frontmost 'wave' (mine is black and white, with tossed coffee cups), fuse a strip that's about 2.5" x 8 3/4" to a piece of fusible interfacing (This is optional; interfacing just makes it easier to handle.)

6. Figure out with tracing paper the shape of the wave. I wanted to cover "Peets" but leave the word "coffee". Once you have the shape, cut it from fabric C. Glue-stick the wave into position on top of  the bag rectangle. 

7. From a novelty fabric (fabric D) that has a large (1.5"-3") coffee cup on it: rough-cut around a cup, leaving a quarter inch or more fabric around the motif. Fuse the fabric cup onto fusible interfacing or paper backed fusible web. Once fused, cut closely around the cup.   

8. Place the cup in position. You can use a glue stick again to temporarily hold it in place. Stitch down with a loose zig zag, using invisible thread .  

9. Cut a piece of backing fabric slightly larger than your finished top. In my case, it's 4 3/4" x 9 3/4"  (or the same size as your finished top). This is fabric E. (It's the heart fabric shown below). 

9. Cut a piece of thin batting (I like Warm'n'Natural) to the same size as the backing fabric.

10. Stack components: Batting on the bottom, backing on top of it good side up; then your pieced top, good side down. Pin in place, but don't put any pins through the coffee bag area. Beginning on one long side, stitch almost all the way around, leaving a 2" or more gap. 


11. Trim back the corners, cutting near but not through the stitching line.
12. Gently pull out the front. 
13. Press the edges (but keep the iron away from the bag! Finger-press those areas.) 
14. Hand-stitch the gap closed. 
15. I did a decorative machine wave stitch with metallic thread over the seams where fabric A meets fabric B. I used invisible thread in the bobbin.
16. Hand stitch beads and buttons wherever you please, using thread that blends well with the backing. 
17. Hand stitch snaps to the corners. Look at the first picture above - see the black snap-halves in the two far right corners? The corresponding snap halves can be seen in the far right corners of the heart backing fabric picture below. 
18. You're done! Send pictures!  You definitely deserve a nice fresh cup of Joe! Trade in that Starbucks bag!

(P.S. Here's the back side. Black snaps are on the upper and lower right hand corners. It still needs a loop for hanging in the middle top.)


Update: I've been looking around for other coffee bag creations. Here's a flower necklace: http://thecsiproject.com/2011/04/18/coffee-bag-necklacemrs-greene/
Scroll about 2/3rds of the way down the page for a nice tote: http://meggitymegs.wordpress.com/tag/crafts/
Quilter Eleanor Levie has made wonderful concoctions from coffee bags and other trash. She calls it her ReUse series: http://www.eleanorlevie.com/gallery.php. My favorite: http://www.eleanorlevie.com/gallery-detail.php?cat=43&ID=0.

Sunday, November 18, 2012

A Farewell to Hostess; Twinkie Quilt, Part II

I had so much fun in the last post making a virtual Twinkies & Cupcakes Quilt, that I decided to add more.

So here's my new, updated hypothetical Hostess quilt:
In the upper left corner, that's a coconut and pastel pink Snowball Sno Ball (thanks, Corinne, for the correct, incorrect spelling).  On the upper right, a Ho Ho (aka Ring Ding in the Northeast part of the US). Lower left is the Zinger, which I'd never heard of before - it's a terrifyingly bright-coral-colored Twinkie. And the lower right, of course, is the distinguished Ding Dong. The abstract yellow bars are Twinkies, and that's a Cupcake in the middle.

Update: Due to popular demand, I'm adding a Suzy-Q:

And an Orange Cupcake: 


Please feel free to use this idea to make a real or virtual quilt of your own! All I ask is that you send me a pic and link back to this post!

Update: Various people, and Wikipedia, are reminding me of more Hostess treats, like the Fruit Pies and the neon-green Sno Balls for Halloween (Thanks, Antonija). So I turned the 9-patch into a 15-patch:

The Halloween Sno Ball is on the lower right, and the Fruit Pie (apple?!) is on the lower left. Ding Dongs run down the center. (Did I ever imagine I'd be typing that last sentence?)

Now I'm starting to feel more than a little nauseated. Maybe I should make this quilt. Just looking at it might stop me from eating junk.

UPDATE: Check out this wedding cake. http://pinterest.com/pin/117586240241454136/. There are actually quite a lot of them on Pinterest. I'm guessing they're for the weddings of 11-year-olds.


Friday, November 16, 2012

Quilts I'll Never Make: A Farewell To Hostess

(For an update to this post, click here)
Here's the fantasy quilt sketch that jumped into my head when I heard today's news about Hostess cupcakes(It was good news if healthy eating is your priority. But it's terrible news for 18,500 employees, plus millions of Twinkie addicts.)


Hostess products bring me back to my childhood in the 1960s, when hostesses (and their refrigerators) looked something like this:  

(Total non-sequiter. Isn't that a great fabric?)

My own mother did dress like that, but, alas, she was into healthy eating, so we rarely, if ever, had Hostess products at home. I got them from the local candy store, or other people's mothers.  I always preferred the (chocolate) Hostess Cupcakes to the (not chocolate, what's the point?) Twinkies. 

But I decided to fling a couple of the latter onto the imaginary quilt above, along with the cupcakes. Fabric Twinkies are so easy to make, just rectangles with shaved corners. The hand is open to interpretation: Is it taking a cupcake, waving farewell, or both? 


I'll never make this quilt because, if I keep thinking about cupcakes any more than I did while composing this, I'll run out and buy some. I bet by now there are suspicious characters in my supermarket parking lot selling Twinkies, Ding Dongs, Snowballs, Yo Yos, Yee Haws, Ho Hums, and all the rest at extortionate prices from their car trunks. (Update: Boxes of Hostess products are now listed on ebay for hundreds, and even thousands of dollars!)

Feel free to borrow the idea for a quilt of your own, though. (Send pix when you're done).  

If I were to actually make it, the icing "o" s would be the big challenge. Seriously sharp scissors required.

And while we're telling Twinkie truths....When I had my first baby 18 years ago, our pediatrician reminded us to pack infant supplies in the earthquake kit. Among other things, he told us that Twinkies are shelf-stable for decades. We believed him! (The Internet wasn't as   omniscient then). 

So a box of Twinkies sat in our earthquake kit for about 15 years, along with diapers and onesies, for my now-college-freshman. A couple of years ago, I realized that the onesies wouldn't fit him anymore, plus it was inconceivable that Twinkies could have such a long shelf life. I was right: it's only 25 days. I threw them out.  Which is too bad, because now I could go sell them, mint in box, in front of my local supermarket.

My heart goes out to the laid-off Hostess employees, and I hope someone comes along, bails them out, and revamps their jobs so they're baking and distributing something just as popular and tasty, but maybe just a little bit healthier, than Twinkies.

P.S. For an updated and more elaborate virtual Twinkie quilt, see my update here.

P.P.S. I shared this link at Nina Marie Sayre's gorgeous art quilt blog. Her off-the-wall Friday project is a great way to share the week's creativity.


Thursday, November 15, 2012

Eye Candy from Houston

The annual International Quilt Association show, affectionately known as "Houston," is one of the most important shows in the world. The 2012 show just ended, leaving behind a trail of phenomenal quilts on the blogs of amazed attendees everywhere. Here's the top prizewinner, called 'America, Let it Shine,' by Sherry Reynolds of Laramie, Wyoming.   


This trifle is embellished 5,121 Swarovski crystals. which Sherrie says, totals the age of the US  (235), plus the number of words in the Constitution (4,543), the Pledge of Allegiance (31) and the Star-Spangled Banner (312).

Ogle all the mind-boggling award winners on the official show site, or, for a more relaxing and diverse experience, watch this slideshow of favorites, from quilter Sheila Frampton (herself an off-scale art quilter). 

Sheila's Part 2 is here(I like Sheila's technology, because you can speed or slow the pace with the arrows, and stop the show at any point by clicking on each slide.) 

MORE Houston eye candy, not in slideshow form, is on Susan Brubaker Knapp's website:
http://wwwbluemoonriver.blogspot.com/2012_11_06_archive.html

Staggering quilts! Enjoy!

Monday, November 12, 2012

Quiltlet #3: Hearts Rising


(For my introduction to the Quiltlet project, click here.)

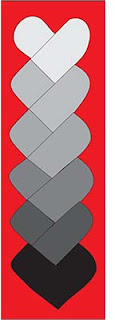
This quiltlet makes an especially good Valentine's day bookmark/wall hanging/bracelet. Use six fabrics that contrast against each other. Do a rainbow. Or how about a gradation?


For this tutorial, we're going to make the quiltlet that's at the top/left side of this post.

1. From each of your six fabrics, cut a strip 1 1/2" wide by 4" long.

2. Subcut each strip into two pieces, one a  1 1/2" square (= "the square"). The remaining piece will be 2 1/2" (=" the long piece").

3. Decide what order you want to arrange your fabric in. The fabric that you want for the top heart we will call fabric A.

4. Place fabric A square good side up, and the long fabric A piece good side down on it, so the bottom edges align. Stitch them together. (Tips: Stitch with the back of the square facing up, not the long piece, to avoid unstitching later. Make sure you pull a long lead - at least 8" - of bobbin and top thread, and hold those tails back for your first few stitches, or else your machine may swallow your fabric.)

Open it up.  Press seam allowance toward the #2 piece.  It looks something like this:


5. Place the fabric B square even with the bottom edge of  piece #2.
Stitch piece #3 in place.

6. Add the next piece, the long Fabric B piece. Its bottom edge should be even with piece 3.


(6a. Unlike the drawings, each new heart piece will slightly overlap the heart before it. Here's how it's really going to look: 

7. Next comes the square from fabric C. 


8. Now you've hopefully got the idea: 


Keep on going til you've finished six hearts. Now it should look like the drawing in step 6a., above.

9. Trim away any threads that show.

10. Optional: For easier handling, press this strip onto a slightly larger piece of fusible interfacing, or paper-backed fusible web (Use a teflon press sheet or scrap paper to keep the iron clean, and press from both sides.) 

11. Using sharp scissors, trim the strip  into curves, as shown by the dotted lines.  

Once it's cut, it looks something like this: 


12. Place that strip onto a coordinating piece of felt, at least 1/2" larger than the strip all the way around.

13. If you put fusible web on the back of the hearts, now fuse the strip onto the felt. (Use a press cloth and lower the temperature slightly from the recommendation, if the felt contains polyester).  If you put a fusible interfacing on the back, use a glue stick around the edges of the piece and press in to place on the felt backing. In the diagram below, the felt is red.


14. Trim the outer to within 1/4" of the strip edges.


15. On top, use an invisible thread, or thread that matches each heart color. On bottom use thread that is invisible, or matches the felt color. Check on a scrap that the tension is right and doesn't show from the back to the front. Do a straight-stitch around each heart, just about 1/8" inside each.

16. Load the machine with a constrasting or matching thread (I used a variegated rainbow thread, which has dark blue, red, yellow, and green). Zig-zag stitch all the way around the outside edges of the hearts.


17. Add sew in snaps, stitching the "innie half" just above the bottom point point  of the bottom heart, and the "outie" the back side of the top heart. A small loop at the top back will make it suitable for hanging!


VARIATIONS
For this plaid/homespun version, I  trimmed the backing felt even with the raw edges of the hearts, and then did a corded edging all the way around. I also did a slightly different trimming job than appears in step 11 - I only trimmed the outermost corners, as shown in the dotted lines in the diagram on the right.