Monday, November 5, 2018

Break Out the Pom Poms! Eye Candy from a (Mostly) Knitting Show

Stressed out by the upcoming election? Here's some eye candy from a fabulous yarn show, to distract you while waiting in line to vote, and/or awaiting election results. What could be more enticing than this?
From The Yarn Guys booth
Or these: 
   
Or this: (It's a wall of beads from Bead Biz, of Guilford, CT): 
The nice thing about beads sold at yarn shows, I discovered, is that the holes are relatively large - one could conceivably attach them to quilts by machine. 
Or this joyously geeky tableau at the Dizzy Blonde Studios booth (creative hair color was abundant):
Or Art, a lovely guy from Needlepoints West (an LA shop), who supervised a children's swimming pool full of luscious bargains: 
I resisted the urge to dive in and roll around: 
And that's just the beginning of the sensory overload that was Stitches SoCal, one of many Stitches shows that, I learned, that take place across the country. This one was in Pasadena, CA last weekend. (Other show sites include Northern California, Georgia, Illinois, Utah - complete list here.) 

I can barely knit; I love crochet, but my shoulder doesn't, so I don't do much of either. I might never have heard of Stitches if my friend Jeri Riggs (Ravelry name: Knitbird), who lives in Massachusetts, hadn't told me she was heading my way and among other things, planned to attend this show. Jeri is a master quilter, knitter and, for as long as I've known her, a mermaid of azure beauty: 
She knitted that incredible peacock shawl with gradated yarn. The vest? She knit it in white yarn, and then dyed it green and blue. Between the shawl and the vest, Jeri literally stopped traffic at the show as people admired them and asked her questions.

For your relaxation purposes, here are some more sights that astonished and/or taught me something related to quilting. This show was mostly knitting and crochet, with just a handful of quilt-related vendors, guilds, and mini-shows (including the Cherrywood Quilt Challenge honoring the singer Prince, as you'll see toward the end).

Lesson 1. I was in Color Heaven. I overheard a man saying, "So is this knitter's heaven?"  I had no idea that there are so many amazing artists out there whose art form is painting and dyeing stunning variegated yarns. Below, the skein on the left was inspired by Japanese wisteria; and the one in the middle was inspired by Harry Potter (The company with the inspiration is Forbidden Fibers).  Also note the project bag on the right made with Harry Potter fabric (more on bags later.)
This hefty hank, from Black Cat Fibers in Milwaukee, is about 3-feet high: 
Here's its massive, autumnal neighbor: 
Noti Yarns, LLC, from Texas (notiyarn.com), also sells hand-painted yarns. Look the color combinations in their display shawls. (Their website is as delicious as their booth.) 
Lesson 2. Green is In. Not just the shawl on the upper right - there was a lot a green - would you call it chartreuse? - that, by itself, is remniscent of my middle school corridors. But combined with other colors...and sometimes, intricate patterns...it becomes...sublime. Here's another green-and-purple confection: 
Next, from Stunning String Studio, this Interpolate kit shawl is to die (dye?) for:  
Lesson 3. The Inventiveness of Knitters is Boundless. Cindy of Alamitos Bay Yarn Company showed me this loop scarf that switches from woven to crochet, and back again. Cindy told us that in when she wears it in airports, fiber arts people stare at it for long periods before throwing up their hands and approaching her to ask how the heck she did it. (She did it by picking up yarns from a loom and knitting them! That's all I understood.)
Speaking of green, Cindy's sweater/shrug was lovely too. 
Lesson 4.  Colorways Make All the Difference. There are fads in the knitting world, Jeri explained to me, just like the quilt world. Jeri told me about this popular Butterfly Papillon Shawl, designed by Marin Melchior. The first booth that we saw it in, it was knitted in psychedelic colors: 
Jeri showed me the yarns that could be used for a similar effect...
Then we saw it in another booth, with a gentler colorway.  It's no longer Peter Max....
...it's more Art Deco! And then we saw another one, made using the same technique, in black and gold:
 It's spectacular formal evening wear! 

Lesson 5: Knitters Love Bags, but Don't Make Them. Handbag-sewing patterns are popular at every quilt show I've visited (as are  zippers and other purse hardware). At this show, I saw zero bag-sewing patterns; and few patterns for knitted bags. But there were tons of ready-made fabric bags and backpacks, from tiny to vast, designed to hold knitting projects. Here's the booth of Atenti Bags, a family-owned business in La Crescenta CA, with an eye for delightful fabrics. 
Check out the kooky fur - the red-and-pink poofy bag, and the hairy yellow one above it on the far right, the white ones on the far left in the photo above. Atenti only sells wholesale online, but you can find shops that carry their bags on their website. 

There was a smattering of African fabric, yardage and products made from it. Below, some fabulous purses from Handspun Hope, a Christian charity that produces knitting wares in Rwanda. (www.truevineyard.org.). Loved the large round zippered bags; 
A missionary project in Uganda, Project Lydia, was also selling finished bags, including this tote. (The round embellishments aren't shells - they're rolled-paper beads.) 
Other booths had racks of bags sewn from novelty fabrics - everything from Star Trek to Sailor Moon was featured in this booth by Seven Sisters Arts of Maine. (sevensistersarts.com). 
The shawl on the lower left is from a knitting pattern called "Prime Directive" by Sara Wilcox, inspired by a Star Trek Bird of Prey.
More novelty fabric bags in a different booth:
Next, project bags sewn from faux knitting fabric (looks like knitting, but it's fabric.)
And the bags below, in the Knit Picks booth, feature clever sayings - I especially like the top one that says, "I'm working on my PhD - Project Half Done." (Also, "Socks To Be You," and below that, "Alpaca my bag.")
Lesson 6. Cherrywood is Rich. Cherrywood (www.cherrywoodfabrics.com) makes glorious, sueded hand-dyed cottons. The only problem with Cherrywood is the same problem I have with chocolate truffles - I can't just eat one piece. I have to buy all of it. I am not worthy. But I'm getting there. It was impossible not to stroke the wares.
Lesson 7: Like Quilters, Knitters Grapple with the Grandma Stereotype How many articles about contemporary quilts and quilters have you read that begin with the words, "These are not  your grandmother's quilts!"?  The knitting community is fighting the same battle. Except the Twisted Skein in Bakersfield CA, a shop that decided to embrace the stereotype. Here's one of their tee shirts:
Lesson 8. "The Fade" is Big, Jeri explained this to me and then I saw it everywhere, colors fading to light or dark, or fading into other colors. In the quilt world, we call it gradation. Here's a gorgeous knitted skirt that I wish I could just buy....
And here's a mind-boggling op art scarf by Alasdair Post-Quinn of Falling Blox Designs. How did he do it? Jeri explained that the gold-to-grey effect is from one color-gradated skein of yarn, while the other skein is black. 
Lesson 9: English Paper Piecing is a Crowd Pleaser In the midst of all the knitting and crocheting, there was an EPP  experimentation station. The Glendale Quilt Guild sponsored some EPP activities in the show's "Playground" area. Everyone can learn to love EPP!
Lesson 10. Quilters and Knitters are Cat Crazy.  Awwww. This cute pattern was in the booth of Knit Picks, from Vancouver, Washington. 
Lesson 11. We're All Button Lovers. Knitters love buttons, even more than quilters - after all, most sweaters require buttons, whereas quilts don't (except mine). This show had only one button booth, a company called (believe it or not) Buttons! from Calistoga, CA (website at unbuttons.com). Good buttons, good prices. 
Lesson 12. Pom Poms. That is all. There were lots of them. These faux fur pom poms were from Knit Picks. Now I'm wondering whether judicious pom-pom placement on my quilts would make them less washable, let alone less respected.
Lesson 13: We Have Technical Challenges in Common. Check out the star sweater below, in L'Atelier Art Yarns booth. For quilters, joining 12 seams in the middle of a six-pointed star is hard enough; I can't even imagine what it involves in knitting. 
Lesson 14:  Knitters Think About Socks a Lot More Than Quilters Many quilters make Christmas stockings, but that's about all in the way of quilted footwear. But knitters, omg, the gorgeous yarns and designs knocked me out. Like this, from discontinuedyarns.com. 
The Purrfectly Catchy Designs booth, below, offered charming carved wooden sock blockers, each with a different cut-out - cats, dachsunds, dragons, dots, lobster, squirrels, you name it. (They sell knitting wares from their ebay store.)
Lesson 15: Who Doesn't Love Hooked Rugs? Occasionally at quilt shows I've seen rug hooking vendors. At this show, Wooly Walkers offered wonderful punch needle embroidery projects. 
They even worked it into a collar of a felted garment:
PART TWO: THE QUILTS! 
 Artist Page Wood, of Sherman Oaks CA, displayed both prints and his machine appliqued quilts. This one's stitched: 
 And this one's a print: 
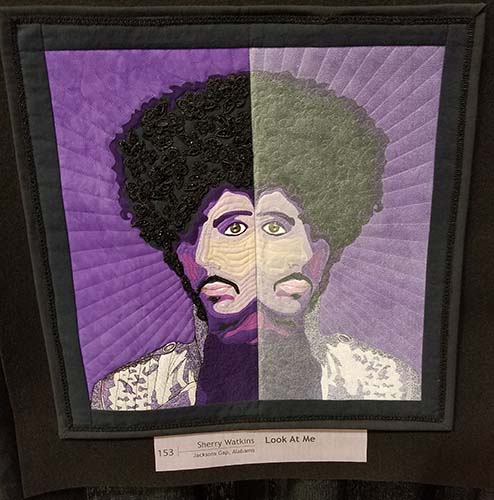
Perhaps the most exciting part of the show for a quilter was the 75 pieces from the Cherrywood Challenge 2018, themed "Prince." It was a sea of purple. 

 ...each so heartfelt...
The next one is by Sherry Watkins....
Below was one of the prizewinners. The workmanship in this little quilt by Robin Gausebeck was perfection. 
Karen Collins made the stunner below, "Purple Reign," which won a judges' choice ribbon.
The Glendale (California) Quilt Guild had a fun exhibit that included this beautiful Australian-themed quilt: 
It's called "There's an Emu on my Quilt," by Terry Simon. Awesome detail:
Next, I loved the fabric embellishments and vintage pieces in "Fiesta" by Cindy Caldera: 
There was also a small but powerful show of quilts by Lynn Carson Harris. She writes, "My most recent work is a series of small-scale abstract designs inspired by the experiences of someone I love and care about who is in an abusive relationship. My wish is that these pieces of art can help to prevent domestic abuse by increasing understanding an awareness...." The first piece is a large black expanse (most of what you're seeing below  is the quilt, not the black curtain).

 The next quilt she calls "Crepuscular."
This set of 11 small quilts represent different aspects of abuse. 
 The sign on the middle right breaks it down: 

IN CONCLUSION
The show that most quilters are thinking about this week isn't Stitches - it's Houston. Stitches was the next best thing. I recommend a Stitches show to needleworkers of all kinds. They also offer classes (including several quilting classes.) Learn more at their website, here.

NOTE: I have no financial affiliation of any kind with any of the organizations, artists, vendors or products in this article. 

UPDATE: For even more images from StitchesSoCal 2018, enter the term in Instagram. 

Sunday, October 28, 2018

Reflecting on Pittsburgh Synagogue Slaughter

When I read that the Pittsburgh shooter burned with hatred of HIAS, the Hebrew Immigrant Aid Society, for advocating for immigrants at our southern borders, a shock went through my system. HIAS brought my mother to this country.  Here's the HIAS ID card she carried on a ship from Bremen Germany to America in 1947. 
My beautiful mother, who died in 2016, was a Polish Jew who lived through years of terror, first in the Radom ghetto where the Nazis packed and starved Jews from their city; and then in three concentration camps, Plaschow, Bergen Belson, and Auschwitz. She and one sister survived the war (from a family of five). She finally got out of Germany in late 1947. In her HIAS ID, the small print right below mom's name is so moving. "______(name) is under the protection and sponsorship of the Hebrew Immigrant Aid Society. Any courtesy extended to the above named will be appreciated." There's an underlying assumption that the country will treat her not just fairly, but with courtesy. 

And America did. My mother graduated Hunter College, and and had a long career as an outstanding high school teacher and psychologist in Newton, Mass, She adored her students, and made films with them that encouraged tolerance and dialogue between different ethnic groups and cliques in the large public school. And of course, she became a mother. Without HIAS, I literally wouldn't be sitting at a computer in bucolic Southern California, having had a long and peaceful life, feeling utterly secure as an American Jew. And most American Jews would say the same. Until recently.

May those who lost family members to racist and anti-Semitic violence in America find comfort. May this nightmarish outbreak of bigotry end soon. My parents would say: Battles that we thought were long over now must be re-fought. We must treat each other with courtesy. The alternative is too terrible. 

Sunday, October 21, 2018

I made some little dreidels. I made them out of scraps. They spin like...

(Sung to the tune of "I had a little dreidel")

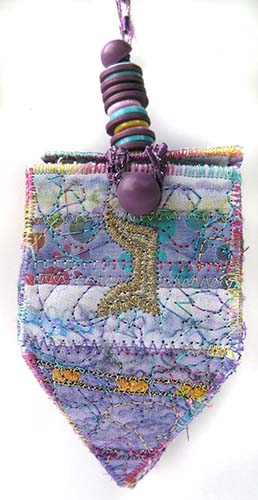
I made some quilted dreidels...
...I made them out of scraps (batik scraps, stiff interfacing scraps, gold lamé, etc.)...
...And when I tried to spin them....they spun like cr#p. [End song.] My husband, a physicist, explained that because the buttons and beads are not glued together, they dissipate the energy from the spin, not to mention angular momentum, a phrase I always wanted to type. Oh well. On the brighter side of physics, the lids open and shut...

...one of them has a bobbin at its base....
 ...and inside, you can store small toys...

...chocolate coins and/or wrappers from chocolate coins of yore...
...even (bellydancer) coins... 

....or stuff another dreidel inside!

My little dreidels really fit inside the big ones (because the stems are flexible and dissipate energy) - they're matroyshka dreidels!

I had so much fun making them, that I sat down and wrote up a tutorial, much of which is free below. (Commercial interlude: For people who prefer a clear printout, an inexpensive 13-page e-pattern is now in my etsy shop.)

The Hebrew letters on a dreidel are a nun,

..gimel
hei

...and shin

...Representing the sentence "nes gadol heya sham," "a great miracle happened there." Wikipedia's dreidel basics are here.

Making these didn't take long - I made two in maybe three hours, no shopping required. Below is the plan (developed in hindsight. When I set out, I had no plan).


These are the measurements for the larger dreidel. You can go bigger or smaller. (I made a 1" version, and it was very tricky to sew, but doable. Watch your fingers!)

You'll need small amounts of stiff fusible interfacing (product names include Pellon F2F, Peltex, Peltex2, or Fast2Fuse).

1. Decorate a piece of interfacing that's big enough to later subcut the pieces shown in the diagram above. A minimum to decorate would be about 8" x 10". Or, scrounge up smaller pieces from which you can cut the individual pieces above.

I started out with a bunch of leftover 4" x 6" fiber art postcards backed with fusible interfacing. I fused a streaky batik on as background, then zig-zag stitched fabric strips and ladder yarn on top. 


Then I scribbled over them variegated thread....
and/or gold thread....
[What I should have done, but didn't in my first dreidel: Line the other side. If you want the boxes lined, this is the time to fuse or glue-stick a nice piece of fabric on the reverse side, and cut it even with the edges of the top.]

2.  Cut the individual shapes from the embellished interfacing:  
  • 5 squares that are 2.25" on each side; 
  • 1 small rectangle for the tab that's 2.25" long by about 3/4" high; and
  • Four equilateral triangles (or near-equilateral triangles) that are 2.25" across (= same width as the squares), x about 2" high (height needn't be precise - isosceles triangles work too.)

3. Sew the squares to the triangles. I recommend a satin stitch, though in this case I did a loose zigzag. The satin stitch is stronger. 
4. Do the lettering. Draw out the Hebrew letters - if you have a dreidel around the house,  you can copy those letters, or mine, or those on Wikipedia here. (My pattern has some nice letters) If you choose lamé for the letters, fuse light interfacing to its back, setting iron at the lowest possible temperature for fusing, or you will melt it.  Or use a less fragile fabric, and add fusible web to the back. Cut out the Hebrew letters  Fuse or gluestick one to each square. (You could also paint them in!)

5. Stitch around the letter. I used gold metallic thread:
6. Join the four panels, including the seams that will bring the shape into the third dimension. If you've machine-sewn bowls before, you know this is tricky - go slowly. (You can also hand-sew.)

Line up the panels, tips pointing away from you, next to your machine, in the correct order (follow the diagram above, but in reverse, since they're upside down). Set a wide satin stitch and starting from the bottom tip, stitch forward. This is simple...until you get to the point where the two squares diverge.
7. Gently bring the two corners closest to you a bit towards each other, and take ONE more zigzag stitch, just catching the edges with your needle. Bring the corners closer, and take another stitch, catching both sides. By the second or third stitch, the corners will demand to snap together! Encourage this, pressing the two square sides tightly together. Stitch forward, slowly and carefully (Do a couple tiny straight stitches at the end). You'll have this: 
8. Next, sew the two pairs together thusly: 

9. Cut out the D-shaped tab from extra interfacing - as shown in the diagram. it has the two bottom corners rounded off. Satin stitch it one side of your last square, the lid. The tab really helps hold the lid in place, and the dreidel in shape.

10. Then satin stitch the opposite side of the lid, to the top of one of the panels. Before you attach it, you might want to quilt a spiral into it, like I did! (Pretend the handle isn't there yet.)

11. Satin stitch all the way around all the remaining unattached raw edges, including the lid and tab. (Pretend the tab is on top of the lid in the photo below. Do what I say, not what I did!)
12. The last crucial seam is shown below, running from the dreidel's lowest point, up to the beginning of the lid. You must sew this seam by hand.

For my large dreidel, I did a hand whipstich from the outside with thick variegated thread - you can see some of it on the right edge, below, where the thread is white. On such a scribbly messy dreidel it's not a big deal.

For the smaller dreidel, I hand stitched the last seam with a pink Bottom Line thread, which is strong and thin, so the stitches hardly stand out (on the right, below).
13. A stack of buttons makes the handle. I used 6-strand embroidery thread and a needle longer than the button stack. I sewed up and down through the button holes, a couple of times to get it firm and (relatively) straight.
I also added a button in the front, to use with an optional loop that goes under the handle. 

They work not only as gift boxes, but as hanging decor. I do feel bad that they don't spin well. I couldn't think of a secure way to install a stiff rod in the lid - if you have ideas, please do share!
If you attach a bangle bracelet, they can double as a wristlet. The one below is not large enough to hold a cell phone, but certainly lots of chocolate coins! (It's posing on my backyard rhododendron;  but you could also hang it on a Christmas tree!)
If you can make them from the tutorial above, have at it! I'd love to see pictures. If you'd like more guidance, the e-pattern includes illustrated step-by-step directions, the pattern in three sizes, a one-piece version that's simpler than the one above, a nice Hebrew font for medium and large size dreidels, and embroidery letters for the small dreidel. Find it here. Email me with any questions!

Sunday, October 14, 2018

From Tree to Shining Tree (With 3 Tips)

In our last installment, I showed off a commissioned tree-themed quilt. Sending it to its new owner broke my heart! It also lacked buttons. So I rapidly made the following three quilts, each about 15" square. A winter tree:

An autumnal tree (or maybe a summer citrus?)
Can you find the bra clip?
 Next: Winter again? The trunk is white.
But the leaves are green, so let's call it early spring!
The trunk is Jane Austen text so I added a metal heart charm (the text below it says "heart is really attached")...
...and a squirrel from the cake-decorating store.
Want to make your own tree quilt? Two tips:
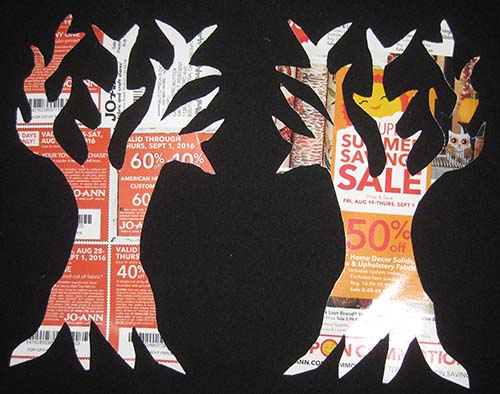
1. Practice is important, but I like my designs better if I don't draw them first - use scissors to cut trunks from paper. I grab every bit of junk mail and scrap paper in the vicinity to cut out practice trees. Below is a draft for last week's tree quilt, cut from the paper that comes with batting.
And here are two smaller trees cut from a double layer of an old Jo-Ann Fabrics fliers. 
2. To give fabric tree trunks extra dimension, back them with Decor Bond, a medium-weight fusible interfacing. A layer of DB isn't strong enough for, say, a fabric box, but it is thicker than interfacing you'd use for most garments. I pencil-traced my papercut trees onto DB's non-fusible side, rough cut it out (beyond the pencil borders), then pressed the fusible side to the back of the trunk fabric and cut out the two layers together along the pencil line. DB also controls fraying. I then used a glue stick to lightly attach the non-fusible DB side to the background fabric. In the squirrel picture above, you can see the slight but satisfying ridge that raises the trunk above the background. (No financial affiliation with DB.)

3. Combining batiks with prints is always a gamble. The immediate background for two of these tree quilt is a bunch of batik strips I sewed together a couple of years ago, in my Ann Brauer phase. 
If you want to combine batiks with prints, it's often better to choose prints that have a watery near-batik quality. The postage stamp print below was pretty watery. The button print and text print, not so much. 
As with almost every other decision in quilting, combining batiks and prints means auditioning things next to each other to see if they work!

Sunday, October 7, 2018

Use Your Best Scraps for Quilts that Sing

I recently finished this commissioned quilt, a gift for a singer-songwriter. This artist's lyrics are full of natural imagery - I listened to loads of them on Youtube before designing this.
What also served me well was a lesson that took me years to learn: To make a beautiful quilt, start with beautiful fabric. 

I know, guilds are always doing "ugly fabric" challenges - but the exceptions only prove the rule. Fun, funny, interesting can be done easily with hideous fabric. But if you need beautiful, on deadline, pull out the good stuff.

In the background of this piece, the light vertical rectangular column below is from a striated batik, the last remnant of a gorgeous yard. The mottled brown/violet batik horizontally along its top was a fragment of a different yard that made me swoon. 
For the tree, I used up a fat quarter of the richest, thickest turquoise hand-dye that someone gifted me  years ago. 
The planetary print fabric along the top is from a thrift-shop shirt, and has a wonderful antiquey look. More of my favorite batik scraps are down the left side and across the bottom.
The back is batik grape fabric. Grapes are, among other things, a Judaic symbol for joy (via wine!).
I included a hanging dowel along with the quilt, and of course added a label.  It was hard for me to separate from it! All the scraps were favorite children, and I couldn't imagine making another one nearly as good. But then I bought some more beautiful batiks! And made more tree quilts!

Update: Three more batik and print tree quilts are posted here.