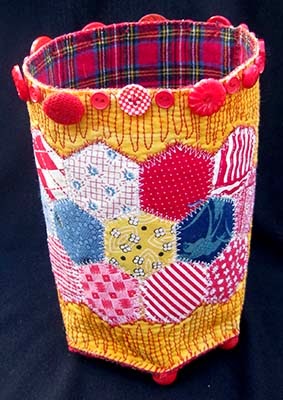
Look! Up in the cyber-sky! It's a bird!
A plane(t)?
A table runner?
A vase?
A what???
 |
| If you don't want to read through the directions, just go to the end of this post to show a photo of the finished product. |
Yes, all of those! Also, whatever! If you start making it, it will come to you. Begin with a hexagon, and finish where you dare.
1. Obtain a hexagon on paper, or print out mine, free, here. (Click "Download," to bring the PDF to your computer; open it with Adobe reader. Print it "actual size" or "100%". After printing, check the size. My large hexagon measures 2 1/4" per side, 4" across from side-to-side, not corner-to-corner.) The printed page should look like this:
2. Use the large hexagon pattern to cut out a piece of heavy-duty fusible interfacing, such as Fast2Fuse or Peltex 72F. (Thick interfacing + paper-backed fusible web added to both sides is okay, too.)
3. Measure the large hexagon's side, and multiply by six - for mine, that's 13.5". Add 1/2" - total about 14". Cut a strip of heavy-duty fusible interfacing to that length. Make it as wide as you want your vase high (or, as wide as you want your table runner. I randomly chose 6 1/2" wide.) So my strip is 14" x 6 1/2".
4. Fuse yellow fabric (or whatever you want your featured side to be) to one side of your strip. Don't fuse the lining inside yet - the back should be the interfacing + fusible. (Put parchment paper or an applique press sheet on the reverse side, to avoid fusing it to the ironing board.)
4. Fuse fabric to both sides of the large hexagon. I used the red plaid on both sides.
6. Use the small hexagon template (mine are 1" to a side) to cut the hexagons from the fusible-backed squares.
7. Arrange the 22 hexagons as shown in the topmost picture on the featured side - or however you like! They can clump together, or fly around separately. Fuse them in place.
8. Simultaneously stitch down and quilt the hexagons in position using a three-step zig-zag. I used white thread.

10. Quilt the background. I went back and forth with a straight stitch in red thread). I also did a decorative stitch in red around the edges of the hexagon formation.
9. Fuse the lining fabric to the reverse side of the long strip.

11. Do a corded edging around both the strip and the large hexagon. Here's how: Find a non-fuzzy (unless you want fuzz) string, cord, or yarn - crochet thread is great, so is 6-strand DMC embroidery thread or thin rattail. I used red DMC. Switch your machine to an open-toe applique foot, if you have one.
12. Starting anywhere but a corner, hold your cord next to the edge of the project. Set your machine on a moderately long zig-zag, like a 3. Zig-zag your away around the piece - on its leftward swing, the needle should go about 1/4" inside the shape. On it's rightward swing, it will stitch into air, just past the edge and the cord. This brings the cord up tight against the edge of the shape. I know, it sounds unlikely, but it works. (For more detailed tutorials on corded edging, see the bottom of this post.)
At each corner, when the needle goes down next to and outside of the corner, stop with the needle down, turn the project, and continue.
13. When you've gone all the way around, cut the cord and zig zag over the remnant. Option: Go around again - but this time, you can tighten up the zig-zag to cover the cord more (or completely). Sew slowly and carefully. I stitched my red cord on with a yellow thread. I only went around once.
14. With corded edging on the large hexagon and the strip, you can now claim that you have a small table runner and a large coaster. Do you want more? If so, continue.
15. Hand-stitch the strip to the base, using a very strong thread (may be called 'heavy duty.' 'upholstery,' 'button,' 'carpet' - I used a red Coats heavy-duty thread.) I didn't create a seam allowance - I just overcast-stitched the bottom edge of the strip to the outside of the hexagon. Then I ladder-stitched my way up the seam.
You have to pinch it at the bottom, where there's a little extra length on the strip - as you move up, no more need to pinch. That makes the vase a bit wider at the top than the bottom.
14. Option: Add buttons around the top edge.
Done? Not necessarily! What if we happened across some vintage ball buttons and....They make a nice footed base.
Unexpectedly, a lid appeared:
Actually more of a crown. Now we have this: (Cue obelisk music from 2001: A Space Odyssey):
Still absent: A kitchen sink, and a seam from cut-up jeans. I went for the latter. So here's the finished project...so far:
What is it now? I think it's a basket with a small earring tray on top, but my wise friend Kay opined that it's a purse. A purse for low-motion occasions such as sitting on the couch watching Sherlock, because it doesn't really shut securely, yet.
Do you want to learn more about the beauty, wonder, and versatility of corded edging? Scroll to the bottom of this earlier post, for a bunch of links to detailed tutorials.


Neat! Could be a project bag for knitting socks.
ReplyDeleteLove it
I love it! Especially the vase!
ReplyDeletethat vase, basket, sculpture thing is too cool. Good to see you playing and having fun! Art does not need to be serious.
ReplyDeleteleeanna Paylor
Thanks, Leeanna! I am playing!
Delete