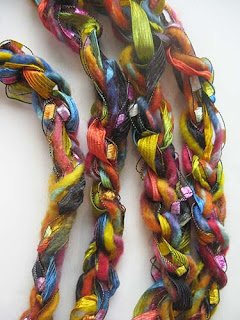
This plan will only work if you happen to have some beautiful yarn and maybe a bit of fancy ribbon lying around the house. Plus glue. And an empty cardboard box.
Thanks to the ever-creative, kind, and generous Jo Ann Leeds, who heads the San Fernando Valley evening chapter of the Pomegranate Guild of Judaic Needlework, I am now addicted to making yarn necklaces. Jo Ann led our chapter in a necklace-making session, offered us beautiful yarn, plus cardboard wrapping forms made by another member, Sharon Shuster. They consist of two pieces of cardboard, 12" x 12" , with clips on the sides. Humble to look at, but best craft tool ever!
I went home from that meeting, dug out some of my most beautiful fibers, and made things more complicated. Instead of wrapping one yarn around my new cardboard form - I went a little wild and simultaneously wrapped 2, 3, 4, 5, 6 strands of different fibers.

The join was informal....

So to dress things up a bit, I wrapped and glued velvet ribbon, or vintage grosgrain ribbon around the joins, then sewed on a button....

...or two...


...or three...


...or one again.

Some yarns, I crocheted into a chain; then I wrapped the chain around the form.
That's a black velvet ribbon under the buttons.
For the next necklace, I used two different copper/brown yarns. I crocheted one into a chain that circled the form three times - and then I used the same yarn to go around the form a few more times, uncrocheted. The contrast in textures is interesting.
Here's a long lariat-style necklace - no join - made up of three different variegated yarns crocheted together into a chain.
A couple of years ago, there was a huge fad for Red Heart's fascinating and ridiculously cheap Sashay yarn. It looks like a thick rope, but when you stretch it open, it becomes netting that can easily be knitted or crocheted to form a ruffle. It's ideal if you want to make a boa for a 4-year-old, but adult projects are a little more elusive with this yarn. Below is a compromise: I crocheted a ruffle into two rounds of open Sashay, then wrapped a couple more rounds closed.
Dupioni silk covers the join.
The next necklace is made with blue Sashay, entirely closed:
It's kind of a cross between a necklace and a scarf. I lost the label for the next variegated ruffle yarn - like Sashay, it can be pulled open into a fishnet. Two rounds went a long way.
That's dupioni under the buttons.
In yarn stores, I can't resist gold and black sparkly fibers, but then I never know what to do with them. I don't have the skills to make them into sweater, so they've been sitting in my stash for years, awaiting purpose. With necklaces, they've found it!
Below is a necklace with maybe 5 fibers, partially chain crocheted, partially braided.
I think it looks like a glamorously messy hairdo. The join is covered with grosgrain ribbon and a textured button.On a second look, that ribbon join above doesn't work so well on narrow areas of the necklace. But if a necklace doesn't work out, it works as gift ribbon!
I did a single chain for part of this necklace, and crocheted a thicker stitch for the rest.

I embellished the join with a flashy rhinestone button.
Doubling it highlights the contrasts:How to make a wrap necklace? You could wrap it in mid-air, like doing cat's cradle, but that's awkward. It does help to start with some kind of form, like Sharon made us. A large book, a magazine, or even a file folder can work. Test to figure out the form size needed to create a necklace in the length you want. At a minimum, it must fit easily over a head, since these necklaces can't be opened. (Make open-able yarn necklaces with the help of a finding called a bead cone; I haven't tried it yet.)
Below is my wrapping procedure. Disclaimer: For purposes of these photos, I grabbed a scrap of the single ugliest yarn in my collection, an acrylic that I think is from 1953. Don't try this at home. Horrible yarn doesn't get any prettier when you wrap it.
I adjusted the two pieces of cardboard to the length I wanted, clipped them in position, then started wrapping in the middle of the cardboard, leaving a tail of 5" or so. With multiple yarns, I found that wrapping them all at the same time worked better than wrapping one by one - the former spreads the different strands more evenly through the mix.
Once you like the thickness, bring one end under and around, cut the end at about 5" from the beginning, and tie a knot.
Now you can either wrap one end around and around, covering the knot and beyond. Or, do a bunch of half-hitch knots with one end, as I did here.
Once wrapped and/or knotted, put a yarn end through a yarn needle, and bury it inside the wrapped area. Pull it through and trim off the protruding end.
Do the same to hide the other end. If you don't want to cover the join, you're done! Maybe add a few drops of Fray Check to stabilize everything.
But if you want to cover the join, proceed as follows.
Cut a piece of grosgrain, velvet, or other ribbon to about 2 1/2" (Longer if you're making a very thick necklace.) Fold the bottom edge up about a quarter inch, and secure with glue. For purposes of demonstration, I'm using pink construction paper, but pretend it's a scrap of ribbon. (If you want to use dupioni silk, fold each side edge inwards before proceeding.)
Spread some glue at the top, where I scribbled....
Begin wrapping. You can add a few more drops of glue as you go. Be sparing toward the sides - you don't want it to ooze out.
When you reach the inward fold, add more glue where the scribble is, on top of the flap - but again, use the glue sparingly so it won't be pushed into view.
Press gently.
Use pins - as many as needed to hold the glued flap in position. Leave it alone until it dries.
Once dry, take out the pins, and sew on decorative buttons, using heavy thread, and hiding the knots inside the ribbon, diving your needle in and out the sides.
Thank you JoAnn and Sharon, for providing me with so much fun! I hope readers will have fun with it too. Wishing all who celebrate Christmas tomorrow a wonderful holiday!
P.S. You can also pin brooches to this necklace, and dangle pendants and solo earrings from it!
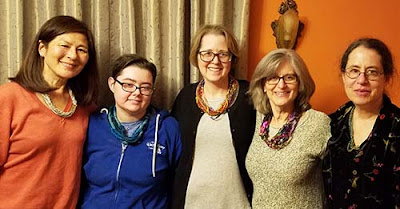
P.P.S. You'll know you've succeeded if you can persuade your lovely & stylish friends to wear them, for at least one photograph. Thank you, dear L&S friends!
Part 2, with even more yarn necklaces, is here.


Those are some amazing fibers. Love the addition of buttons to secure the piece together.
ReplyDeleteThanks! The only problem with the buttons is that I do worry some of the fibers might get tangled on them....
DeleteYour creativity never ceases to amaze me. These are terrific!
ReplyDeleteThank you, Norma, I'm glad you enjoyed the necklaces!
DeleteI agree with Norma, Cathy. Your creativity always amazes me. The necklaces are so much fun.
ReplyDeleteMaggie, I was actually thinking that this is exactly the sort of thing you could take to new andcreative heights!!! I'm trying to figure out if ripped fabric might work into them...
DeleteSimply gorgeous - and lovely to read your texts - Must go to the basement to pulll out those horrible yarns of the last century, ha!
ReplyDelete