
This tutorial is for a very comfortable, roomy, two or three-layer mask that has quickly became my family's favorite.


I have a big head (for a woman), and both sizes work for me. If in doubt, make a medium first. (Below, I'm wearing a large one sewed from a polypropylene tote, scientist-endorsed for masks here.)


This pattern assumes basic machine sewing skills. If you've ever made a simple lined tote bag, this will be familiar. Your first might take an hour, but after that, it will go much faster, especially if you make several at once. I can finish the main body in 20 minutes. (Deciding on the ties and adding them adds a few more minutes.)
The entire tutorial is below. A printable version is in a free 6-page document on Dropbox, here (Version 5a, 4/19/20). If you can't download it, I'll send it to you - email me at cathy.perlmutter.gmail.com.
Note: This design is not doctor-approved. Some of my favorite approved mask patterns are on my resource page, here. For a faster mask, you can also consider my simple pleated mask here.
MATERIALS
Launder cotton fabrics on warm or hot. Iron cottons on "high"; if using polypropylene, set iron to "acrylic."
8 " x 10" featured
fabric for Large; (7.25" x 9" for S/M). Plus, enough to cut side panels from one 4" x 8" rectangle for L (3.5" x 7" S/M). The featured layer
shows on the outside. It's a green floral in these photos. Use quality
quilters' cottons, especially batiks.
8" x 10" lining fabric for L (7.25" x 9" for S/M); plus enough to cut one 4" x 8" rectangle (3.5" x 7" S/M). The lining layer will go against your face. It's light pink in the photos.
Option: 8" x 10" hidden layer fabric for L (7.25" x 9" for S/M) Cottons or polypropylene from a cut-up tote bag, or Oly-fun, a brand of polyproylene. In this tutorial, the magenta layer is OLY-fun polypropylene.
Wire, about 5"- 6" for large. (4" - 5" for S/M). Grocery ties are barely adequate - use two. Stronger, longer ties, like those for produce, gardening, or trash bags, are better. Pipe cleaners work, but may not last long. Right now, I like 22 gauge floral wire (center of the photo) best. Use small pliers to put loops at wire ends, so it doesn't poke anyone.

Option: Sewing clips. If you have them, use them. We want to minimize poked holes, especially with polypropylene.

If you only print out the small/medium size pattern from page 6, its bounding red box should measure 7.2" x 9".


4. Or, trace all the way around the pattern, including the dart lines on top.

5. Then cut out three layers at once. I use pins outside the mask area, and clips inside, because holes in polypropylene do not heal. If you're working with cotton only, pins aren't such a big an issue. DO NOT cut away the inside of the darts.

6. As I cut away each edge, I clip the three layers together there. Next photo, everything is cut out from three layers.

7. Unclip the pieces.
8. For the layers that were not on top, use the pattern to draw in the darts.


10. Do four darts (for 2 layers), or six darts (for 3 layers). You can chain-sew them through your machine without cutting thread. The wrong sides will look like this.


12. Using a 1/4" seam allowance, stitch from the top of the corner, down and off the bottom corner.

13. Chain sew to finish the same seam on the wrong side of the featured fabric. If there's an inner layer, send those edges through too. Repeat to stitch the other sides of all layers. After stitching, a top half looks like this:

PREPARE THE SIDE PANELS
14. Cut two 4” x 8” rectangles (large), or two 3.5” x 7” (small/medium), one from featured , and one from lining fabric (I don’t add a third layer because these will be doubled into 4 layers in the finished mask.)


19. At the machine, baste both flaps in place with a scant 1/4”seam allowance (using a thread color that matches the lining!)


Keep going, it's almost all the way in!

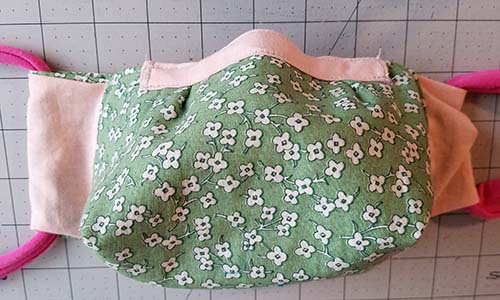
Massage til all the top edges are more or less even! The lining and the featured side should meet, good sides together. From the top, shown in the photo below, you should see the wrong side of the hidden layer. (If there’s no hidden layer, you’ll see the wrong side of the lining). Finger press the featured darts in the opposite direction from the lining darts.
21. Once all the edges are more or less even, it's time to sew. The next photo has letters marking the mask’s four corners, 1/4" down.

With a 1/4" seam allowance, stitch from a to b, stop and swivel, down to c, swivel, and stop at d and do a few backstitches. Try to start and stop before hitting a side panel.
In the next photo, the new seam is in red thread, and the left panel edge is open, from corner to corner.


25. Topstitch! Start at the lower left of that flap, Do a few back-and-forth stitches, then stitch all the way around the main body of the mask, from the outside, 1/8" in from the edges.

I stop and swivel at each corner. End where you started with a few backstitches. Here's the outside of the first flap, topstitched.


Start with a 2" x 6" strip of fabric for large ( 2" x 5" for S/M ), or a 2" x 5" strip of polypropylene (2"x 4" for S/M). A bias strip will curve a little better to fit the top of the mask, but straight-of-grain works too.


N-6. Sew up the short sides only to seal them (so someone doesn't accidentally slip the wire inside and get stuck on the seam allowances). In the next photo, I used white thread to seal the ends, so you can see it more clearly.

N-7. If you use polypropylene, all you have to do is press the long sides inward to the center, then fold in half again. There's no need to turn the short raw ends inward - they won't ravel. You might want to stitch down the short edges, to prevent someone from inserting the wire through the wrong channel.

N-8 Find the center of the mask, and the strip, by folding in half. Place the center of the strip to the center of the mask, above the nose darts, and clip or pin in place. I don't think it matters if the strip's open end is along the upper or lower edge.

N-9. Stitch two horizontal rows, along the top edge of the strip, and then its bottom edge. Do some back and forth stitching at the beginning and end of each row. Don't seal up the strip's short sides.

Finish with elastic, tee cord, or ties
36. Elastic: Cut elastic to 12" or whatever size you think you need. (After you try it on the first time, you can adjust to the right size.) Slide your piece through the side panels.


Tee cord: It's more comfortable, and doesn't trigger latex allergies. Cut two 1" strips crosswise from a tee shirt. Pull on the ends so it curls in on yourself. If you know you want behind-the-ears ties, cut the cord into two 15" pieces. Slide them through each panel and tie a loose knot. Try it on, and adjust as needed. When worn, the knots can go inside the flaps, or where they're shown in this picture, just below the flaps. (If knots go behind the ears, the mask won't stay on.)

If you want to leave open the possibility of behind-the-head tying, cut one long piece - whether a tie, twill tape, or tee shirt cord, whatever you're using - to 40" - 60". Thread one end down through the flap on the right, then up through the flap on the left. When worn, the bottom loop will go around the back of the neck, and the ends will be tied up above and behind the ears. (I accidentally drew Homer Simpson in Marge blue.)


A mask won't be helpful unless the wearer uses it correctly. Everything you need to know about mask-handling is in a short video from the World Health Organization, HERE.
Tell me how it went - your comments and suggestions are so appreciated.
When this pandemic is over, I'm looking forward to converting the masks into tiny purses, perfect for holding a lipstick, when the time comes that our mouths can breath free again.

Brilliant. I may need to make one for the immune-compromised hubby and moi. I'm thinking novelty prints---newspaper, matzah, food. What about flannel for the lining? -- Eleanor Levie
ReplyDeleteHey, cover girl, thank you! I did use some fun novelty prints in my first round, two blog posts ago. I made my DH a pirate one Love your matzoh idea! I put flannel on the back of some, but I get the feeling it's not as densely woven as regular quilting fabric - all other things being equal, I would imagine that a tighter weave is better . But flannel is definitely softer and more comfortable! Let me know how it goes!
DeleteThis is wonderful and a great service to the community! Thank you for all the research, testing and organizing you did to make this post...
ReplyDeleteThank you, Cathy.
ReplyDeleteYou are right, the first one took a little longer as I went back and forth to the computer and the sewing machine. I was in a hurry of course, trying to catch the mail time, so I adapted in a few ways that work fine. I used one 4x4 square for each side elastic holder. I folded edges in then folded in half wst, then sewed by machine to the edges of the front sides, so there is a smaller tab than yours. Then I sewed front and back together as you did, leaving a little edge open at the bottom. I turned the mask right side out finger pressed, and edge stitched all the way around. Yay! no hand sewing. I used some pastel lingerie elastic I have, which is soft, and made a generous elastic lop because we all have big heads, too. I love this roomier mask. Not claustrophobic. Thanks for your excellent tutorial.
ReplyDeleteJane, thank you soooo much for testing this! Did you try downloading the PDF from Dropbox? I'd love to see the finished mask, please post or email it! I do like the roomier fit inside, but I wish it were faster to make. It's good for a one-off but not mass quantities!
ReplyDeleteThanks so much, My husband has to work around people, and all the masks i made for him, were too close to his face and it was uncomforable. I have been looking for a roomy mask pattern for so long. I am going to try out this type. Thank you again
ReplyDeleteLet me know how it goes, and email me if you have any questions. This mask is nice and roomy!
DeleteThank you so much! I have asthma (pretty well controlled) and want to try a mask that gives me extra room to breathe. This looks perfect!
ReplyDeleteKepieliz, I also suggest you use very lightweight fabrics, and only two layers instead of three. It will make a big difference in breathability, while still giving you some protection. If you have a piece of polyester chiffon (called silk chiffon, but it's not really silk), make that one of the layers. It provides electrostatic protection without the weight or difficulty breathing of cottons.
DeleteHi: thank you for sharing this. It looks like it's a good mask. The measurements are useful. I usually print things at the lib'ary, but they're seldom open now. When sewing other patterns, with nose-wires, I've found that tin-ties work well. Especially the ones that (usually) fall off the coffee bags. They're plastic coated, just the right length, and won't poke through the fabric. (My husband and I drink a fair amount of coffee, so I've been able to collect quite a few)
ReplyDeleteFashion fabrics and fun prints are a good choice for face masks. Having several to exchange after wearing in a store, and being able to wash them and keep them clean is a good idea. I seldom go to town, and wear a mask only if I absolutely have to. The disposable ones have stuff I'm allergic to in them, so, making my own is essential.
Thank you for engineering these and sharing with your fellow seamsters.
I haven't tried the coffee bag ties, I'll have to try that, thanks so much for the tips, Morel!
DeleteI added a strip of boning to the inside, since my cotton wasn't sturdy enough to keep the mask from collapsing when I breathed in. It really helps it keep its nice shape.
ReplyDeleteSo interesting! Where exactly did you put the boning?
DeleteI find I can use firm fusible interfacing on the lining and it won't collapse.
DeleteI found fusible interfacing, after fusing, difficult to breathe through, but I guess that was just the brand I tested - thanks for the suggestion, haydeeho!
Delete