Sunday, August 10, 2014

Flip Flop Coffee Dots, or Symmetry Fun with Novelty Prints

How do I love novelty prints? Let me count the ways. They're fun. They're wacky. And you can cut them up and play symmetry grames with them.

As I mentioned in a blog post a couple of  weeks ago, I recently acquired this frenetic coffee-themed fabric, 40% off:
I woulda bought just a half yard, but when it's on sale, the LQS makes you buy the whole yard. (So much for savings.)

Also on the sale shelf was the opposite fabric, which is to say, it had white figures on a black background. When I first saw it, in the name of economy, I left it there, but couldn't stop thinking about making reflections between the two fabrics. So I finally caved, went back to the shop, and bought a yard.
I took it home and started lining things up. In the next picture, the white-on-black fabric is on top; I matched the design along its bottom, and stitched the BACK of the black-on-white fabric to the bottom edge.
The design reflects along the center line.That was interesting, but not interesting enough. I cut a strip of the black-on-white and placed it toward the upper right, matching designs (It goes most, but not all of the way across.) Can you see it? It has the words "coffee" and "latte" on it.
I added another pattern-matched stripe just above the lower edge of the top fabric (where you see "Yes!"), and I cut and reversed a white-on-black strip through the middle of the lower half. 
Then, just for the heck of it, I chopped a piece vertically off the right, and stitched it to the left side, upside down. (I tend to do this whenever I'm stuck.)
I raw-edge appliqued the strips down with invisible thread in a three-step zigzag. Done? Not yet! More experiments. I made a coffee cup pattern
 and cut the pieces out from red-on-white and white-on-red dot fabric. 
I placed giant coffe beans down the left side, and cut wavy edges. Those cups needed ingredients. I used white-on-black and white-on-grey polka dot fabric to make long ovals to fill them.

I photographed a small plastic spoon, put it in Corel Draw....
...And generated a row of flip-flopped spoons. (Below it's on paper, testing different sizes.)  I also used the leftover borders from the large coffee cups, using the FRONT of red-dots-on-white fabric alternating with the BACKS of white-dots-on-red fabric. (They're reverse applique, with the cup black-on-white fabric as a backing): 
Too much! Got rid of the cup column (they'll become another wallhanging, you'll soon see), and decided not to use the spoon strip.

Here's Finished Project I, all quilted. I used a "foamy" bubble fabric for the upper horizontal and right vertical border.
It's okay, but I think I like the next one even better. Here's Finished Project II, made from the leftovers. The borders  alternate between black-figures-on-white-background and white-figures-on-black-background. The cups  reflect across the horizontal midline (more or less). It has a white-on-grey polka dot binding.
I especially like the second cup down.
Total accident. The "coffee" fabric had widely-spaced large black circles on white. It wound up looking like an evil eye amulet, warding off bad coffee! I'm going to run with this idea.

Most of the stitching is raw-edge zig-zag applique. (A school-glue stick and Stitch-and-Tear stabilizer helped). They give the piece a frenetic energy appropriate to the subject.

For more caffeine-driven experiments, click the word "coffee" in the word cloud on the right side of this blog. Does this make you want to buy matching novelty prints? Or run away from them screaming?

UPDATE: Here's music to go with today's column. Thanks, Debra! https://www.youtube.com/watch?v=iP6IUqrFHjw

Sunday, August 3, 2014

My Big Jewish Quilted Wedding Canopy

You get a call asking if you can do an assignment that would normally take nine months. It sounds like a great gig, and you're excited. So when's the deadline? 

Two months. Uh oh.

That's how I felt when an imminent bride contacted me after seeing the sushi chuppah (wedding canopy) on my Judaiquilt website. She wanted something like it, including sushi fabric; a shining gold star in the middle; and fabrics related to herself, her fiance, and their children's many activities and passions. They will have a sunset beach wedding. 
It was a dream commission. But the timing was tight - the call was in early June and the wedding's in mid-August! That sushi chuppah had taken me maybe nine months! 

Yet the more she told me about her fiance and herself and their children, the more I fell in love with her and the possibilities. Their avocations and passion ran the gamut from country music to Chanukah to tequila to skiing.  

So I said "yes." Then I sent her directly to equilter.com (no financial affiliation). It's not that equilter has the best fabrics or prices - they're comparable to other high-quality quilt fabric sites - but equilter organizes the novelty fabrics better, by topic, which is ideal if you're making a quilts representing someone's interests. She gave me a long list of favorite fabrics from the site. 

She also gave me a sense of  favorite colors - teal and pink, cream and gold - and I used those to send her images of fabrics from my LQS or my stash that might work for the central circle. 

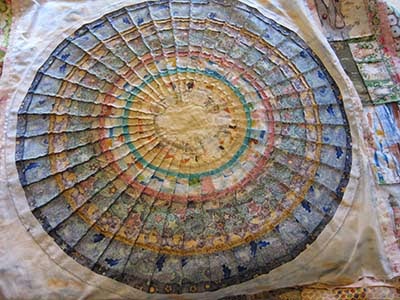
With her approval on most fabrics, I constructed the central medallion. I created strip sets, then used a Marilyn Doheney 9 degree wedge-shaped ruler. Here's the view from the back. I often find I like the back as much as the front! 
I set the circle in the middle of the chuppah, against a sunset fabric, and the novelty fabrics in rectangles in the borders around the center. Without further ado, here is the finished quilt. It's about 63" square. 
Below is the center of the circle. The central star is gold lame - it's surrounded by floating seashells. That's on top of musical note fabric, followed by sushi fabric, and followed by a whole constellation of fabrics evocative of  beach, ocean, and sky/stars. There are 14 fabric in all in this circle (and about 55 in the entire quilt.)
Here are some of the novelty fabrics in the borders. Below, cowboy hat fabric with fabric transferred  photos of the bride and groom (I blurred them in this photo for privacy purposes) along with travel fabric,  Chanukah and Rosh Hashana fabric: 
Next, record albums, crackers, Hostess cupcakes, fortune cookies, New York style pretzels: 
Motorboating (with an appliqued photo of the family in kayaks), beach with an appliqued country music star's photo (that's Kenny Chesney, in his blue rocking chair), donuts:
Winter sports, light house,
 Same country music star, guitars:
Salad, s'mores, bagels, donuts, tequila....
(And yes, they asked for shrimp on their chuppah. Who am I to argue?)

Grilled cheese sandwiches, black-and-white cookies, hot peppers, record albums (remember those?) I added the pomegranates as a symbol of fertility and Torah. (To counterbalance the shrimp). 
Pets, football, lacrosse, soccer.
Each corner had fans made from leftover wedges from the central strip set, and in the lower right corner I put a phototransfer of the wedding invitation. 
The back features bigger pieces of the novelty fabrics for people to enjoy. 
I put the label on the lower left corner, on one of the strip sets that made up the central medallion. 
I had a wonderful time, worked night and day, and finished early! It was a joyful collaboration with a delightful client and fun fabrics, and I loved every minute of it! 

(To see more of my chuppot, go here.)


Sunday, July 27, 2014

Almost Vegan Quilted Gifts

In our last installment, I was heading for a summer reunion AND needed a creative jolt, so I made some coffee-themed potholders to give as gifts.

Since I do have friends whose lives, enigmatically, don't revolve around caffeine opportunities, I also made a couple of fruit-vegetable-and-egg-themed potholders. Why eggs? They're elongated polka dots, and polka dots make everything better! The only downside to adding the eggs is, of course, that you can't give these to vegans. Here's # 1:
 And # 2.
I know. It's a little wonky. I'm not sure what happened over on the left. What can I say, I was working fast.
The back:
The egg fabric has been in my stash for a while, but all of the luscious fruit and vegetable fabrics are from the Farmer's Market collection by Fabri-Quilt. Previously, I made a large quilt from these fabrics, which you can see here. Click on the "Farmer's Market Fabric" in the word cloud to the right to see many more. There's a quilt and free potholder pattern on my pattern page that uses fabric like this (scroll down on this page). 

You don't need a pattern for today's potholders, because it's stunningly obvious, right? Cut nine 3"squares, plus a border of however wide you need to show off the eggs!  

I put a double layer of Warm'n'Natural inside my potholders, but one of these days I'm going to buy Insul-brite, which presumably protects hands better. 

Monday, July 21, 2014

No Pressure! Just Potholders! Or, Coffee Madness, Continued

When I find creativity blocked by the need to impress myself (or, worse, others!), the go-to game is potholder. Just make a flippin' potholder! It doesn't have to be great Art! In fact, forget the A word!  I imagine it with burned corners and embedded egg whites, and that soooo takes the pressure off. NOW we can play!

Motivation increases if I need gifts. No agony over gifting old friends with the masterpiece they deserve. Everyone needs another potholder!

So last week,  I made a slew for our upcoming travels.

I started with this amazing  fabric.

I'd been eyeing it at my LQS for months, so imagine my joy when I found it on the 40% off shelf. Why is this magnificent fabric on sale? Doesn't every caffeine-blooded American quilter need some? (Also on the sale shelf: Same fabric with the values reversed, with the figures in white).

I surrounded a square of that fabric with a red coffee cup fabric,
but the results were sort of plain. Time to drag out the fusible-backed scrap bin!
This is the purgatory to which all my leftover fusible-backed fabrics - especially small novelty items - go. Once I pull everything out, it is very difficult to push it all back in again.

I did some free associating, finding ready-to-fuse objects to place on my potholder base.

For this first potholder, I created a fully bodied, sensuous appreciation of my favorite drink by adding coffee-appreciating body parts: Lips on the upper left corner,
... a hand making a victory sign on the lower left...
 .....and a guy with caffeine-induced delusions of superpowers on the lower right. 
 (Yes you've seen this strongman edited onto on a coffee cup before, here.) The cup also has clouds of decorative steam.

For the next one, the steam cloud is multicolored:
and there's a collaged redundant fantasy label on the lower right. 
 
The whole thing:

 For the third, I added an Earth-like marble on the upper left, a rocket ship on the lower left... a
and a small color cloud on the lower right corner. 
The backs are mug fabric that's been in my stash for decades. 
 To  see more coffee creations, click "coffee" in the word cloud on the right of this post. And remember: If you're feeling intimidated by the need to make a masterpiece, go for a  potholder instead. (You never know: Your friends might frame it.)


Sunday, July 6, 2014

Fabric Saves World in So Many Ways! News Roundup Part 11,678-83

1. Fabric saves world! No more need for paper towels! Make these cool hanging things instead! Fabulous idea here.

2. Packing hot cooking pots in a thick fabric bag with lots of batting helps people in developing nations as well as rich nations use less energy and natural resources! Here is how it works.  Another excellent article here.

3. Blankies help suffering people! Quilts for people with dementia, or people in difficult places.

4. Modern Quilting revives the quilt world! The quilting population was heavily senior, until "modern" quilters came along. They're young and they're saving the day, beautifully and con gusto!

5. Colorful fabric becomes feminine hygiene equipment becomes the ability to go to school and work for girls in developing countries. That's the importance of the Days for Girls project. News coverage here.  

How is fabric saving your world?

Sunday, June 29, 2014

Cross Stitch Interlude: Spelling Out the Torah

My #1 secret career fantasy is to be Bruce Springsteen (not to meet him - to BE him), and another one is to be a calligrapher. Unfortunately, I can't sing or play guitar, and my handwriting has always been appalling My glorious calligraphy career began and ended with addressing my wedding invitations.

A sub-secret fantasy, within my calligraphy fantasy, is to be a Torah scribe, someone who sat quietly all day writing out the elegant Hebrew letters on parchment. 

So when I first heard of Canadian fiber artist Temma Gentles' international project to cross-stitch out an entire Torah, I got pretty excited and signed up for a portion immediately. (It's here.) That's despite the fact that I haven't done cross stitch since I was about 11. 

My excitement waned when I received the kit and realized that, unlike my wedding guest addresses, there was no wiggle room here: The spacing, as well as the lettering, had to be dead accurate. It came with a terrifyingly  blank piece of special cross-stitch cloth which has teeny, tiny squares that I could only count with my handy magnifying glasses.

So I was insanely relieved when Saraj, a cyberfriend from the opposite corner of California volunteered to share the portion with me. She let me send it to her immediately,  and boy, was she good. She laid out all the spacing, PLUS she stitched the first six lines of text PLUS the exquisite twined border. Overall, she did the heavy lifting, putting 40 hours into this sampler, compared to my 20. I simply couldn't have done it without her. 

Here's Saraj working on the top:

Once she finished her share, she sent it to me, a couple of months ago. So for the past two months, I stitched out the last five lines of text, plus the illustrations along the bottom. Here's the almost finished piece (some of my letters still needed crowns):
In case your Hebrew has lapsed, it's Genesis 27:37-40, in which Esau begs his father Isaac for a blessing. Isaac at first tells him he's too late, because he's already given his #1 blessing to his Jacob, who will therefore have plenty of wine (thus the pink cups) and grain (the golden wheat/grain) and rule over Esau. But then Isaac decides to bless Esau with the ability to make his living as a hunter (the sword) and eventually rid himself of his brother's yoke. (Find a variety of translations here.) Here is the completely finished piece.
People always think that quilters have a lot of patience, but I don't see my quilting that way - lemme tell you, quilters, CROSS STITCH requires a lot of patience. For example, let's take the following word, from the next to last line, which, like all Hebrew, reads from right to left, (and means "which."). It's about an inch and a quarter long.
The first letter, furthest to the right, is a pretty simple letter, 'kaf', (looks like a backwards C). It probably took me about 7 minutes to stitch. The second and third letters are brutal - first the 'aleph' (second from the right), followed by the 'shin' (third from the right). I'm counting 28 cross-stitches in the aleph, and 36 in the shin. Each took about 15 minutes. The final letter is a simple resh, let's say 5 minutes. So this entire word would have been about 45 minutes. 

At first, moving so slowly - along with stitching, there's checking, double-checking, and triple-checking - drove me bonkers.  But as I sank deeper into it, I began to find it almost relaxing! I could almost imagine doing another cross stitch project. Almost. But not for a long time.

 Want to see more? Temma's Torah Stitch-by-Stitch project has has enlisted more than 700 stitchers in 13 countries. Check out some of their fabulous illustrations here.

If you're tempted to sign up, just make sure that you're the kind of person who is very diligent and patient - or that you have a stitching partner who is! Thank you, Saraj, and Temma, for making my scribal dreams come true in such a meaningful way!

Sunday, June 22, 2014

Blood, Tears and Stitches for Gun Sense

Richard Martinez is the father of one of the six youngsters slaughtered on May 23, 2014 at UC Santa Barbara, not far from where we live. His son, Christopher Ross Michaels-Martinez. was 20, same age as my son. 

After the massacre, Martinez quit his job and began travelling the country to speak out about gun regulation. His words sparked a national "Not One More" campaign, (#Notonemore) in which, at last count, some 600,000 people sent more than 2.4 million postcards to US legislators of all political stripes. 

In early June, our local community gallery hosted a Not One More Postcard Event  & Art Installation, which alone generated 1,000 cards. Some made their cards at a reception, where our hosts provided blank cards, markers and lists of legislative addresses. (The event's FB page with lots of useful links is here.) Here are my artistic buddies Marian and Karen creating and addressing their cards. 
 

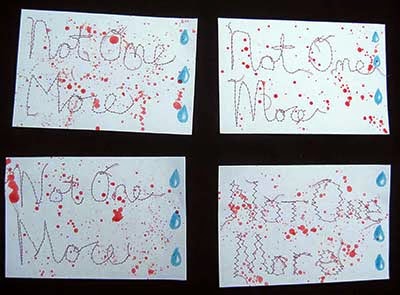
I made my cards in advance, by stitching the words in red thread on cardstock.

As I stitched, my mind wandered - as is its wont - over to the idea that the needle puncturing the paper was kind of like bullet holes puncturing someone's kid. The rapidity is kind of like an automatic weapon. When I trimmed the red threads, I thought about they looked like blood shooting out. And other horrible, morbid musings.

 I've never been in a war or at a scene of a shooting, but I imagine that it's a mess, and I wanted my cards to capture that. Once stitched, I splattered red paint on them. This is easily accomplished by dipping a paintbrush in red paint, and then tapping it lightly above the cards. 
On some, I drew in a few symbolic blue teardrops, for color contrast. 

 
I experimented with a machine zig-zag for the lettering on one card:

My friend Marian is an amazing artist and she made this one (and others). 
 
The event was fun, because it was arts & crafts and lots of friends, but it was also deadly sober. Since I'd already made my cards, I used my time there to address them. As I wrote out the names of well-known gun control foes in Congress,  I thought, what's the point? You know they'll toss it. Even if it's stitched and splattered just so.

I addressed one of my cards to Eric Cantor, and just a few days later, he lost his bid for reelection. My immediate reaction: I bet he won't save my card to pass on to his successor. Or even use it as a bookmark. But I had to do something.

Completed cards were hung on the gallery wall before mailing.


Mr. Martinez posted a thank-you video for the postcard (and Twitter) campaign. (He had also asked people to tweet  #Not One More). In the video, he essentially said, "Don't wait until your family member or friend is killed. Otherwise you might wind up like me."

It's not too late to send your legislators a card.  If we don't overcome our cynicism and find new ways to take action, how dangerous will America be when this little one turns 20?

Two of the latest campaigns from Moms Demand Gun Sense are a quilt project (described here), and  the #offtarget campaign. The latter hopes to make the point to Target stores that their open carry policy need to be changed. Shop at stores with sensible gun policies, and snap a photo to send to Target. Complete info is at http://www.momsdemandaction.org/target/.

Update: Another avenue of action: Download the “Don’t Make My Family a Target” sign here: http://every.tw/1nuXJXs. Take a photo of yourself holding the sign and tweet it to @Target using the hashtag ‪#‎OffTarget‬. Then send it to photos@momsdemandaction.org.

Sunday, June 15, 2014

Sweet Dreams are Made of This: A Pillowcase Adventure

A very wonderful  teenager is graduating from high school this month, and we were thrilled and honored to be invited to her graduation party. She had overcome serious health obstacles, which made the celebration especially meaningful. She also has many passionate interests, one of which is Star Wars.

Oh happy day! Not just for her - for me!  Licensed character fabric purchase excuse! Normally I try to buy fabric from my LQS*, but they generally don't carry non-top-quality licensed fabric. So off I went to The Local Chain.

But first I asked her mom if she thought her daughter would prefer a Star Wars tote bag or a pillowcase - mom picked the latter.

They had several different Star Wars print. The best one was a comic book theme:
This was my very first pillowcase, and gee whiz, it came together a whole lot faster than a quilt or a tote bag. I used the fairly simple instructions in this one-page PDF from Quiltmaker magazine.

Because it's all squeezed into one page, this pattern is light on explanation, and the drawings are enigmatic, but the main conceptual challenge for quilters is that the two strips of trim - a narrow band and the wider end band - should be pressed in half the long way, wrong sides together. Then you stitch them, right sides together, to the main panel. Clothing and handbag makers, I know you are guffawing that this was a conceptual challenge for me. Once I grokked it, the rest came together very quickly.

There's something else the pattern didn't warn me about. I discovered I had made a slightly vast miscalculation, and instead of buying a yard-and-a-third , I bought 3/4 of a yard, thinking it was plenty. It would have been plenty, if the fabric hadn't been a directional print running the long way.  Back home, studying the pattern and the fabric together, I realized that that meant my print had to run sideways. We can only hope this does not give the sleeping giftee a kink in her neck. Here's the finished pillowcase.

I prefer to look at it this way:
 There's a one inch trim strip with gold stars on a navy sky, and then a navy-and-white Darth Vader-intensive print along the open edge. Sweet dreams?
Come to think of it, this orientation would be perfect for a carrier of some sort. Maybe I should just add some rope and declare it a laundry bag?

Not being a perfectionist, I pressed forward. For the presentation, I folded it up, stuffed it in a Yoda mug, added a huge ribbon loop attached by a butterfly pin.
(It's sitting on my leftover quarter-yard from the trim. What to do with it? ) I wrapped the whole thing in Chanukah cellophane (e.g. clear cellophane with big 6-pointed blue stars, which I took artistic license to redefine as non-denominational intergalactic stars). I hope she likes it!

There are a lot of good causes and children's charities that need pillowcases- they're a fast and rewarding way to use up all your leftover juvenile fabric from years of making childrens' quilts.  Find charities in the middle of this page, part of  American Patchwork & Quilting's 'Million Pillowcase' project. There's also a brainstorming list at the top of the page.

APQ also offers a slew of  free pillowcase patterns - some more advanced than the one I used, with a  pieced trim strip; some simpler, especially for youngsters and beginners to stitch - here,

Now if only someone would manufacture licensed Pride and Prejudice/Colin Firth fabric....or Sherlock/Benedict Cumberbatch fabric...or Dr. Who fabric (any doctor)....I really need some new pillowcases.....

*LQS = Local Quilt Shop

UPDATE: My correspondent Robin Levenberg told me about another wonderful charity for whom she and 5 friends have made 800 pillowcases so far - which, she says, barely scratches the surface of the need:

There is a organization in Philadelphia, Conkerr Cancer, as well as chapters around the world that make and donate pillowcases to children's hospitals.  When kids come in for treatment, they can choose a fun, happy pillowcase.
This organization depends on donations from sewers like us, to fill the demand.  Just in the Philadelphia area (3 hospitals) they need 1100 cases/ month!  Directions for making pillowcases are on their website, www.Conkerrcancer.org.
They are easy to make, and use 1yd. of fabric.  These cases are so appreciated by the kids and their families.  Sometimes, it is the only bright spot in their day.
Thanks, Robin, for the addition!