Tuesday, January 28, 2014

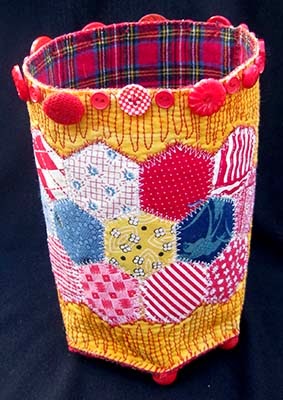
Hexagonal Mystery Quilted Object: If You Build It, It Will Come to You

Look! Up in the cyber-sky! It's a bird!

A plane(t)? 
                                             
 A table runner?

A vase? 
A what???
If you don't want to read through the directions, just go to the end of this post to show a photo of the finished product.
Yes, all of those! Also, whatever! If you start making it, it will come to you. Begin with a hexagon, and finish where you dare.

1. Obtain a hexagon on paper, or print out mine, free, here. (Click "Download," to bring the PDF to your computer; open it with Adobe reader. Print it "actual size" or "100%". After printing, check the size. My large hexagon measures 2 1/4" per side, 4" across from side-to-side, not corner-to-corner.) The printed page should look like this:


2. Use the large hexagon pattern to cut out a piece of heavy-duty fusible interfacing, such as Fast2Fuse or Peltex 72F. (Thick interfacing + paper-backed fusible web added to both sides is okay, too.)

3.  Measure the large hexagon's side, and multiply by six - for mine, that's 13.5". Add 1/2" - total about 14". Cut a strip of heavy-duty fusible interfacing to that length. Make it as wide as you want your vase high (or, as wide as you want your table runner.  I randomly chose 6 1/2" wide.) So my strip is 14" x 6 1/2". 

4. Fuse yellow fabric (or whatever you want your featured side to be) to one side of your strip. Don't fuse the lining inside yet - the back should be the interfacing + fusible. (Put parchment paper or an applique press sheet on the reverse side, to avoid fusing it to the ironing board.)

4. Fuse fabric to both sides of the large hexagon. I used the red plaid on both sides. 
5. Apply fusible web to the back of 2" squares of a variety of fabrics (I chose mostly blue, white red, and yellow fabrics with small 'ditsy' prints). If you're using my measurements, you need 22 hexagons.

6. Use the small hexagon template (mine are 1" to a side) to cut the hexagons from the fusible-backed squares.
7. Arrange the 22 hexagons as shown in the topmost picture on the featured side - or however you like! They can clump together, or fly around separately. Fuse them in place.

8. Simultaneously stitch down and quilt the hexagons in position using a three-step zig-zag. I used white thread.

10. Quilt the background. I went back and forth with a straight stitch in red thread). I also did a decorative stitch in red around the edges of the hexagon formation.
9. Fuse the lining fabric to the reverse side of the long strip.

11. Do a corded edging around both the strip and the large hexagon. Here's how: Find a non-fuzzy (unless you want fuzz) string, cord, or yarn - crochet thread is great, so is 6-strand DMC embroidery thread or thin rattail. I used red DMC. Switch your machine to an open-toe applique foot, if you have one.

12. Starting anywhere but a corner, hold your cord next to the edge of the project. Set your machine on a moderately long zig-zag, like a 3. Zig-zag your away around the piece - on its leftward swing, the needle should go about 1/4" inside the shape. On it's rightward swing, it will stitch into air, just past the edge and the cord. This brings the cord up tight against the edge of the shape. I know, it sounds unlikely, but it works. (For more detailed tutorials on corded edging, see the bottom of this post.)

At each corner, when the needle goes down next to and outside of the corner, stop with the needle down, turn the project, and continue. 

13. When you've gone all the way around, cut the cord and zig zag over the remnant. Option: Go around again - but this time, you can tighten up the zig-zag to cover the cord more (or completely). Sew slowly and carefully. I stitched my red cord on with a yellow thread. I only went around once. 

14. With corded edging on the large hexagon and the strip, you can now claim that you have a small  table runner and a large coaster. Do you want more? If so, continue. 

15. Hand-stitch the strip to the base, using a very strong thread (may be called 'heavy duty.' 'upholstery,' 'button,' 'carpet' - I used a red Coats heavy-duty thread.) I didn't create a seam allowance - I just overcast-stitched the bottom edge of the strip to the outside of the hexagon. Then I ladder-stitched my way up the seam. 
You have to pinch it at the bottom, where there's a little extra length  on the strip - as you move up, no more need to pinch. That makes the vase a bit wider at the top than the bottom. 

14. Option: Add buttons around the top edge. 
Done? Not necessarily! What if we happened across some vintage ball buttons and....

They make a nice footed base.
Unexpectedly, a lid appeared:
Lid is made from two layers of denim (from jeans) fused together, cut in a hexagon shape, blanket stitched with yellow embroidery thread, each side tacked down in its center. Round red buttons are on the top and bottom center. 

Actually more of a crown. Now we have this: (Cue obelisk music from 2001: A Space Odyssey):
Still absent: A kitchen sink, and a seam from cut-up jeans. I went for the latter. So here's the finished project...so far:
What is it now? I think it's a basket with a small earring tray on top, but my wise friend Kay opined that it's a purse. A purse for low-motion occasions such as sitting on the couch watching Sherlock, because it doesn't really shut securely, yet.

Do you want to learn more about the beauty, wonder, and versatility of corded edging? Scroll to the bottom of this earlier post, for a bunch of links to detailed tutorials.

Sunday, January 26, 2014

Collage Tribute Quilt from Novelty Fabric

Do you have a trainer? I didn't, for most of my life. Until, 3 years ago, I met Wendy.

Before, I looked like this:

Now I look like this:
Just kidding. I still look a lot more like the ladies on the first fabric. But I kinda feel like the second one. After three years of training, I am pretty darn strong (relative to me). Yesterday morning, shlepping my 1950s-era boat-anchor Supermatic sewing machine (here's one, not mine) out of the house, through the 25-foot long backyard, and out to the car, and then the 15 feet from the car trunk into the repair shop, was easier than it's ever been in my life. Grocery bags are a snap. 

And not only do I lift things much more easily, but most importantly, I FEEL a lot better. 

Much of this is thank to Wendy, a good-humored angel who is funnier than she is merciful. I do a circuit class with a bunch of other women my age, and Wendy cheer-leads, commands and jokes us through, burdening us with the right amount of weights and reps, periodically chirping "Good times!" as we  kvetch our way along.  

So I wanted to make her something special for Christmas.

My favorite part of making a birthday, anniversary, holiday, or other tribute quilt - whether for someone I like, or as a commission for someone I probably would like if I met them - is digging through my stash (or the LQS's stash) for fabrics that speak to the interests, pets, pet peeves, of the honoree. For Wendy, I had a lot of material to work with (literally), because she and her husband co-own the gym, where there's always a lot going on. Here's an overall shot of the collage quilt:
Specifically, I used:

An out-of-print Lunn/Red Ant Studios black-and-white fabric panel
(If this looks familiar, it's because I also used it in a coffee quilt, here.) 
The gym draws a significant crowd of (male) high school football players who heave Pluto-sized barbells around (the planet + the dog), grunting to beat the band. (Howcome the women clients never grunt? Complain, yes; grunt, never.)

Speaking of women, I threw on a shapely brunette who bears a vague resemblance to Wendy:

To her right are pictures of a heart ('el corazon,' from Spanish tarot fabric), and a before-and-after  illustration from an anti-smoking fabric. Underneath are three women doing Rockette kicks, a variation of which our circuit class also performs on occasion.

Then there's another large figure, a guy who bears a eerie resemblance to Wendy's husband. He came off a novelty fabric panel designed for making muscleman-themed boxer shorts, believe it or not. (I'm glad to get that out of my stash!)

There's a lady doing laundry (because Wendy washes all the complementary towels):
Then there's a fabric that someone gave me years ago that shows an ethnically-diverse group of women quilters, one holding a sign that said, "Will Work for Fabric." I covered "fabric," and replaced it with "Wendy." 
Because I do work a lot harder when she's around.

The gym is decorated with superhero posters, not to mention some exceptionally fit clients, so I threw in some cartoon characters:
To offset them, there's that Terrie Mangat fabric showing more zaftig people, who also abound at the gym: 
I strewed measuring tape fabric all about, not because I'm about to start measuring my muscles or my so-called waist but because there is an awful lot of counting involved in being a gym rat (reps and weights and such ), and, as mentioned before, having a trainer and compatriots makes it all much less boring and painful than I had always believed it had to be. 

So in conclusion: Go to the gym, find a trainer with compassion and a good sense of humor, sign up for her class, let her remake you, buy a lot of novelty fabric, and make her a quilt. She'll thank you. You'll thank her. And maybe me. 

By the way, if you live in the San Gabriel Valley of Southern California and are thinking about joining a gym, Wendy's is here. Highly recommended. Exceptional trainers. Loads of clean towels.

Sunday, January 19, 2014

Salvaging Selvages and Old Denim Jeans

Here we have one of my two new selvage pillows:
Pattern here. Newbies, do I hear you asking me exactly what is a selvage (British spelling selvedge)? In the world of quilting cotton, selvages are the two thick finished edges on either side. One edge is often white/unprinted, and bears manufacturing information plus a delightful series of color dots:
The dots along the lower edge here reveal the colors used in the fabric. I'm wondering: Do those dots have a special name? 
Here's a bunch of cut-off selvages:
The selvage on the opposite edge is often not white nor marked with information - it can look almost exactly like the middle of the fabric. But quilters virtually always remove both selvages before cutting quilt pieces - both have a thicker weave and pinholes. If you use a selvage in a conventional quilt, the quilt police will persecute you. Friends, relatives, and infants, on the other hand, can't tell the difference without magnifying headgear

When I started quilting, quilters generally tossed the selvages. I couldn't quite do that - so I crocheted them into things (like this:
)

 or jammed them into the empty coffee cans that serve as small scrap bins.  

But in recent years, the humble selvage has gone from peasant to royalty. This happened partly because young artists/craftspeople are ornery and love breaking rules; partly because of the interest in upcycling; and partly because selvages' spareness - lots of white with a few dots of color - mirror the austere aesthetic of the modern quilt movement. (Q: Can I earn an Internet  MFA for a sentence like that?) 

If you go to Pinterest.com and type "selvages" in the search engine, you will see what I'm talking about. There's an an abundance of beautiful, light, fascinating and witty projects - not just quilts and tote bags, but backpacks, stuffed whales, a Halloween mummy, an office chair, a spectacular spinning skirt. and much, much more. You'll thank me. You're welcome.

People take several different approaches to severing their selvages. Some include only a tiny bit of the featured print area, just enough to capture the pinholes. Others take a generous inch or more of the printed area. Over the years, I mostly did the former, but only recently converted to the latter, so the bulk of my selvage collection does lean to mostly white.

For these two pillows, I wanted to intensify the upcycling theme, so I combined them with denim from  jeans. Selvages and old jeans! Arsenic and old lace! What's not to love? 
On the left is a traditional snail's trail block; the pillow measure about 17" square. The pillow on the right is a rectangle that's a little bigger. I'm calling it 'Labyrinth.' It's improvisationally pieced, a variation on a log cabin block, meaning you add strips and chop them off when they're about the right length.  An easy, illustrated pattern for both that I spent the last two weeks toiling over is here

I created the 'selvage fabric' by laying selvages across a breadth of plain white muslin, and zig-zagging the edges with 'invisible' nylon thread. That's what you saw in the second photo in this posting, above. Once everything is zigzagged down, you can cut out your new selvage fabric and play with it just as if it were regular yardage. 

On the back of the pillows, I used more pieced jeans, and, just for fun, threw on some pockets. I didn't stitch through those thick pocket seams - I cut the pockets an inch out from its edges, then folded the fabric under and stitched next to the fold, all the way around. 
(I don't want to think about what this person kept in that back pocket because I just noticed, oh no! it looks like cigarette packs? No, wait, maybe it was a wallet. The jeans don't smell like tobacco. Oh wait, it was an iphone! Phew)

What if you don't have enough selvages to make a project? I wouldn't recommend cutting selvages off all the fabric in your stash, without thinking it through first - what if finishing a future quilt, or saving someone's life, depends on obtaining more of that specific fabric? Without the name and manufacturer, you'll have a MUCH harder time locating more. 

So remove SOME of the selvage. 

Or, write the information on a sturdy piece of white scrap fabric, with an archival permanent pen, then safety-pin that information to the fabric whose selvage you want, and THEN cut off and use the entire selvage. In decades to come, your heirs and heiresses will find these notes in your stash and know for certain that you had a serious obsessive disorder. I haven't done this yet, but considering how these two pillows decimated my selvage stash, I might need to start doing it soon.

Yes, I'd love to see you what you have made in the past/will make in the future from selvages!  
 
The pattern for both is here

Sunday, January 12, 2014

Sometimes It Takes a Lifetime (or Two)

For quilters, it's both fun and horrifying to read about quilts that took years, decades, and sometimes even centuries to finish. My worst fear is that my kids and grandkids will have to finish my UFOs.* (OK, not my WORST fear, but it does give me pause). Local newspapers, on the other hand, love these stories. For example, an Indiana paper recently announced that it took one family 138 years to finish a spectacular red-white-and-black quilt  (scroll to the middle of that page to see it, not the top photo.)

I have finished other women's quilts, but we didn't have quilters in my family, so they were almost always strangers'. For example, this blue-and-white quilt is from flea-market find: a large bag of fan-shaped pieces, with a postcard template marked 1936.
I blogged about it  here.

Below is another quilt I made from a stranger's pieces.

It started when I bought an old metal biscuit-tin full of flower petals, at a flea market. The vendor told me that he purchased them from a senior citizen named Mrs. Blackhorne, (no "t"), who lived in southwest Los Angeles - and that it was her grandmother, an African-American woman from the American South, who made them. I tried to track down a Los Angeles Blackhorne family, to no avail. (If you know them, tell me!)

Most of the petal edges were carefully turned under and basted in place with even, white stitches. You can see the stitching around the lower edges of the calico brown and green petals:

There was only one sample block in the tin  For that block, the quilter used identical colors for the inner and outer petals, and placed it on a white muslin background.

I made a few changes - I put the pieces on a red background, and mixed up the petal colors on each flower. This became my  travel handwork project. For a couple of years, I brought these blocks everywhere. There weren't enough petals or leaves for all the flowers, so I used modern fabric for some.

Once stitched to a backing, I initially began removing the basting stitches from the petals. Then I started to think about how beautiful those basting stitches were. So after that, I left them in.

I am always hypnotized by plaids, especially when they're cut off-kilter. So I made an impulse decision to use a vintage plaid for sashing. 

And then - because whenever I see red fabric, I automatically think of mother-of-pearl white buttons (channeling my inner Northwest Coast Indian) - I added buttons and hand-quilted around each pansy. 

I hope the Mrs. Blackhorne - or whoever carefully cut and based these pieces, wherever she may be now - likes what I did with her beautiful petals! 

* UFO = Unfinished Objects

Sunday, January 5, 2014

A Quilted Vase From Swimming Pool Scraps

One of the most overlooked joys of making a quilt is the scrap pile. When the quilt is done, and you (or rather, I), have tidied up the hurricane zone, I often wind up with a scrap pile that's at least as intriguing as the actual quilt.

The leftovers relate to each other in unexpected ways. Because of the relationship - shape, size, color, intention? - they can quickly be turned into something new. (And we all know that working quickly is the most psychotherapeutic form of quilting.)

Like, when I was auditioning embellishments for my big swimming pool quilt (shown last week), deeply pondering the sublime question: Yes, Diving Boards & Umbrellas? No? A lot? A few? I freehand cut a bunch of vaguely umbrella-shaped pieces, in different solid and print fabrics, and tried different quantities and arrangements. I wound up using only a few.

When the quilt was over, the colorful pile of pseudo-umbrellas demanded immediate attention.

So I churned out the following, starting with a 16" x 8.5" parallelogram of grey fabric. (with a purple chevron backing, and batting between two layers.)  (It's actually slightly narrower at the right end than the left, which was pure carelessness ummm, I designed it that way.) I strewed the freeform umbrella shapes about, then stacked them in layers, cutting smaller or larger shapes as needed. There's no fusible on the umbrella backs - they're just raw edge cut.
I added freeform pool shapes from three shades of blue solids. Then, I quilted around and on top of things with variegated thread. Finally, I stitched on a bunch of buttons, small white ones for the centers, larger white ones floating about.  

The same week, serendipity gifted me this vase (from a holiday event centerpiece): 

They came together in a wrap! 


Before washing, this little quilt was quite stiff and stood up straight even without the vase. After washing, as you'll see below, the flowers developed a wonderful texture, and the whole thing got a lot floppier, though it still stood up (barely).

I contemplated it for a while, thinking it might also serve as a little zip-up case (with a zipper joining the short ends, and sides stitched together.), or maybe a small bolster pillow. But who needs a small bolster pillow? I finally decided to set one quilted oval on the bottom. 

The ends overlap: 
Now it's a vase, and the glass insert is optional. I am deciding between putting some tacking stitches in to hold the flap shut for a few more inches from the bottom, or adding buttons and buttonholes. Note that the fact that one end is higher than the other makes for a messy look an artistic look. 
Many more quilty vessels are here (denim vessels 1), here (denim vessels 2), landscape basket with crochet lid here, another one here.

Sunday, December 29, 2013

Swimming Pool Quilts II: Serendipity and a Tutorial

 
After finishing the small pool things in the previous post, I was contemplating a larger quilt with multiple pools. By astonishing serendipity, on Monday December 2, as I was eating breakfast, I found a front page article in my Los Angeles Times about - swimming pools?! 

It seems that a young German designer named Benedikt Gross, flying into LA, was fascinated by the glittering landscape of pools below. He partnered with Massachusetts Institute of Technology scientist Joseph Lee, to map some 43,000 local pools (and hot tubs); they analyzed the data using cutting-edge methods, correlated it with public databases (including the child molester's registry, and people who donated money to defeat same-sex marriage!?) I cannot adequately describe this projects's complexity, so here's Gross's summary.
The project attempts to highlight on one hand the emerging and powerful role of non-domain experts in the discovery of scientifically and socially relevant information, and on the other hand seeks to emphasize the darker, creepier, and more contentious issues surrounding data processing and exploration.
Got that? They wound up with a 6,000 page 74 volume set of results. And here's one of the creepy parts: they produced a voyeuristic silent video called The LA Swimmer which takes you on a Google rover tour through back alleys, peeping over fences at pools. Gross describes it more poetically:
Imagine swimming across Los Angeles as if pool-by-pool they form a river through the city; 43,123 oases stitched together in a desert of hyper-urban reality. You float unabashed down your unmapped highway of water, but are confronted very quickly by the fact that you are not welcome in this realm of kidney and clover bowls, Olympic-sized parallelograms, and hot tubs. Threatened by an unforgiving obstacle course of disgruntled homeowners and an impending court order you continue from pool to pool, your reconciliation awaiting you in the next chlorinated ecosystem.
And speaking of kidneys and clovers (hey, that's an old song! sort of), one more interesting result of their study (that I am capable of comprehending) is how irregular most of the shapes are. You'd think most pools would be perfect ovals, rectangles, and kidneys, but in fact most appear to be quite asymmetric and quirky. 

So I gave myself artistic liberty in imagining various pool shapes. From a quilter's and a viewer's perspective, the most important (and fun) aspect of translating pools into fiber is creating a ridge and a height difference between the water on the lower level and the what I'll call the "patio"fabric above. You can see it in the shadowed outlines:
 
For the patio level, I mostly used  novelty fabrics that resemble flooring - bricks and planks. Quilting along the texture lines of these fabric make touching the quilt irresistable.

The technique I used has a name, reverse applique. I also added a layer of a fusible interfacing called Decor-Bond (thin fusible fleece works too), to raise the ground level above the water. 

To make one block:
1. Cut a square or rectangle of  patio fabric (something that resembles outdoor flooring) the size you want the block (plus a half-inch for seam allowances.) 
2. Cut a piece of Decor Bond or fusible fleece to the same size.
3. Do a few sketches on paper  until you have a pool shape you like. The pool's edges should be at least an inch from any outer edge. For shape inspiration, along with the Gross/Lee study above, I also looked at aerial Google satellite pictures of pool-ridden neighborhoods near my corner of southern California; and at swimming pool builder websites. You will also be struck by how assymetrical many are. For ease of turning under, avoid sharp corners in your pool design.
4. Trace the pool shape onto the interfacing, and cut out it. (We won't need the center for this project.) 
5. Fuse the outer area of the interfacing to the back of the patio fabric. 
6. Cut away the patio fabric inside the hole, leaving just a quarter inch showing all the way around.
7. Clip valley curves only, perpendicular and close to but not touching the edges of the interfacing. Don't clip curves that jut into the space. 
8, Turn the unbacked edges inside and to the back of the interfacing. Glue-stick in place. 
Here's what the back of each block looked like after I'd cut and turned in the edges, and stitched several blocks together, but before I added the blue backing: (Ignore the blue in this picture; it just happened to be resting on that fabric; the idea is that these are holes.)

8. Turn the windowed block over, and lay it on your pressed pool fabric. Pin the pool fabric place around the pool edges (about an inch out), inserting the pins through the patio fabric. 
9. Stitch in place by doing a straight topstitch 1/8" onto the patio fabric,  all the way around the edges. 

When you have enough, sew the blocks together. Assembled, my large quilt looked like this.  
I really liked it undecorated. But since I suffer from chronic horror vacui, I thought: Maybe it needs more? Diving boards; slides; umbrellas? (The satellite imagery that I looked at showed LOTS of umbrellas. Fewer diving boards, and I couldn't identify any slides). I gave some of them white and dark grey diving boards, plus some medium grey slides and colorful pool umbrellas. 
I can't decide which way I like this quilt, naked or loaded, and I would be very grateful for your vote in the comments. 

Meanwhile, here are some more individual pools. I quilted the water in Sulky holographic thread, which gives them a shimmer as you walk by (just like flying over LA). Alas, the shimmer doesn't much show in the pictures. 
The next pool inspired by Las Vegas', maybe the world's most expensive private pool (to the tune of $7 million):
More, 


The slides have Sulky holographic thread strands stitched down them, and  over the edge into the air above the pool (I did that part with wash-away stabilizer).  The pool umbrellas are mounted on shank buttons,so they jut upwards and lean over a bit.

If you're inspired to make a pool quilt, you can consider adding even more features: Water-loving creatures, beach balls, people, palm trees, etc., from novelty fabric, or scan them from copyright free art and print onto fabric sheets run them through your printer. Applique in place with invisible thread. (That's what I did in the previous post.) Send me pictures!