

You will need: One photograph of a beautiful bride, ideally my friend Alison, wearing a wowza of a turquoise beaded gown:


Can you spot the bride to the left of the tree? Here's a closeup:

1. If you're not doing this for immediate family or very close friends, ask permission to use their photos. Download an image from Facebook by clicking on it once; then right-clicking on it, and selecting "save image as." Or, ask your friend(s) to send you a high resolution image of the bride (or groom, or pet, or whatever).
2. Print the hi-res picture of the bride onto a sheet of fabric. Use pre-made fabric sheets (I like EQ Printables Cotton Satin, no financial affiliation) - or make your own. Here are directions if you've never printed on fabric.
3. Apply fusible web to the back of the printed image of the bride, then cut her out. No need to leave an allowance - this is a raw-edge appliqué project.
4. Print out a forest photo (onto regular paper, and it doesn't have to be hi-res) and place it by your ironing board. (Or just stare at it on your phone or tablet without printing it out.) You're going to interpret it, not print it on fabric.
5. Apply fusible web to the backs of 3-11 different fabrics in leaf colors. I used shades of gold and green.
6. Bring everything to the ironing board. Study the forest photo, and reinterpret it. Start by laying down the ground (I used brown batiks along the bottom) and a sky (I left the white fabric to serve as sky.) For trunks, I pulled from my scrap bag long thready cuttings made when straightening tan and brownish batiks. (Never throw anything away!) There is no fusible on those strips - you'll see why, soon.

For the leaves, I cut gold, green, and orange fabrics into triangles and arranged them.

6. Once you like the arrangement, press everything in place (and/or glue-stick key elements so they don't shift).
7. Now, test what a single layer of tulle does to your quilt top. Yes, tulle - the stuff that's used to make bridal veils! If you've never used it before, you're going to be amazed by the impact that one layer has, while remaining mostly invisible, and holding everything in place. Different hues have subtly different, and unexpected effects on the colors below. Light tulle, like white, tends to grey things down, while dark colors can make the fabric colors pop!
For this project, after many tests, I wound up using a sheet of red tulle. As you can see in the image below, you wouldn't have known if I hadn't told you. It castsjust a hint of red in the white upper sky portion - but it made those leaf colors catch fire.
6. Once you like the tulle, pin it in position.


8. Bind. I bound mine with turquoise fabric, to match the gown.

Addendum: Are these leaves ringing a bell? If you've been a quilter since the last millenium, the word banging around in your head is probably "snippets."
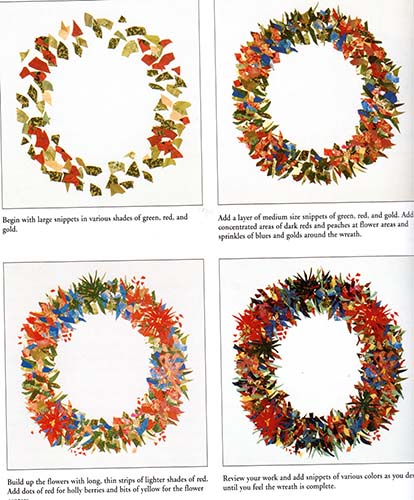
In the late 1990's there was a huge "snippets" fad. Innovative quilt designer Cindy Walter wrote at least four snippets books, still on sale on Amazon (no affiliation). Her idea: Apply fusible web to the back of fabrics; go to the ironing board; cut the fabric into little or not-so-little pieces just above the fabric, so the pieces land fusible side down; press with a hot iron; frame and go! You don't even need to quilt the piece! Here's a page from her first snippets book, Snippet Sensations, showing how she laid down a wreath.
Not long after that, a tulle fad came along I don't know who started it, but suddenly, a whole lot of quilters and fiber artists' studios started looking like tutu factories. They were cutting fabrics, threads, yarns, dryer lint, pet hair, plastic bags, and other random stuff into small pieces, laying them down a surface (maybe with fusible web, maybe with a glue stick, and maybe with no adhesive) - and then pinning a layer of sheer tulle on top. The final step was to stabilize the pieces with freemotion quilting on top.
I've had a lot of fun using tulle this way over the years, especially in a class I took from fabulous quilter Phyllis Cullen at the 2015 convention of the Pomegranate Guild of Judaic Needlework. In that class, we created richly-colored fused raw-edge appliqué tropical scenes, then covered them with black tulle, which, counterintuitively, popped the colors. I wrote about the process here. I also wrote a blog post showing how different tulle colors affect the colors beneath, here.
UPDATE: The forest photographer, Dave, has kindly given his permission for anyone reading this to borrow his forest image to inspire their own. Do email us a picture when you're done, at cathy.perlmutter@gmail.com.
UPDATE: Share on Nina Marie Sayre's Off the Wall Friday, a compendium of art quilt bloggers' latest projects! Enjoy it at http://ninamariesayre.blogspot.com/2017/01/in-search-of-brown-off-wall-friday.html#.
I love this!!! You should add it to Off the wall Friday...I've been playing with transparency and layering too.
ReplyDeleteThank you, Nina, will do!!!
DeleteI love this post! I played with tulle and snippets as a last century quilter, ha! Fantastic! For small project like book covers.
ReplyDeleteWe're revealing our ages here, Anneliese! Book covers is a good idea!Thanks for stopping by!
DeleteOh. How I remember the snippets! I watched a vcr tape of her on simply quilts over and over. And to this day have a plastic Baggie of dryer lint in my stash ( just in case) thank you for reminding it's there :-)
ReplyDeleteDryer lint, oy vey! Every time I pull lint from my dryer I feel guilty that I can't come up with a craft for it! Thanks for visiting, qfa!
ReplyDelete