There's batting inside, and the edges of the top and backing are all turned in 1/4" and sealed with a hand running stitch.
It started a couple of weeks ago with a short trip to Europe, where I took pictures of interesting chairs. Back home, I did a lot of tracing, drawing, and redrawing of my photos, and brainstorming fantasy chairs. A late draft:
These were turned into blocks with fusible web, and a zig-zag to applique pieces to black/white/grey print rectangles.
Several were directly inspired by vacation photos. For example, inside a glacier, we saw this chair carved from the ice:
My version:
Lacy red cafe chairs:
Became this:
Chairs with backs like tree branches
My version:
This was a train station bench, with an ad for an art exhibit atop it:
It inspired the overall configuration of the quilt, plus this block, a sewing machine bench:
...and an Ohio Star seat:
Here's a thundercloud chair (the cloud is outlined with silver metallic thread, of course):
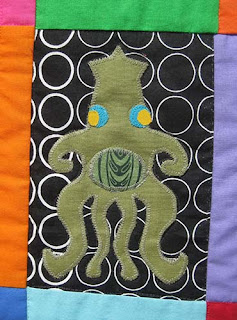
A squid seat (with cushion):
A handy chair:
A plump purple paisley corduroy easy chair:
A breakfast chair:
And two chairs inspired by quilting motifs, a swirl chair:
And a feather chair...
After making it, I discovered that, by pure serendipity, this quilt fits my parents' 1965-era Sears-Roebuck rocking chair almost perfectly! Rocking chair before:
Rocking chair after: Much happier! If I attach ties to the quilt's back, I can hang it there permanently. I think I would first paint the rocking chair in bright colors - anything but Sears brown!
I added fun details, including 3/4" yo-yos (made with this tool, to ensure consistency, no financial affiliation) and cross-stitches in the seat cushion.
The back incorporates a vintage fabric depicting old-fashioned, (OK, very tacky) furnishings....
Note that this fabric's seating only shows two legs each....A good reminder that if you take on a chair quilt, you don't have to be literal with perspective - unless you want to be!
Although it's shaped unevenly, the quilt hangs well from just one rod along the top. However, if I were going to hang it on a wall permanently, I might add another rod sleeve just above the chair legs, to ensure they hang straight.
What kind of chair would you design? Please feel free to play with these ideas to generate your own!


Wow, such a clever project. I enjoyed seeing the inspirational photos too. If the rocker gets a new paint job I hope you post it again.
ReplyDeleteThank you, Ann, I will, though I'm a little vague on how to refinish furniture! (I'm sure there are tutorials on the Internet!)
DeleteSuper project - ingenious - and funny, too!
ReplyDelete