

Then I made one from a plaid scraps, with embroidery thread flowers. It's about 5" high

I switched over to denim - specifically, worn and washed jeans. Here's a friendly flat cactus, about 5" high.

Cross stitches serve as quilting, too. In the base, there are dimples, quilted in by machine. It doubles as a pincushion/temper tantrum doll:

Below, the same idea, but twice as tall (about 10"). Again, cross stitches provide dimples. I accidentally poked a hole in the denim, so I sewed on a patch.

Here he is sitting in a custom container:

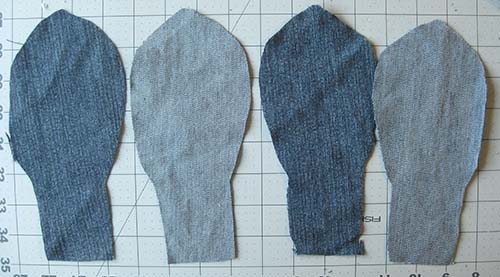
My method of making those cactii is obvious - cut two layers, wrong sides together. If you want to keep the raw edges showing, sew all the way around with a 1/2" seam allowance leaving only the bottom open. Use pinking shears to trim seam allowance back to 1/4". Stuff it and go.
But if you want raw seams turned to the inside (like in the Manhattan and plaid cactus), cut the two layers with right sides together, sew with a 1/4" seam, and clip all the convex curves. Turn right side out through the open bottom.
Tip for both methods: Invest $4 or so in a curved hemostat. This tool is not a scissors - it's a small clamp that makes stuffing and turning narrow spaces much, much, MUCH easier! I couldn't have done any of these projects without it.

The next cactus is plumper and more dimensional, with four sides instead of two:


Start off by folding a piece of paper and drawing a half-cactus.


Pin if you like before you sew.

Do it again. Now you have two pairs that look something like this.


When you've sewn all four seams, it will look like this from the top (but less fuzzy, sorry about the photo).

If you stand it up, it might look like this:


Stuff lightly, pushing the stuffing against each seam. You'll do more stuffing later - just do a little now.

Load up a long sharp needle with strong embroidery thread, craft thread, or perle cotton.


Time to close the base. Set the cactus on a square of denim. Cut it to a square about 1" all the way around.


I played around with a lot of different embellishment ideas for this cactus. These loops were cool, but not sustainable.

I liked a running with white perle cotton....

A pieced denim planter on bottom looked good! In the next shot, I dressed up the cactus with a flower/brooch (wearable by the giftee)...

And a denim jeans basket on bottom....
I hot glued a jeans seam to the rim, and added belt loops, adorned with belt loops, through which I threaded this lovely embroidered ribbon - and I added snaps to make it changeable.


So wonderfully clever!
ReplyDeleteThanks, Ann!
Delete