Sunday, June 8, 2014

From Bargain Charms to Zillionaire Art

Do you have a charity home tour in your area? Here in LA, we have the Pasadena Showcase House, which is a very big deal. Every year, this charity borrows a zillionaire's manor, guts it, and then high-end designers glam it and cram it with expensive furnishings, often white. (Video here.) Hordes of people then pay to look around.

No mortal could live in these modern Versailles - for one thing, you'd need a maid in each room to vacuum the pale rugs and buff the pale tchotchkes - but it IS a spectacle, a fun girl's afternoon out for me and some pals, and the money raised from ticket sales - at about $40 per - supports community arts organizations. 

The one thing I DON'T go to the Showcase House for is home decorating tips, since my own manse is rigorously maintained in a Post-Modern Neo-Star Trek/Pez-Roccoco style. 

You're not allowed to take pictures at the Showcase House, so trust me on this - though the furnishings over the top, the artwork on the walls this year tended to be very simple - modern, colorful, austere. 

I thought about that simplicity, and then I pulled out some charm squares - 5" squares - I'd bought on sale a few years ago. They were from the 'Center City' collection by ultra-talented Project Runway winner, Jay McCarroll, and they have a strong geometric feel. Here are several: 
(More fabrics from his collection here. Unfortunately, the Center City collection is out of print but I am finding pieces of it for sale on Etsy.)

Thanks to this year's Showcase House, I finally knew what to do with them. I decided to use each as inspiration, to make a series of 'keep it simple' wallhangings (or, it occurred to me later, placemats) that would look good in a billionaire hallway and/or a Pez-crammed sewing room. 

First I made this: 
The black isn't part of the quilt. They all measure about 18" x 13". Closeup: 
I'm calling it Aqueduct. I kept the charm square's original pinked edge in all these pieces. The quilting, like the color and shape choices, were inspired by the charm square. Everything is raw edge appliqued - glue sticked down and zig-zagged in place. 

The next piece got even simpler. I used two charm squares - the square print with the white background (the spheres look like viruses - I'm not sure what Jay was thinking - urban plagues?) and the spattered gold print, which I cut into a circle with pinking shears. 
The grey slash extends beyond either edge of the piece. 
I surrounded the gold sphere with grey buttons. I'm not sure if this piece is about viruses or planets. 

Next, I took a map charm, and set it on a purple print from a totally different collection. The quilting continues the map theme: 
Here's the whole thing: 

The purple wedge hangs off the top and bottom edges. It's a good place to put a fork.

And finally:

The large-scale fabric with squares and rectangles is from a different, 'modern' fabric collection (seems familiar? you may have seen it here), and the grey chevron is from a third. The original charm is on the upper left. I think the shapes on the upper left look like a totem pole face.
I'm really happy with the way these turned out. If only I had a long, empty, white zillionaire hallway, I'd hang them in it. As it is, I think they make very artistic placemats, though perhaps so much white was not the best choice given food spillage (as in the Showcase House rugs).

 If you've splurged on bargain charm packs that are now just occupying space in your stash, this is a creativity-prodding and fun way to spend a day - let each piece guide you. Aim to make them all the same size, so you wind up with a series. You never know where they might end up! Befriend high-end designers!

UPDATE: Shared on Nina-Marie Sayre's Off theWall Fridays - Check out the all the quilt art eye candy at http://ninamariesayre.blogspot.com/.

Sunday, June 1, 2014

Eat Your Way to Interesting Templates

I recently joined Weight Watchers - 9 pounds down, thank you very much - and really, everything about this program is brilliant, and I totally recommend it, except for one teeny little thing: their relatively low-key peddling of processed junk food deserts.

Knowing that their clients grapple with excessive food lust, dangling this stuff in front of us should be beneath this corporation's dignity. I vowed when I joined that I wouldn't fall into the trap....but then, well, heck, they've got the words ICE CREAM and WEIGHT WATCHERS on the same box.  So I caved and bought. I'm only human.

Then, even worse, I ate the first one while sitting at my computer, contrary to all weight loss psychologist advice (I'm supposed to eat isolated at a table, staring at it.) I'm also supposed to eat slowly, but somehow, in an all-too-brief amount of time, I was left with this.
 I stared at it intently. First, because I felt like I could eat seven more.

But then, because I quite liked the graceful shape. It reminded me a bit of Cheryl Lynch's  futuristic quilting template I'd used to make this 'modern' baby quilt, described in a recent post.
Since the wooden stick was at my desk, and my desk is a few feet from my trash basket, requiring exercise to get up and throw things away, I started making tracings/doodles with it on the backs of scrap paper. Like this:
 And this:
I was falling in love with my stick. I decided to turn it into a quilt, and doodled another page expressly for that purpose:
But then I decided I liked my first page better. So I traced that onto white fabric, then sandwiched the fabric with batting and a turquoise fabric backing, and quilted around all the shapes in black thread. Next I filled in the shapes with colored pencils:


Here's the back:
Kinda cool, but needed more. I considered painting the background, but I didn't want to get paint on the black thread outlines. I did some freemotion squiggling in the blank spaces:
A corded edging finished it up. I like it!I'm thinking about bleaching out the shapes on the back. I'm also thinking of stitching the original stick to it. Maybe set it horizontally on top.  

It might also make a nice clutch in which to put an ice cream store gift certificate for someone who is young and/or does not yet need to join Weight Watchers.
If you are interested in having this template as your very own to fool around with (plus a low-point processed junk food ice cream treat), these graceful sticks can be found within Weight Watchers Dark Chocolate Dulce de Leche Bars (and some of their other flavors). 

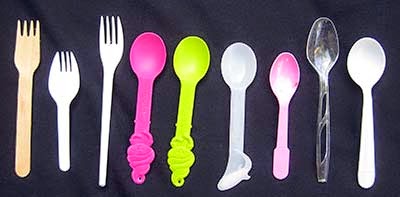
This experience also made me wonder what other templates I had lying around the house. I looked in our plastic tableware compartment and found these: 
Tracing them has great potential - or, come to think of it, I could simply stitch them to a quilt!

Have you made a quilt from templates found around the house? 

Sunday, May 25, 2014

Denim Rings: Upcycling Tiny Bits of Jeans

If you're a reader of this blog, you've seen my upcycled denim bracelets,
...Not to mention denim quilts, vases and mystery objects. (Click 'denim' in the word cloud on the lower right of this page for more).  Here's one of the tinier things you can make from denim: Rings! Front:
Back:
                                      
They're so easy! Cut out a denim seam. Measure and fit to your fingers. Slather the cut ends as well as the edges with 'Fray Check' or some other fray-stopping substance (thinned glue works too).

Add embellishments to the middle. The question mark ring is simply stitched on - the question mark is a bead, and there's a button behind it. For the zipper pull ring, I stitched on a button and then glued the zipper pull in the center.

Once the fray-stopper is dry, butt and stitch the ends together with straight stitches. Voila, you are ready to take on any cocktail party with your new rings!

Sunday, May 18, 2014

Quilt News Roundup: We Are Luxe

I'm working on a large project (to be unveiled), so I don't have anything of my own for show-and-tell this week. But I have been finding some interesting articles related to quilting. Here's the roundup:
+++++
Expensive Aura - I love it when quilting is associated with expensive things. Like Chanel purses, for all the good it does us. Why can Chanel charge thousands for a wee trifle like this...
...While quilt artists, making queen-size stuff, starve? 

Still, perhaps the expensive aura rubs off on us. So the good news is that quilted clothing is totally IN right now, according to Glamour Magazine. Actual headline: 

Quilted Clothes: The Sophisticated, Luxe Micro Fashion Trend We Are Loving Right Now

I Am So Loving That Headline Right Now. On a different site, I found these intense quilted shorts for men. They're made by the Sons of Odin? Is that a Tolkien thing? And don't peek - how much would you pay for these?
They're $220. If you cut them up and turn them into a purse, it's a bargain, compared to Chanel. I hope the people who actually stitched those shorts (probably in a sweatshop) get most of the money, but I doubt it. I personally have always found that quilting shorts is especially tricky. All those steep curves.*
+++++
Hawaiian Bliss - A quilt collector shows off his spectacular Hawaiian quilts. I especially like this second one, in red and white!
(I'm a sucker for red and white - see my recent baby quilt.) Need more? Do a Google image search for "Red and white Hawaiian quilts." OMG!!!
+++++ 
Digital Manipulation - In our last installment, I photographed a quilt, rearranged the pieces digitally and printed the new version on fabric. This week, Quilting Arts came out with a new free booklet with much more sophisticated techniques for creating photo collages and printing them onto fabric to embellish. Claim your copy here.
+++++
They Had to Ask - Hilarious quilt show questions, by hilarious quilt blogger Kathy Matthews.
+++++ 
Quilt Camp -  I want to go to quilting summer camp! Unfortunately it's only for second through seventh graders. Plus, it's across the country,  in Georgia, at the Southeastern Quilt and Textile Museum. They're currently featuring a gorgeous show called "Wall Art," by quilter Marilyn Wall. Really!
+++++
Head Trip - I've heard of altered books, altered purses (not Chanel - sell it on ebay), and altered shoes, but what about altered bike helmets? They're real and way cool, at  the Funky Diva blog.  But a bike afficianado warned me - don't try this at home. Sanding and glue compounds might weaken the skull protection. They're fun to look at and, come to think of it, wouldn't that be a great quilt, showing different colorful helmets arrayed in rows? Or decoupage your old, used helmets and hang them on a wall!
+++++
Have a great week, and remember to always wear your bike helmet, along with your quilted Tolkien riding shorts!


* Joke. I know they quilt the fabric first.

Sunday, May 11, 2014

Photograph Your Quilt & Print Out Variations

A couple of weeks back, I showed you a denim quilt I made by cutting wavy slices from jeans (tutorial here.) Here it is:
I liked it a lot, and it was even selected for a juried gallery show. This was so exciting that I started writing up directions more detailed than those in the original blog post. These days, I write my patterns mostly in CorelDRAW, a flexible and intuitive program for both graphics and text that I've been using for years and recommend highly. 

While placing the photos in CorelDRAW, I started playing around different arrangements and pieces. Here are some pages from this doodling

First, just thinking: 
Then: What if I arranged them like a window? And added some red patches? 
 Or, what about alternating circles with rectangles?
Skip ahead a few more experiments: What about rotating a slice 360 degrees, for a woven look? And then adding black rectangles shadowing one edge?
Whoa!!!! I was so enamored with that last design that I immediately printed it out onto photo fabric, backed it with white felt and white fabric, straight-stitched around all the edges, cut out the windows, and wound up with this very cool thing that can be dangled from a finger, if you're in that kind of a mood: 
Here it is against a flat black background: 
It measures about 7" x 7". Can you imagine if you had to piece this thing? 

If it didn't had windows, it could have been a very elaborate potholder. I quilted it with a simple straight stitch down the center both ways - just two perpendicular lines.  That added a dimensionality, begging to fold along the lines, maybe into a dish or a cootie catcher sculpture: 
Hmm, if I run wires through the back, or used moldable interfacing inside (like Inn-spire), I could fold each corner inward as much as I like, and have an interesting candy dish with holes in it, so that the candy ultimately drops through the dish to hide from people like me who don't need it. 

But never mind the practicality - talk about your shortcuts! Since virtually the invention of the home printer, quilters have printed out photos,words,  fabrics and even entire quilts (learn how from the awesome Gloria Hansen) onto fabric, but I'd never really gotten far beyond words and photos. I kinda had to do it to appreciate the miracle! 

It hit me full force that we can do hundreds of hours worth of piecing in the time it takes to play and print. What a great way to explore alternative arrangements for our quilts, not to mention fast, small, and impractical gifts such as wallhangings, potholders, and candy dishes with holes in them!

You can do this at home, too. If you don't have a good graphics program at home, you can simply take pictures of your finished quilt, print out several copies in various sizes, cut and paste pieces into something you like. Scan that and print the results onto fabric.  However you get there, I know you'll have a lot of fun with it!

Sunday, May 4, 2014

Stitch, Glue and Swap Your Way to a Triptych

One of the most fun and creativity-enhancing things you can do as a quilter/artist/maker is participate in swaps. I've done plenty - especially postcards (recent) and artist trading cards (recent)  One of my most satisfying swaps involved wonky, house-shaped panels.

This particular trade was the the brainchild of a wonderful artist named Dove, who keeps a gorgeous blog at http://www.morningdew15-morningdove.blogspot.com/. We were given a simple  line drawing of a classic house outline, but with a wonky roof. It measured  6.5"  x 4.75" wide.

We were told to use it to make three panels to decorate with the theme "Celebrate Me." We would each keep one of our panels, and swap the other two with two other artists.

The usual base is stiff interfacing, ideally with fusible on one or both sides. But you can just as well do it with cardboard, though it will be harder to stitch, and won't be as waterproof (in case someone knocks over a wine glass), and machine stitching might weaken cardboard more than interfacing.

Here are the three panels I made. I placed nice plump middle aged ladies in doorways.  They're surrounded by buttons. The ladies, doorways and buttons are stitched on by machine; the trim is glued.

A closer view: 
That's trompe l'oeil mother-of-pearl button background fabric. Only the blue buttons are real. Vintage trim surrounds everything. Any resemblance to a real button-and-trim hoarder is not coincidental. 

One of my swap partners, Charmion, sent me this fabulous panel, featuring a poignant photo transfer of a young girl, against a spare brick walls with climbing cheesecloth moss and applique flowers. The roof and brick fabrics are stitched on by machine; everything else is glued on. There's something behind the figure, so she stands forward. 
The little girl, Charmion tells me, is her mother, in a photo taken when she was about 6 years old, in the early 1900s. Charmion used a lot of scans and photo transfers until she found one that worked.  

My other swap partner, Sharon, went in the other direction, with loads of joyous detail: paper stickers spelling "laugh"; a metal bird charm; mixed media flowers (wood, silk, etc); a wooden fence; a zipper, and a giant stuffed heart attached by a ribbon to the panel, apparently made from a vintage quilt. And more. The pieces de resistance are the real, usable pearl-headed pins poked into the top right roof line.

Once I had all three panels, I stitched the edges together- and, Voila! 
The triptych stands up nicely, all by itself! 
Here's the back. My panel is on the far left -  I put a vintage fabric bookcase on the back. 
This was the project of an online group called Fiber Arts Traders, run by the extraordinary Normajean Brevik. The group has wound down and no longer does swaps, but I'll always be grateful to Normajean and my various swap partners for the incredibly creative things I received and was inspired to make! (We also did a superfun Steampunk swap, shown at the bottom of this post.)

So if you're itching to exercise your creative muscle, consider a swap with friends - cyber or flesh-and-blood. Just set a deadline that's close enough so you don't agonize over it. Jump in and make it!


Sunday, April 27, 2014

Easy, Modern, and Curvalicious Baby Quilt

What's black and white and red all over? Yes of course, a  newspaper; a skunk with a papercut; and also ....
...This modern quilt that I just finished. I think it's a baby quilt, and it came about, superfast, because my quilting idol and friend Cheryl Lynch mailed me her brand-new 'Curvalicious' tool
The design is fascinating; To me, it has a neo-retro 50s feel, though perhaps I was also influenced by the radioactive color. (It doesn't actually glow in the dark - I ducked into the bathroom and turned off the lights to check.)

After determining that I didn't need lead gloves to handle it, I stared at it for a while longer and waited for it to talk....which it did! "Red and white!" it whispered. Yay, I love red-and-white quilts (how I wish I could have gone to this show), and always need more. So I traced the tool, twice with a washout marker; once onto red-with-white-polka dot fabric - I extended it to 5 circles long -  and once, only three circles long, onto striped red-and-white fabric. The pieces were then cut out with scissors.

I set the two long pieces at 90 degree angles, overlapping the corners, on a white background. Next, the circular openings were used to mark circles on black-and-white, red-and-white, and grey-and white geometric fabrics that I backed with lightweight fusible interfacing, to give them a bit more strength. Those were also cut out with scissors.
(Babies supposedly love high-contrast fabrics, which may or may not increase their IQs.)
Glue-stick everything down, raw-edge applique with a zig-zag stitch and invisible thread, then quilt in an easy sort-of hanging diamonds pattern. (The lines in one direction are straight, and the other have a gentle wave, for an op art effect.)

I could see using these same fabrics and the ruler to make a retro tablecloth and/or apron. Now you may be wondering, what OTHER kind of mood can you create with the Curvalicious design? The answer is quite a lot of them, including contemporary and elegant. Cheryl tested it on a quilt guild in Pennsylvania, and some used her jewel-tone dupioni kit to make stately table and grand piano toppers and wallhangings. Others used cottons for groovy 60ish explosions of rainbow colors. Find all the eye candy from her guild session here.

Cheryl is selling the ruler and an optional dupioni kit on her etsy site - details are here - and I swear I don't get any commission of any kind if you buy them. (Though I will enjoy watching Cheryl become very rich.) I can't wait to see what more people do with this  fascinating and whimsical shape!

Sunday, April 20, 2014

The Freemotion Quilted Denim Vase Face-Off (Say That 10 Times Fast)

Let's make two quilted denim vases from old jeans, with a kick! 

Step one: Cut uneven strips, 1-3" wide, from a bunch of denim jeans. Stitch them together, Then cross cut the strips, and lay out the checkered strips. Add wedges cut from denim between the strips. 

Add batting and a denim backing: 
Quilt as desired. I simply went up and down the wedges with somewhat wiggly lines. 

Finish the edges with a corded edging

Overlap the two long edges by about a quarter inch, and hand stitch in place with strong thread. 

Cut a circle of denim, using the vase bottom as your pattern. Cut it about a quarter inch larger than the base. Cut another layer of denim the same size, place the two circles together, do a corded edging, and hand stitch it into the bottom: 
Now, standing up, it looks like this: 
Are you done yet? If  you're into minimalism, yes. Or, embellish it into a face vase: 

Raid your bead box, button box, your children's toy boxes, your neighbor's kitchen drawers,  whatever, and come up with a bunch of things that have faces. I used the word face literally - like a human or animal face - and also less literally, as you will see.

Side 1, top down: A clock button , a polymer clay face (made in a commercial mold), a mardi gras necklace face bead, an improvisationally crocheted skull (start with the mouth and work your way up), a tiny commercial clay face button. 

Side two, top down: A ceramic sun face button, little plastic paper-wrapped doll head thingie (hard to describe), a happy-face metal button, a tiny dice, a glass head bead. 

Next side: Another polymer clay button, a shrink-plastic kitten face, a domino, a clown face cupcake decoration (with the bottom prong snipped off.) 

And finally, top down, a silver coin, another polymer clay face, a plastic ninja with swathed face, a vintage doll head, an  tiny metal alien charm.

So that was my first face vase. below my second one. It starts out like the first one, but with only denim wedges placed alongside each other. Once the wedges are in position - and while the vase is still flat - I did some improvisational free-motion quilting. It's not easy to think of a lot of different faces! A little more planning would have helped! Learn from my mistakes! Side 1: 

Side 2: 

Side 3. That's my late dog in the middle: 

Side 4. A simplified "Scream" is on bottom.
Novelty yarn creates the hairy top edge.
I lined this one with a Day-of-the-Dead colorful sugar skull fabric: 
FAQs:
Why face vases? I just like the rhyme!  

Can you really use them as vases and put flowers in them? Yes, if you slip a glass vase or jar inside. It's easy to find a size and shape you need at a thrift shop. Or start by using a particular glass vase to guide the size decisions that you make, when you begin the project. 

For many more denim creations, including vessels, click on "Denim" in the word cloud, in the right hand column of this blog.